This illustration show you guide on how to remove and install injector for MTU 12-16V engine.
Related Contents:
2022 MTU DiaSys 2.74 2.72 Engine Diagnostic Software Free Download
MTU Diagnostic Tool USB-to-CAN with MTU Diasys 2.73
Remove:
Removing fuel injector
Release cable terminal union on injector and remove cable terminals.
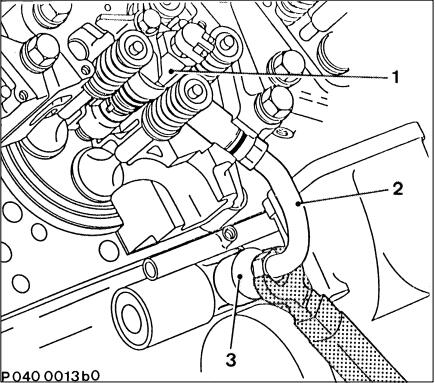
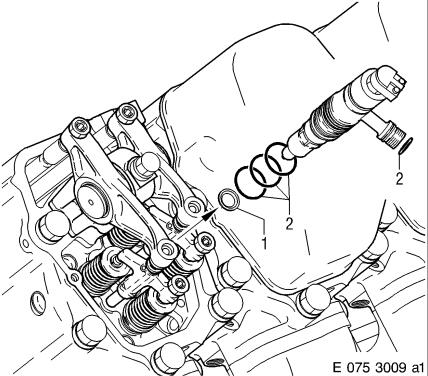
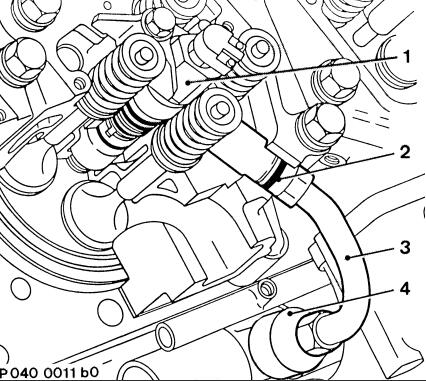
Unscrew H.P. line (2) from injector (1) and limiting valve (3)
WARNING:
Fuels and fuel mists are flammable and poisonous.
Risk of fire, explosions and poisoning!
When using fuel:
– No open flame
– No electric sparks
– Do not smoke
– Do not spill fuel
– Do not inhale

Always wear protective gloves and protective goggles/safety mask. Ventilate working area well.
Note: Ensure that no fuel enters the cylinder chamber.
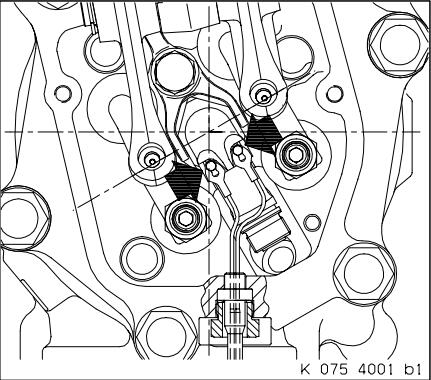
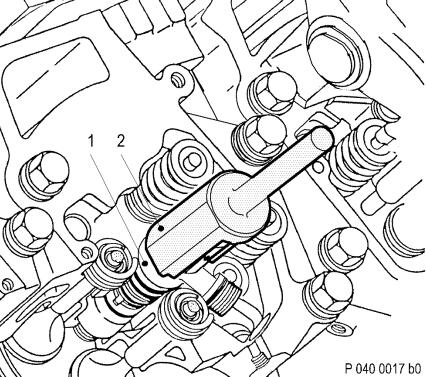
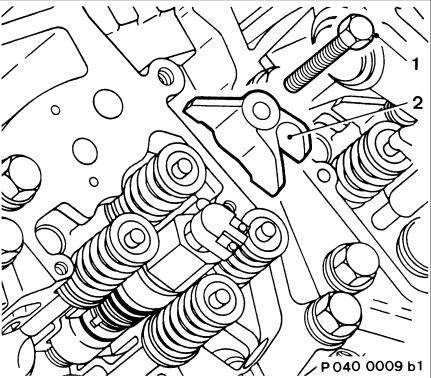
Remove screw (1) on hold-down clamp (2) and remove hold-down clamp.
Note: The removal tool for the injector consists of two components.
Place removal sleeve (4) on injector (1).
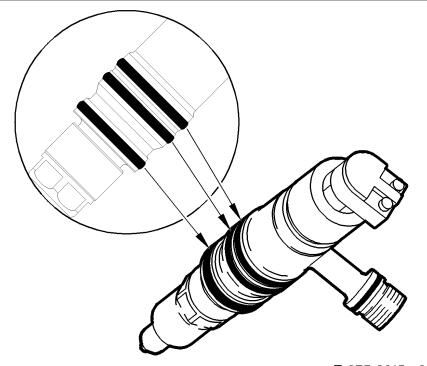
Fit locking sleeve (2) over removal sleeve and rotate to correct position – see next illustration.
Secure locking sleeve with hex nut (3).

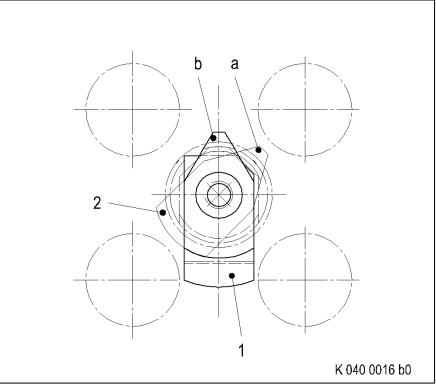
Rotate locking sleeve (2) from position “a” to position “b” over the removal sleeve (1).
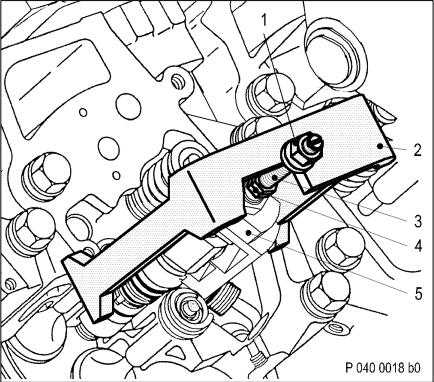
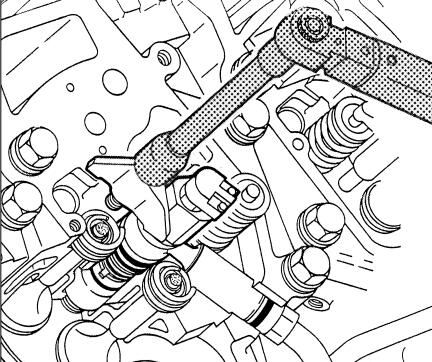
Mount removal bracket (2) on cylinder head.
Insert threaded rod (3) in extractor sleeve (5) and lock with hex nut (4).
Remove injector by turning nut (1) to the right.
Remove special tool.
Remove injector manually.
Remove O-ring (2) from injector.
Remove sealing ring (CE-ring) (1) from injector or use wire hook to remove from cylinder head.
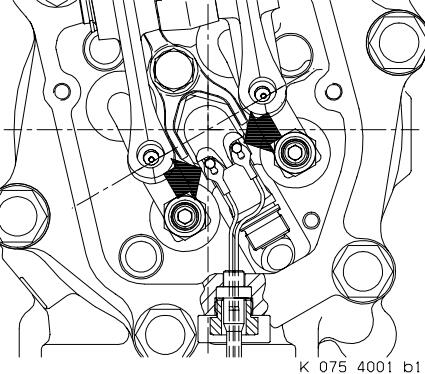
Note: After removing injector, make sure no CE support ring remains in bore for injector in cylinder head.
Cover all connections and installation bores or seal with suitable plugs.
Disassembly
Injector must not be disassembled.
The injector is a replacement part and available in the replacement programme.
C075.05.07 Inspection and repair
Clean all components.
Check injector visually on outside for damage and defects.
In event of wear or other defects, the injector must be replaced.
Using the magnetic crack-testing method with fluorescent magnetic powder, check hex screw and clamping element for cracks; replace components as necessary.
Check mating faces of hold-down clamp; rub down with emery cloth or an oilstone or replace components as necessary.
Check mating face of injector (in cylinder head), replace component if necessary.
Check cable connections for damage.
Check sealing cone of injector for damage and wear; replace component if necessary.
Check thread on hex screw and injector for ease of movement. Replace part if necessary.
Installation
Installing fuel injector
Note: Make sure fuel-carrying components are perfectly clean. Prior to installation, remove all
blanking plug and/or covers.
Coat O-rings with petroleum jelly and fit on injector.
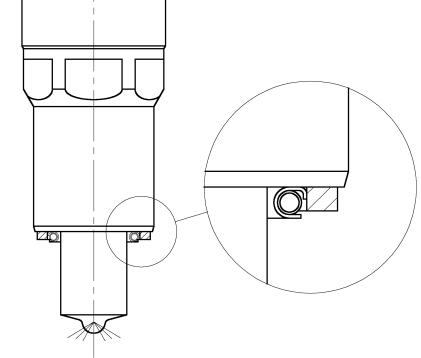
Affix sealing ring with grease on mating face of injector.
Attention: Ensure that sealing ring is correctly fitted, see next illustration.
Check sealing surface on cylinder head and nozzle holder; clean if necessary.
Fit sealing ring on injector so that level contact surface faces injector.
Insert injector (1) into cylinder head, ensuring that H.P. line connection is correctly aligned.
Fit installation sleeve (2).
Lock retaining device (1) of press-fitting tool between pushrods.
Release palm grip (3) and move pressure section (2) to correct position for installation sleeve.
Lock palm grip and press injector (4) with press-fitting tool into cylinder head.
Remove installation tool.

Mount hold-down clamp (2), ensuring it is correctly positioned, and pretighten hex screw (1); injector must still be rotatable.
To ensure smooth assembly on injector, the following procedure should be used for Reman cylinder
heads in conjunction with new CE rings:
1 Tighten hex screws (1) to 100 Nm +10 Nm and then release.
2 Pretighten hex screw, see overview drawing
C 075.05.01; injector must still be rotatable.
Note: Hex screw of hold-down clamp is not fully tightened until H.P. line is fitted.
Note: Do not bend the H.P. line and pay attention to installation position.
Retighten thrust rings at both ends of line with face spanner.
Coat O-rings with petroleum jelly and insert in grooves on union nuts (2) and (4).
Install H.P. line on injector (1) and on limiting valve.
Fit H.P. by hand and pretighten to 10 Nm.
Tighten hex screw of hold-down clamp to tightening torque – see overview drawing C 075.05.01.
Install threaded union of H.P. line on injector (1) and on connector for limiting valve (2) – for tightening torque.
Push cable terminals under screws on injector and tighten to specified tightening torque.
More repair case for MTU engine,please refer to:MTU Engine Trouble Repair