This instruction show you guide on how to remove and install front housing for Perkins 400A and 400D industrial engines.
Preparations:
Perkins EST 2024A & 2023A & 2019A Software Free Download
Perkins SPI2 2018A EPC+Service Manual Free Download
Procedures:
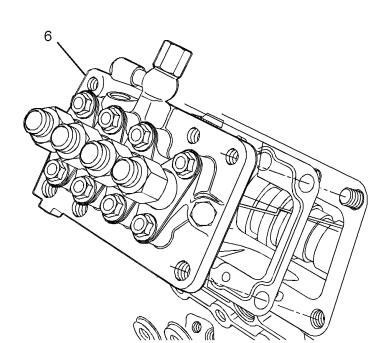
1.Remove fuel injection pump (6).
2.Remove the crankshaft pulley.
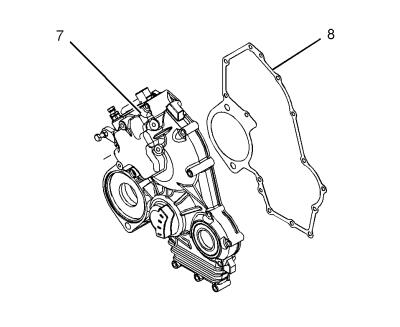
3.Remove front housing (7).
4.Remove the gasket (8). Ensure that the face of the front plate is clean.
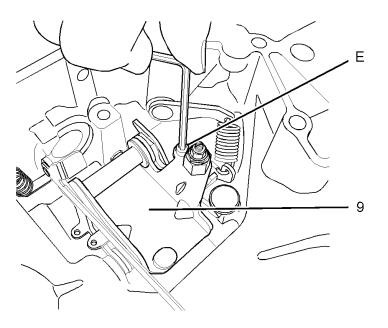
5.Install Tooling (E) to lever assembly (9). Tighten tooling (E) to a torque of 0.4 N·m (3.540 lb in).
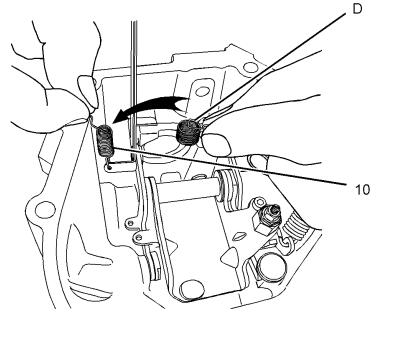
6.Remove start spring (10) and replace the start spring with Tooling (D).
7. Install the front housing.
Note: Do not install a gasket.
8. Install the fuel injection pump to the cylinder block.
Install the original shim.
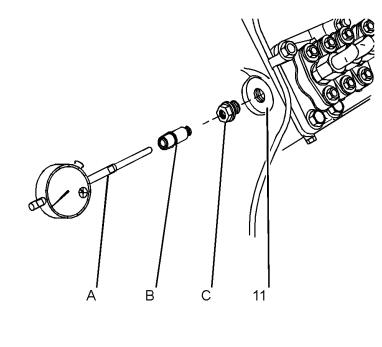
9.Install Tooling (C) into cylinder block (11).
10. Install Tooling (B) into Tooling (C).
11. Assemble Tooling (A).
12. Install Tooling (A) into Tooling (B) until the extension on Tooling (A) touches the rack of the
fuel injection pump.
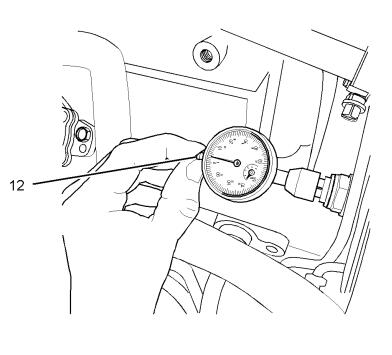
13.Push Tooling (A) into Tooling (B) for a further 2 mm (0.0787 inch). Lock Tooling (B) in order to
retain Tooling (A) in position. Set Tooling (A) to read 2.00 ± 0.01 mm (0.0787 ± 0.0004 inch).

14.Push plunger (12) of Tooling (A) several times in order to seat the rack of the fuel injection pump.
When the plunger is gently released, check that Tooling (A) reads 2.00 ± 0.01 mm (0.0787 ± 0.0004 inch).
Note: If the rack of the fuel injection pump has heavy resistance to movement, remove tooling (A). Remove the fuel injection pump. Wash the fuel injection pump with a suitable cleaner. Install the fuel injection pump.
Repeat steps 12, 13 and 14.
Setting the New Front Housing
Note: Do not move the position of Tooling (A),
Tooling (B) or Tooling (C) in the cylinder block.
1. Pull plunger (12) of Tooling (A) until the plunger has reached the fully out position. Use a suitable clip to retain the plunger in this position.
2. Remove the fuel injection pump.
3. Remove the original front housing.
4.Disassemble the original front housing.
5.Assemble the replacement front housing with the parts that were removed from the original front housing. Install a new fuel screw and a new locknut.
6.Remove Tooling (E) from the original front housing.
Install Tooling (E) to the lever assembly of the replacement front housing. Tighten Tooling (E) to a torque of 0.4 N·m (3.5 lb in).
7. Remove Tooling (D) from the original front housing. Install Tooling (D) into the replacement front housing.
8. Install the replacement front housing.
Note: Do not install a gasket.
9. Install the fuel injection pump to the cylinder block.
Install the original shim.
10. Remove the clip from plunger (12) of Tooling (A).
More trouble repair case for Perkins,pls refer to:Perkins Trouble Repair