This instruction show you guide on how to remove and install radiator for ISUZU 4JJ1 engine truck.More about ISUZU truck case,please refer to ISUZU Trouble Repair.
Related Contents:
ISUZU US-IDSS II 2024 2019 Diagnostic Software Free Download
ISUZU Worldwide EPC 2018.03 Snap-on EPC Installation Service
Procedures:
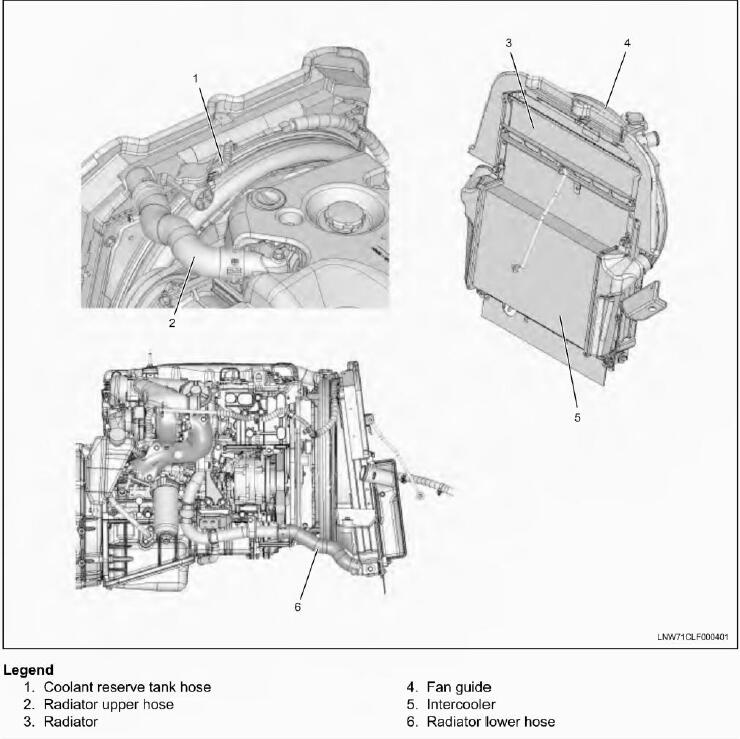
Removal
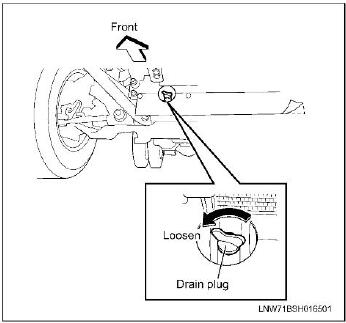
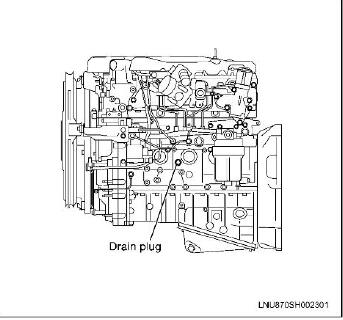
1.Loosen the water drain plug(on the rear right side of the engine) and radiator drain plug, and completely drain the coolant.
2.After completely draining the coolant, securely tighten the drain plug.
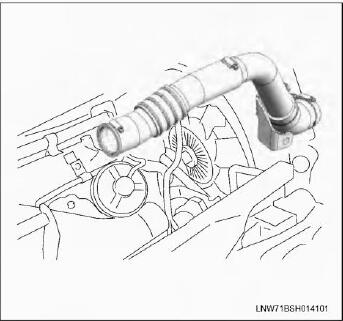
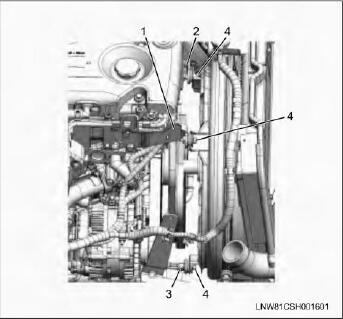
3.Remove the intake hose, turbocharger side, intercooler side, and intake pipe bracket between the turbocharger and intercooler.
4.Disconnect the ECM harness connector.
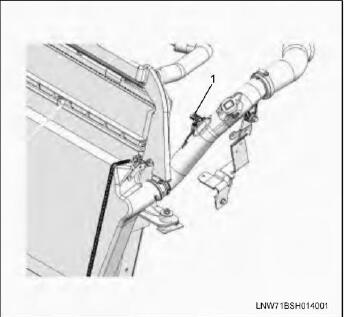
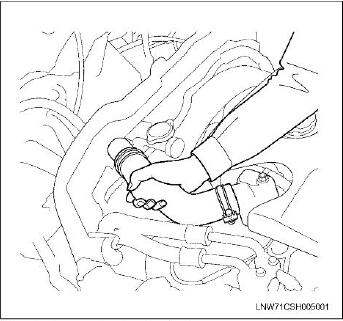
5.Remove the boost sensor harness connector(1).
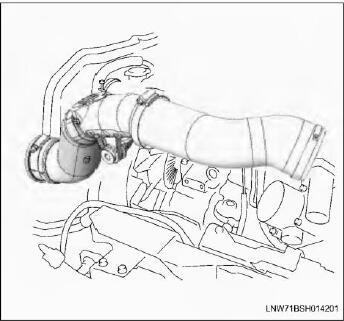
6.Remove the intake hose, throttle side, intercooler side, and intake duct bracket between the intercooler and throttle valve.
7.Remove the radiator upper hose at the radiator side.
8.Remove the radiator lower hose at the radiator side.
9.Remove the fan guide bracket.
10.Remove the ATF coolant pipe from the radiator.
(Smoother vehicles only)
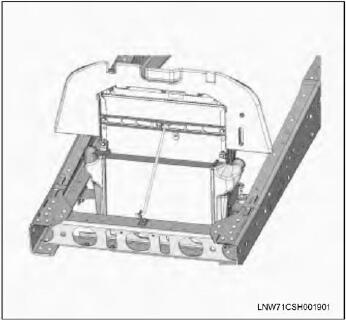
11.Remove the radiator.
a.Remove the intercooler from the radiator.
b.Remove it carefully from between the left and right frames, ensuring that the radiator and fan blade do not touch and get damaged.
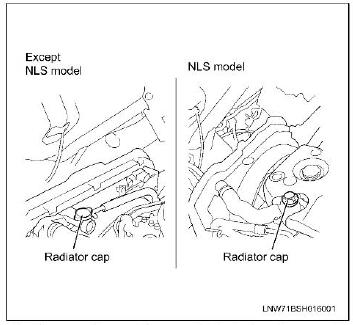
Inspection Radiator cap
1.Use the radiator cap tester to inspect the open valve pressure. Replace the radiator cap if the open valve pressure is not at the standard value.
Open valve pressure
93-123 kPa(0.95-1.25kg/cm2/13.5-17.8 psi)
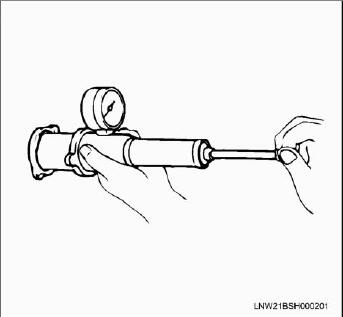
2.Inspect the condition of the negative pressure valve in the center of the cap valve seat side. If the valve seat is not operating smoothly because of rust or foreign matter, clean or replace the radiator cap.
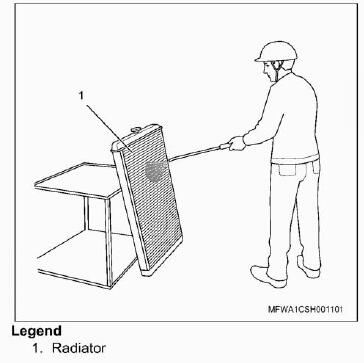
Radiator core
1.Remove dirt or other foreign matter.
Also, if the radiator fins are deformed, this can lead to a drop in heat dissipation and cause overheating. Repair the fins. When repairing, be careful not to damage the base of the fins.
Washing the radiator
1.Wash the inside of the radiator and coolant path with water. Wash away all scales and rust.
Washing the radiator core CAUTION: Do not perform high-pressure washing onto the radiator, intercooler and surrounding parts when they are still installed on the vehicle.
1.Seal the hose connecting section with a cap or fabric tape.
2.Sufficiently wet the front and back surfaces of the radiator.
Adhering matter which easily comes off with a splash of tap water should be washed off sufficiently in advance.
NOTE:
Do not use a high-pressure washer or brush.
3.Prepare a mild detergent.
Use a type which contains approx.8% of surface acting agent.
NOTE:
Do not use anything other than a mild detergent. Use of any product other than a mild detergent may cause corrosion.
4.Spray the mild detergent onto both sides of the fins, and leave them as is for 10 minutes.
5.Rinse off the mild detergent using a high-pressure washer.
Start washing from the engine side of the radiator.
NOTE:
Apply the high-pressure water in a direction perpendicular to the fins.
Do not bring the high-pressure water too close to the fins.
Be careful not to deform the fins.
6.After washing is finished, inspect the fins to confirm that the dirt is removed sufficiently.?If washing is not sufficient, wash them again.
NOTE:
If some dirt is still left, fine black particles attached on the fins can be seen.
7.Rinse off the detergent constituents on the fins and resin parts using the tap water.
8.Remove the seal on the hose connecting section.
9.Clean and dry the hose connecting section sufficiently.
Installation
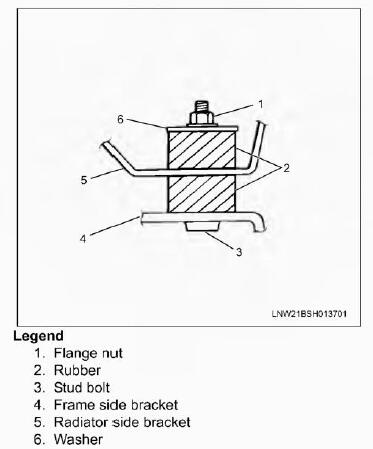
1.Be careful not to damage the radiator core with thefan blades. Install the left and right brackets of the radiator to the frame side bracket as shown in the diagram.
Frame side bracket and radiator left and right bracket Tightening torque:26 N-m(2.6 kg-m/19 b-ft)
2.Install the intercooler.
Tightening torque:15 Nm(1.5kg-m/11 lbft)
3.Install the ATF coolant pipe.(Smoother vehicles)
4.Install the fan guide bracket.
5.Install the coolant reserve tank hose to the radiator.
6.Install the radiator lower hose.
Tighten the radiator hose clip.
Tghtening torque:5 N.m(0.5kg-m/43lb-in)
7.Install the radiator upper hose.
Tighten the radiator hose clip.
Tightening torque:5 N-m (0.5 kg-m/43 lbin)
8.Install the intake hose.
NOTE:
Firmly insert the hose without any twisting or misalignment, and tighten the clamp to the specified torque.
Install the intake hose between the intercooler and throttle valve.
Use a new hose clamp, align it with the marking.
Tightening torque:8 N’m(0.8 kg-m/69 lb-in)
Mount the bracket for the intake duct.
Tightening torque:22.8 N-m(2.3kg-m/17 lb-ft)
9.Connect the boost sensor harness connector and the ECM harness connector.
10.Refill the coolant.
11.Install the intake hose.
NOTE: Firmly insert the hose without any twisting or misalignment, and tighten the clamp to the specified torque.
Install the intake hose between the intercooler and turbocharger.
Use a new hose clamp align it with the marking.
Tightening torque Intercooler side:8N.m(0.8kg-m/69 lb-in)
Turbocharger side:6.4 N.m (0.65 kg-m/56.4 lb-in)
NORMA W3 Clamp
8Nm (0.8kg-m/69lb-in)
NORMA W1 Clamp
Mount the bracket for the intake pipe.
Tightening torque:22.8 N-m(2.3 kg m/17 lb-ft)
Reference Coolant filling procedures(when replacing all of the coolant)
1.Check that the engine is cool.
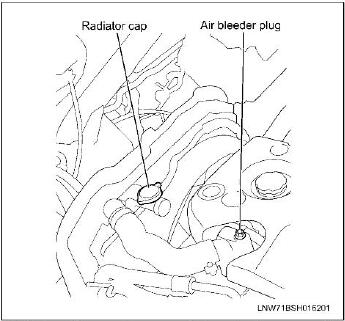
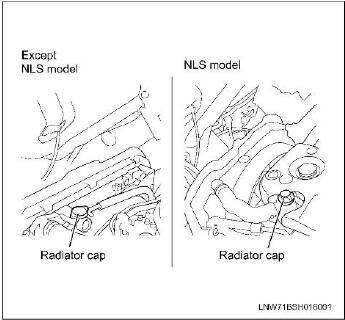
2.Open the radiator cap.
WARNING: Do not loosen or remove the radiator cap when the coolant is hot. Steam and boiling water can burst out from the radiator possibly causing burns or heat related injuries. When opening the radiator cap, place a folded thick cloth over the cap when the coolant is cooled, and turn it gradually to release the pressure before opening
3.Remove the engine coolant drain plug on the radiator and drain the coolant.
4.Remove the engine coolant drain plug for the engine and drain the coolant.
5.Drain the coolant from the reserve tank.
6.Tighten the drain plugs for the radiator and engine.
7.Remove the air bleeder plug from the engine.
(Except NLS model)
8.Fill with engine coolant of the specified concentration up to the filler neck.
CAUTION:
Fill slowly to prevent air from entering the system.
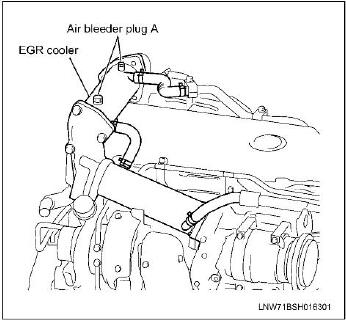
For EGR coolers with air bleeder plugs, remove the EGR cooler air bleeder plug and refill with an amount of coolant equivalent to the level between the remaining coolant and the radiator inlet. Then reattach the air bleeder plug.
9.Tighten the air bleeder plug for the thermostat housing.
10While manually pressing the radiator upper hose several times to remove air from inside the hose, refill with an amount of coolant equivalent to the level between the remaining coolant and the filer neck.
11.Repeat the procedure above until the coolant level no longer decreases.
12.Close the radiator cap.
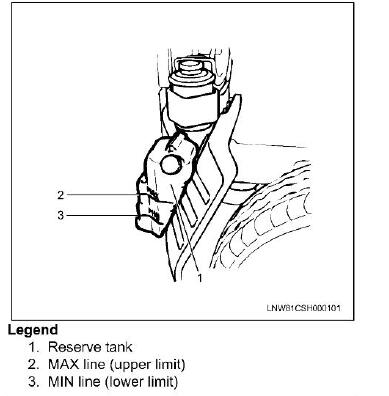
13.Fill the reserve tank with coolant until the MAX line, and then close the reserve tank cap.
14.Start and idle the engine.
CAUTION: Idle the engine for 5 minutes or more.
15.Stop the engine and refill with an amount of coolant equivalent to the level between the remaining coolant and the filler neck.
16.Close the radiator cap, turn OFF the heater fan and heat the engine by turning ON the warm up switch.
17.After the warm up switch shuts OFF, increase engine speed to around 2,000 r/min and continue this for 5 minutes once the needle of the engine coolant temperature gauge reaches the center.
18.With the engine idling, confirm that the thermostat is open by touching the radiator upper hose to see if it is warm.
CAUTION: Confirm this not only by checking the engine coolant temperature gauge and the warm air following from the heater, but also by touching the radiator upper hose to see if it is warm. If the radiator hose is not warm, return to step 17 of this procedure.
19.Idle the engine for 5 minutes.
20.Stop the engine and refill with coolant up to the filler neck once the engine has sufficiently cooled, refill the reserve tank with coolant up to the MAX line.
CAUTION:The following morning, refill the reserve tank with coolant up to the MAX line if the coolant level has dropped.