Here is the details steps on how to install rocker arm assembly for John Deere PowerTech 9.0 L OEM diesel engine.
IMPORTANT:
When possible, install rocker arm assembly PRIOR to installing fuel injectors.
It is easier to adjust valve clearances, and it eliminates the chance of damaging the injectors
when installing rocker arm assembly
Related Contents:
John Deere Service Advisor 5.3.235 AG+CF 2024 2020 2018 Free Download
JOHN DEERE EDL V2 Diagnostic Adapter
Steps:
1 Install push rods in holes from which removed.
NOTE: Index of valve bridges to valve stems is immaterial.
2 Assemble valve bridges to valve stems.
3 Lubricate rocker arm pedestal cap screws in cylinder head with SAE 30 diesel engine oil.
4 Lubricate rocker arm pedestal cap screws under head with SAE 30 diesel engine oil.
5 Assemble rocker arm assembly to head by guiding
6 flange head cap screws located in rocker arm pedestals into threads in cylinder head.
6 Seat rocker arm balls in push rod seats before tightening of rocker arm pedestal cap screws.
7 Align rocker arms centered on valve bridges.
IMPORTANT: Rocker arm mounting screws cannot be reused. Replace rocker arm mounting screws removed from engine with new screws.
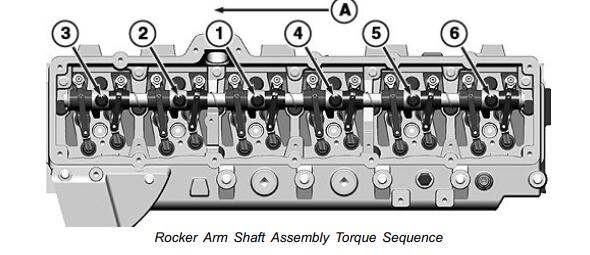
8 In the sequence shown, initially tighten rocker pedestal-to-cylinder head capscrews to specifications below:
Specification
Initial Rocker Pedestalto-Cylinder Head Cap
Screw—Torque………………………………………………………20 N•m (15 lb-ft)
9 Loosen one cap screw at a time 90° minimum.
10 Finish tighten (torque-turn) cap screw to following specification.
11 Adjust engine valve clearance