Isuzu Dealership personnel, whenever possible, should encourage Isuzu customers to follow the Diesel Fuel System maintenance outlined in the owner’s manual. During refueling, it is possible for water (and other contaminants) to be pumped into the fuel tank along with the diesel fuel. This can occur if a service station does not regularly inspect and clean its fuel tanks, or if a service station receives contaminated fuel from its supplier(s). Protect your customer’s engine from contaminated fuel by recommending regular fuel system inspection and maintenance. This will ensure continued performance of the Isuzu Diesel engine and provide the earliest detection of diesel fuel contamination. Maintenance is the customer’s responsibility. Discovering and correcting a contaminated diesel fuel issue early on can substantially reduce the likelihood of damage to fuel system components.
Damage to fuel systems, including to both low and high pressure components, often results from fuel contamination. Fuel contamination can be defined as the presence of water, rust, algae, bacteria, poor quality fuel, or any other substance other than ultra-low sulfur fuel in the fuel system. Operating a vehicle’s diesel engine on fuels and additives that do not meet the vehicle manufacturer’s specifications for lubrication and cooling, or that have improper anti-corrosion properties, can cause drivability problems as well as component damage or even failure.
Due to the tight tolerances on modern diesel engines, contaminants such as water can dilute the lubricating properties of diesel fuel and cause engine damage. For instance, water can lead to acid forming in the fuel system, which can be extremely caustic and harmful to the engine.
NOTE:Any repairs needed as a result of using incorrect or contaminated fuels are not warrantable.
More ISUZU trouble please check here:ISUZU Trouble Repair
Related Contents:
ISUZU E-IDSS 2024 2019 Engine Diagnostic Service System Free Download
Contamination of high pressure fuel system components may cause symptoms including, but not limited to, the following:
- Crank, but no start
• Long crank/Hard start
• Running rough
• Low power
• Fuel pressure-related DTCs
• DPF unable to regenerate
• Engine knocking
• Exhaust smoke
• Fuel rail pressure (FRP) slow to build
Most common sources of contamination:
- Contaminated fuel source
• Above and below ground fuel storage tanks
• Use of fuel stored for long periods
• Not draining water at proper intervals
• Fueling errors (e.g. introducing gasoline or DEF fluid into the fuel tank/s)
• Decomposing Bio-diesel
• Excessive Bio-diesel concentration
• Improperly positioned fuel filler neck
• Improperly installed rollover valve
Some examples of fuel contamination:
Identifiable in shop
- Water content exceeds specification
• DEF (Diesel Exhaust Fluid)
• Gasoline
• Organic Growth (Bacteria, Fungus)
May require external testing
- Aged/Oxidized Fuel
• Unapproved fuel additives
• Fuel with High TAN (Total Acid Number) – Acidic Fuel
NOTE: If you are unable to identify the contaminant it may be necessary to send a sample of fuel out to a fuel analysis lab for contamination identification.
SEDIMENTER MAINTENANCE REMINDER
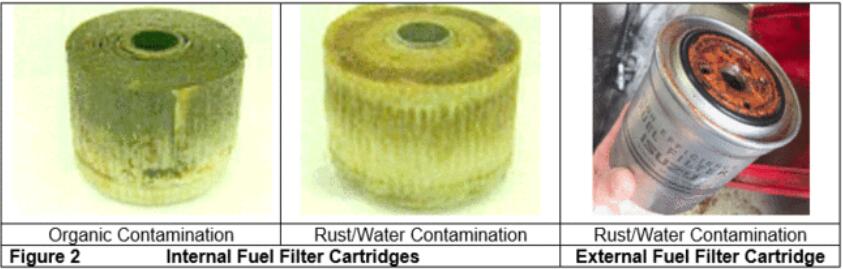
Inspecting the fuel sedimenter and fuel filter cartridge during routine maintenance or during fuel system diagnostics can give indications of fuel system contamination. Look for signs of water, algae or black organic contamination.
IMPORTANT: If contamination is present in the sedimenter, inspect and if necessary flush the fuel tank and supply lines to avoid future concerns.
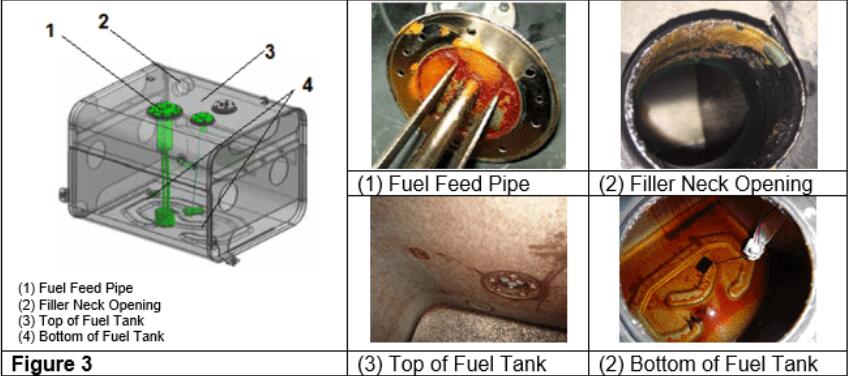
FUEL TANK INSPECTION
A visual inspection of the inside of the fuel tank will often show evidence of contamination. Look for signs of water, algae or black organic contamination.
SERVICE PROCEDURE
CONTAMINATION DIAGNOSIS CHART
| Step | Action | Value(s) | Yes | No |
| 1 | Obtain a fuel sample from the Water Separator using a clean, clear, dry container that is appropriate for holding fuel. Allow the fuel sample to sit for approximately 15 minutes. Compare the sample to the photos of contaminated fuel in Table 1.
Does the fuel appear to be contaminated? |
See photos in Table 1 | Go to Step 2 | Go to Step 3 |
| 2 | Follow the recommended procedure based on the appearance of the fuel as compared to the photos in Table 1 and repair as necessary. | Go to Step 4 | Go to Step 3 | |
| 3 | Obtain a fuel sample from the bottom of the fuel tank(s). Perform a specific gravity test and record the results.
Is the reading within specification? |
API Gravity No1 Diesel 39-44 No2 Diesel 30-39 |
Go to Step 4 | Go to Procedure B |
| 4 | 1. Clear any DTCs with a scan tool.
2. Turn OFF the ignition for 30 seconds. 3. Start the engine. Are there any DTCs or conditions that you have not diagnosed? |
Go to Diagnostic Aides | System OK |

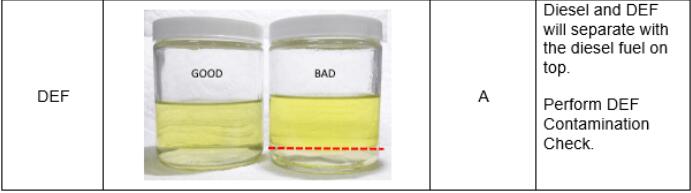
DEF CONTAMINATION CHECK
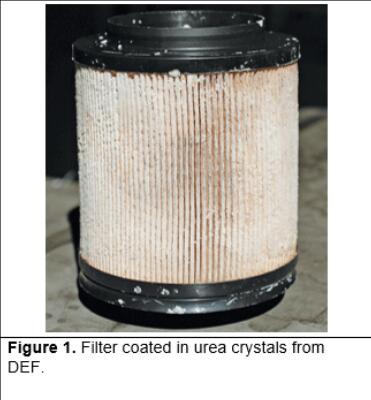
1If the contaminant is suspected to be DEF, verify by removing the Water Separator Cover, Primary Fuel Filter Element, and let the element and cover dry for two (2) hours. If DEF is present, crystalized DEF may be visible inside the Water Separator Cover, Upper Housing, Primary Fuel Filter and the Secondary Fuel System ports.
- If DEF contamination is found during inspection follow Procedure A to repair the vehicle.
- If no there is no indication of DEF contamination follow Procedure B.
PROCEDURE A – DEF CONTAMINATION
1.Remove cap from fuel tank.
2.Disconnect suction line from the water separator.
3.Use air to push fuel and contaminants into fuel tank.
4.Reconnect suction line to water separator.
5.Clean the fuel tank.
- Drain fuel into an appropriate storage container.
- Remove fuel tank. Refer to workshop manual for procedure.
- Inspect fuel tank for signs of damage, (example: water = rust).
- Thoroughly clean the fuel tank.
- Install fuel tank. Refer to workshop manual for procedure.
- Fill fuel tank to ¼ full with clean, fresh, and good quality diesel fuel.
IMPORTANT: To prevent contaminated fuel from re-entering the system, be sure to remove all contaminated fuel from the fuel tank.
IMPORTANT: Be sure to properly dispose of contaminated fuel in accordance to local laws and guidelines.
6.Replace both the sedimenter cartridge and fuel filter. On 4HK1 remove, inspect the fuel screen on the back of the fuel pump for signs of damage due to fuel contamination.
7.Replace all metal high pressure fuel system components.
- Fuel pump
- Injector lines
- Fuel rail
- Fuel injectors
- Injector return hose
- 4HK1, replace fuel screen on back of fuel pump
NOTE: If there are no signs of physical damage, the low pressure fuel lines can be reused.
8.Disconnect the return line to fuel tank.
9.Place return line into a suitable recovery container at least 2 gallons in size.
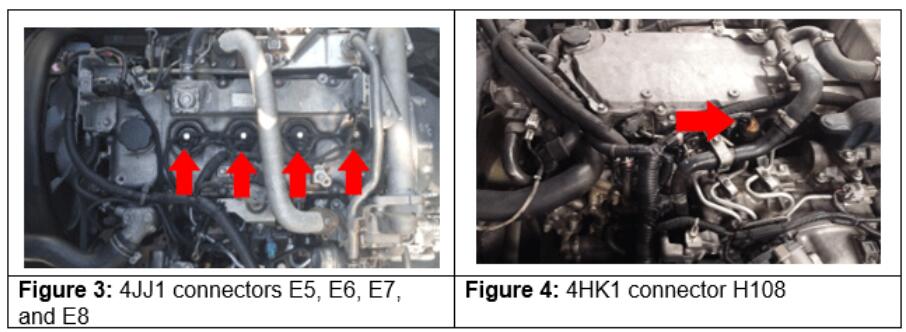
10.Disable fuel injectors.
- 3.0L: Disconnect individual injectors on the top of the cylinder head cover.
- 5.2L: Disconnect all injectors by disconnecting harness connector H108.
11.Crank the engine in 30 second time intervals, with a 1 minute cool down in between, until 1 gallon of fuel has accumulated into the recovery container.
12.Reconnect the fuel return line.
13.Reconnect the fuel injectors. Refer to workshop manual for procedure.
14.Attempt to start the engine.
- If the engine starts, let it run for 15 minutes. Verify injector balance rates are normal. Check for engine noise. Verify proper fuel pressure track.
- On a 4HK1 verify proper low side fuel pressure.
- If the engine does not start, go to the hand primer pump and operate approx., 30 strokes, or until there is firm resistance. Re-attempt engine start.
15.Stop engine.
16.Clean any fuel spillage from engine.
17.Bleed fuel system. Refer to workshop manual for procedure.
18.Start vehicle and check that there are no fuel system leaks. Repair as necessary.
19.Return to Step 4 of the Contamination Diagnosis Chart
PROCEDURE B – Organic, Rust, Water, Gasoline or Kerosene Contamination
1.Remove cap from fuel tank.
2.Disconnect suction line from the water separator.
3.Use air to push fuel and contaminants into fuel tank.
4.Reconnect suction line to water separator.
5.Clean the fuel tank.
- Drain fuel into an appropriate storage container.
- Remove fuel tank. Refer to workshop manual for procedure.
- Inspect fuel tank for signs of damage, (example: water = rust).
- Thoroughly clean the fuel tank.
- Install fuel tank. Refer to workshop manual for procedure.
- Fill fuel tank to ¼ full with clean, fresh, and good quality diesel fuel.
6.Disconnect the return line to fuel tank.
7.Place return line into a suitable recovery container at least 2 gallons in size.
8.Disable fuel injectors.
- 3.0L: Disconnect individual injectors on the top of the cylinder head cover. See Figure 8.
- 5.2L: Disconnect all injectors by disconnecting harness connector H108. See Figure 9.
9.Crank the engine in 30 second time intervals, with a 1 minute cool down in between, until 1 gallon of fuel has accumulated into the revcovery container.
10.Reconnect the fuel return line.
11.Reconnect the fuel injectors. Refer to workshop manual for procedure.
12.Attempt to start the engine.
- If the engine starts, let run for 15 minutes. Verify injector balance rates are normal. Check for engine noise. Verify proper fuel pressure track.
- On a 4HK1 verify proper low side fuel pressure.
- If the engine does not start, go to the hand primer pump and operate approx., 30 strokes, or until there is firm resistance. Re-attempt engine start.
13.Stop engine
14.Clean any fuel spillage from engine.
15.Bleed fuel system. Refer to workshop manual for procedure.
16.Start vehicle and check that there are no fuel system leaks. Repair as necessary.
17.Return to Step 4 of the Contamination Diagnosis Chart