This instruction show you guide on how to disassembly and assembly fuel injector for Bobcat 3450 utility vehicle.
Related Contents:
Bobcat 3450 Utility Vehicle Fuel Injector Removal and Installation Guide
2023 Bobcat Service Analyzer 91.15 91.05 Diagnostic Free Download
Procedures:
Fuel Injector Disassembly
NOTE: Never use a steel wire brush to clean fuel injectors. Damage to the nozzle and other
components is likely to result.
Clean carbon from used injectors using clean diesel fuel.
Hardened deposits or varnish can be cleaned using a brass wire brush.
Place the fuel injector in a soft-jawed vise with the nozzle pointing up.
Remove the nozzle case nut.
Carefully remove the injector from the vise.
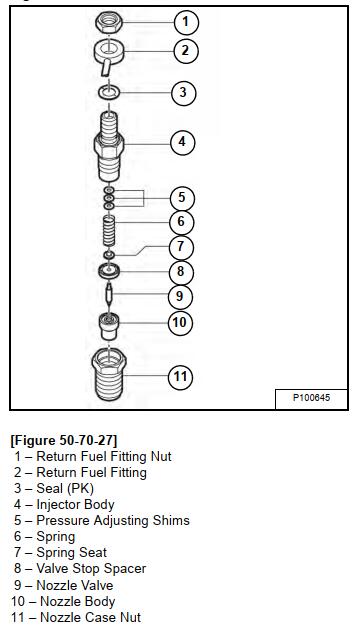
Turn the injector over and remove the nozzle body, nozzle valve, valve stop spacer, nozzle spring seat, nozzle spring and shims.
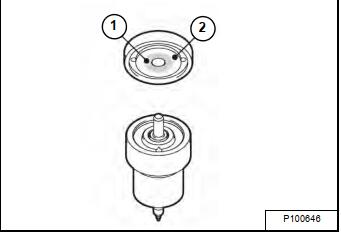
Inspect the sealing surfaces (Item 2) between the valve stop spacer and nozzle body for nicks
or scratches. Check the contact area between the valve stop spacer and the nozzle valve (Item 1) for scoring or pitting. Use a magnifying glass to inspect.
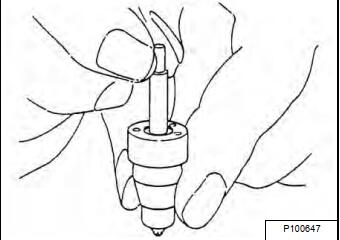
Perform a nozzle valve slide test:
(a) Wash nozzle body and valve in clean diesel fuel.
(b) While holding the nozzle body vertical, pull the nozzle valve about 2/3 of the way out.
(c) Release the valve. It should fall smoothly to its seat by its own weight.
NOTE: Replace the fuel injector assembly if it fails any inspection or if an injector tester is not available.
Fuel Injector Assembly
Secure the injector in a soft-jawed vise with the nozzle end up.
Install the shims, nozzle spring, nozzle spring seat, valve stop spacer, nozzle valve and nozzle body.
Install the nozzle case nut. Tighten to 49 – 53 N•m (36 -39 ft-lb) torque.
Fuel Injector Nozzle Pressure – Checking
NOTE: Never use a steel wire brush to clean fuel injectors. Damage to the nozzle and other components is likely to result.
Thoroughly clean the fuel injector nozzle using clean diesel fuel and a brass wire brush.
Visually inspect the fuel injectors and nozzle protectors for deposits or damage. Clean, repair or replace as necessary.
NOTE:Test the fuel injector using an injection nozzle tester. Operate the tester following the information provided by the tester manufacturer. Use clean, filtered fuel or FIE calibration fluid for the test.
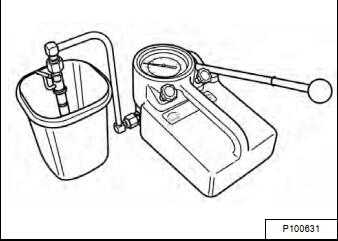
Using the correct adapter, connect a fuel injector to a nozzle tester. Aim the fuel injector into a suitable container to catch the fuel spray.
Pump the operating lever of the tester slowly, observing the pressure reading at the point where the fuel injector begins spraying fuel.
NOTE: Opening pressure of a new fuel injector will be approximately 0,5 MPa (5,0 bar) (72.5 psi)
higher than one that has been operated for 5 hours or longer.
Pump the operating lever slowly to hold the pressure steady at a point just below the opening pressure and hold that pressure for 5 seconds. Observe the injector to see that it is sealing properly and is not dripping. If fuel leaks from the return line fitting, check that the nozzle case nut is tight. Service or replace the injector if fuel continues to leak from either the return line fitting or nozzle.
Pump the operating lever more rapidly to repeatedly “pop” the injector and observe the spray pattern. The pattern should be a very fine uniform spray. If dripping or an uneven pattern is seen, service or replace the injector.
More repair topic for Bobcat,please refer to:Bobcat Excavator Repair