This article show a BMW X5 X6 E70 E71 rear view retrofit installation guide.The installation time is approx. 2.5 to 3 hours. This may vary depending on the condition of the car and the equipment in it.
And for more BMW retrofit,you can check here:BMW Retrofit Projects
2024.08 BMW Rheingold ISTA+ 4.48.40 4.23.14 ISTA-P 3.71 Free Download
Important information
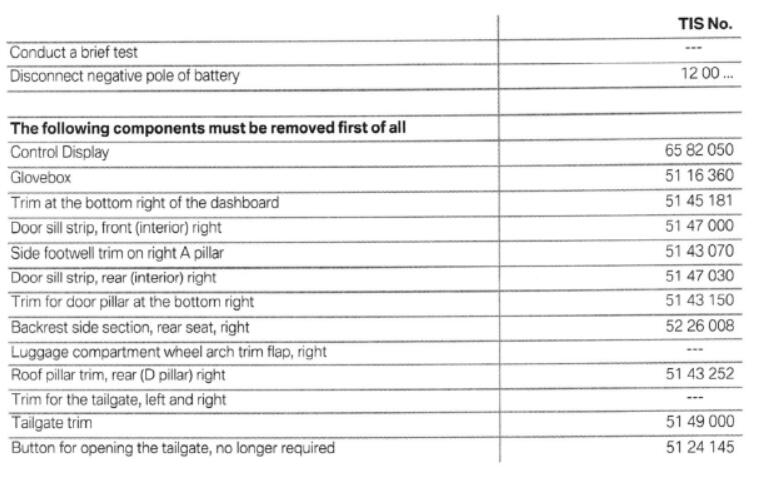
These installation instructions are primarily designed for use within the BMW dealership organisation and by authorised BMW service companies.
In any event, the target group for these installation instructions is specialist personnel trained on BMW cars with the appropriate specialist knowledge.
All work must be completed using the latest BMW repair manuals, circuit diagrams, servicing manuals and work instructions, in a rational order, using the prescribed tools (special tools) and observing current health and safety regulations.
In the event of any installation or function problems, restrict the troubleshooting session to about 0.5 hours for mechanical work or 1 hour for electrical work.
In order to reduce costs and avoid any additional expense, send a query immediately to the Technical Parts Support via the Aftersales Assistance Portal (ASAP).
Specify the following information:
-Chassis number -Part number of the retrofit kit -A precise description of the problem -Work steps already carried out
Do not archive the hard copy of these installation instructions since daily updates are made by ASAP! Pictograms
Denotes instructions that draw your attention to special features.
Installation information
Ensure that the cables and/or lines are not kinked or damaged as you install them in the car. The costs thereby incurred will not be reimbursed by BMW AG.
Additional cables/lines that you install must be secured with cable ties.
If the specified PIN chambers are occupied, bridges, double crimps or twin-lead terminals must be used.
All pictures show LHD cars; proceed accordingly on RHD cars.
In most cases, after installation of the retrofit, repairs or a software update of the car, an image misalignment appears on the Control Display. In order to correct the picture offset the LVDS converter M must be initialized.
The initialisation is to be carried out as detailed in the separate initialisation instructions 01 290432 055.
Ordering instructions
The LVDS converter extras kit is not included in the rear view retrofit kit and must be ordered separately (see EPC for part number and further details).
Special tools required
009 310, installation wedges
Table of contents
4.Rear view connection diagram
5.LVDS converter extras kit connection diagram
6.Installation and cabling diagram
7.To install the rear view with button and control unit
8.To route and connect the rear view wiring harness
9.To connect the power supply and connection cable
10.To install and connect the LVDS converter
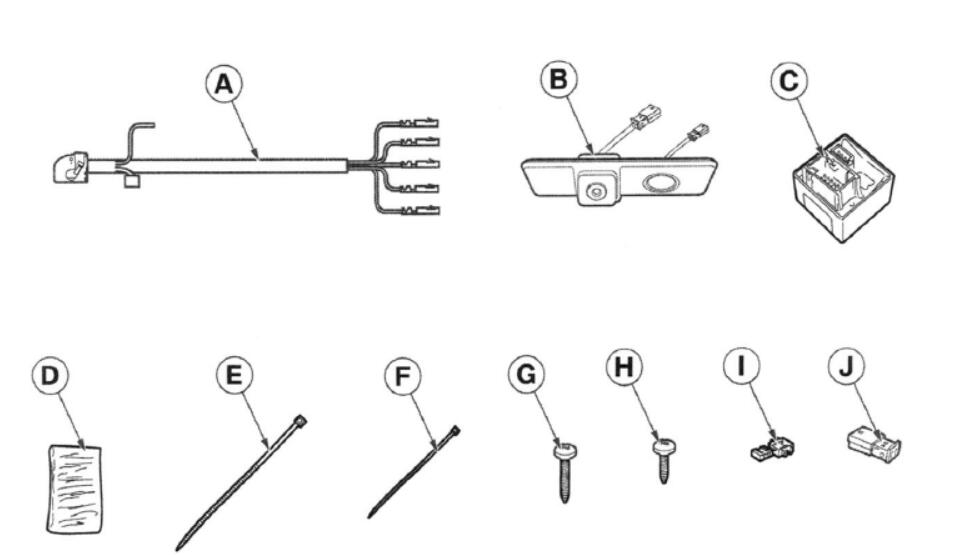
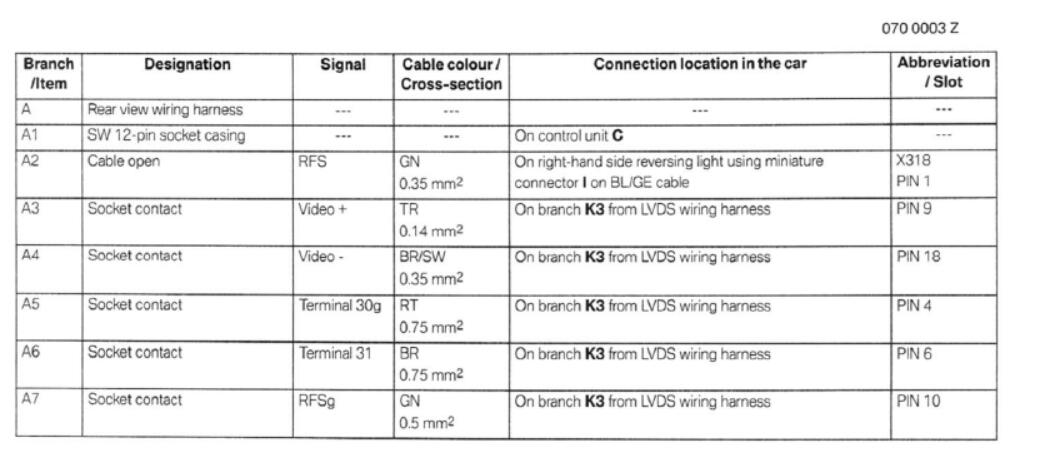
Legend
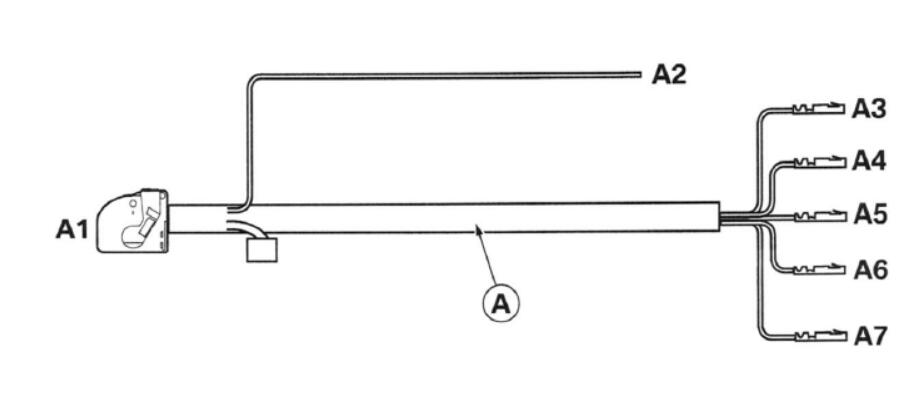
A Rear view wiring harness
B Rear view with button
C Control unit
D Protective strip
E Cable tie 292 x 4.8 mm
F Cable tie 200 x 3.6 mm (20x)
G Philips screw 3.5 x 16 mm (6x, not required)
H Philips screw 3.5 x 9.5 mm (4x, not required)
I Miniature connector (5x)
J 2-pin plug casing
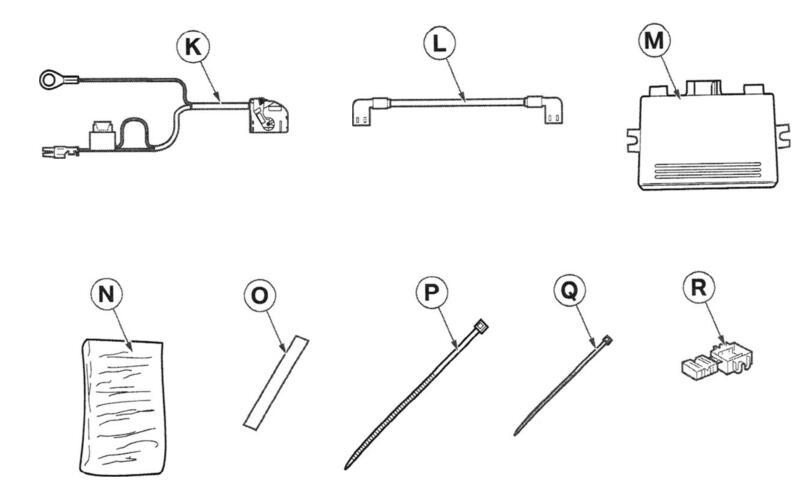
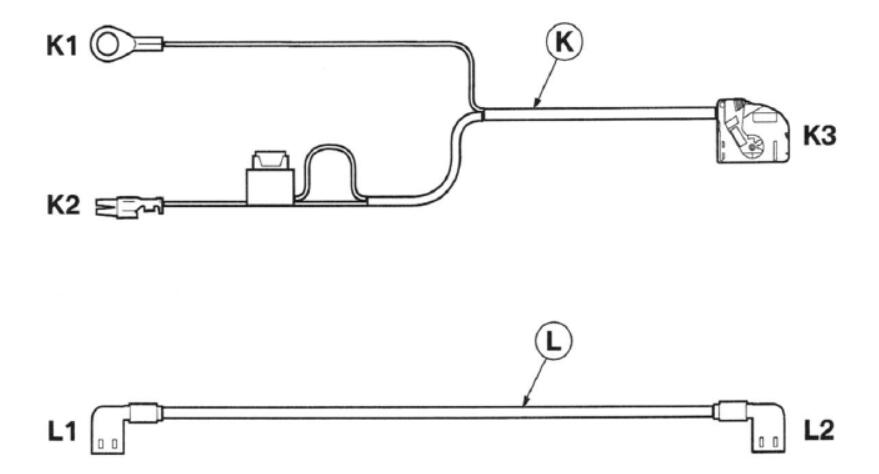
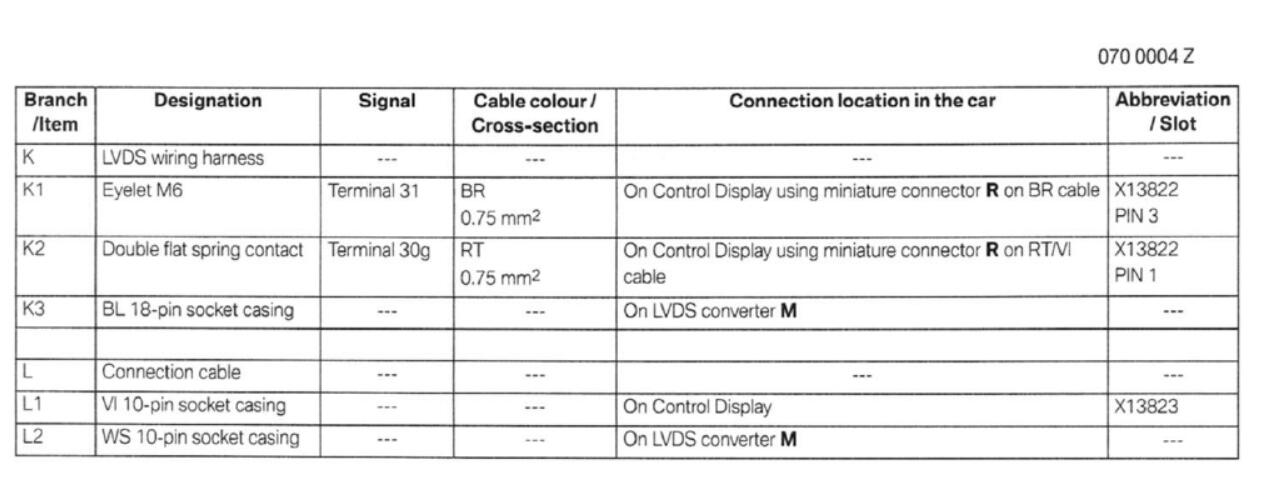
Legend
K l-N/DS wiring harness
L Connection cable
M LVDS converter
N Protective strip (2x)
O Sealing strip (3x, not required)
P Cable tie 445 x 4.8 mm (2x)
Q Cable tie 200 x 3.6 mm (1 Ox)
R Miniature connector (2x)
4.Rear view connection diagram
5.LVDS converter extras kit connection diagram
6.Installation and cabling diagram
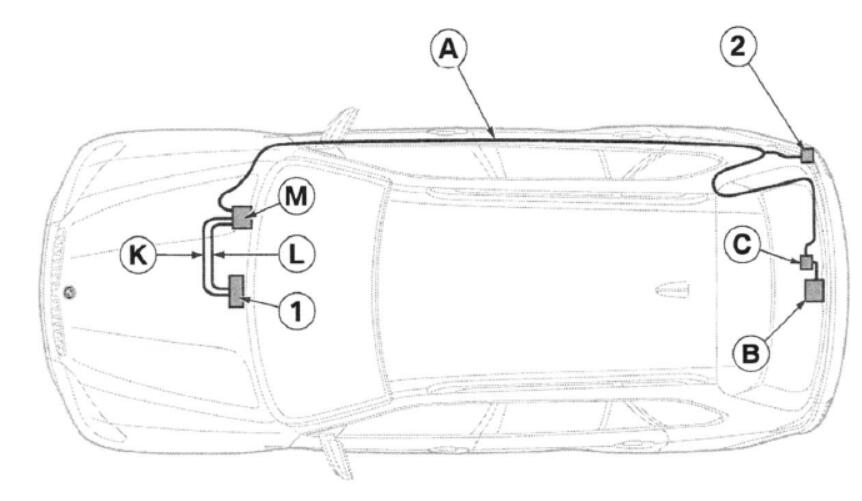
Legend
A Rear view wiring harness
B Rear view with button
C Control unit
K LVDS wiring harness
L Connection cable
M LVDS converter 1 2
1.Terminal 30g and terminal 31 tap on Control Display, socket casing XI3822
2.RFS tap on reversing light, socket casing X318
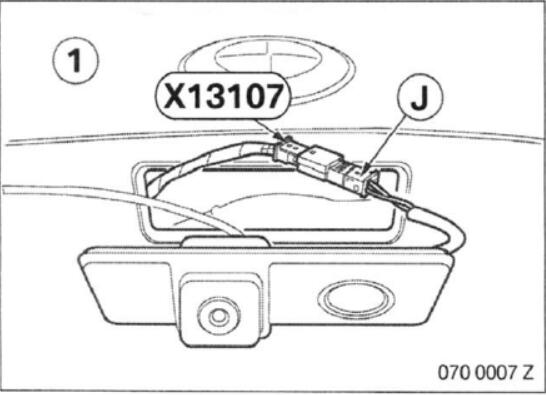
7.To install the rear view with button and control unit
Plug casing J (GN 2-pin) is attached to the M connection cable of the button (3H
Disconnect the cable (2) of the button (3) from the existing plug (1) and connect to plug casing J.
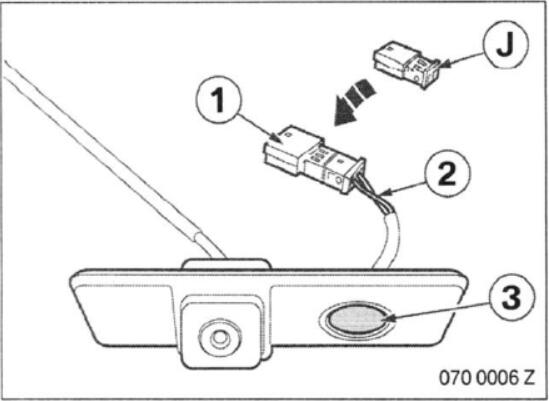
Connect plug casing J on socket casing X13107 (SW 2-pin) of the tailgate (1).
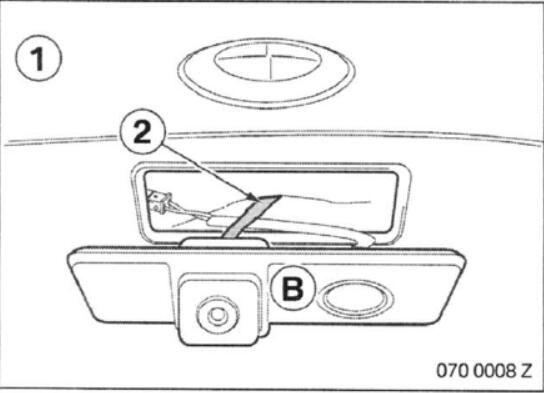
Route the connection plug (2) of the rear view into the tailgate (1) to the wiper motor.
Clip rear view with button B into the tailgate (1).
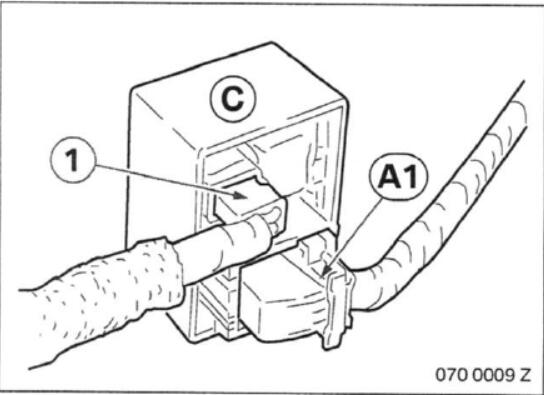
Connect the connection plug (1) of the rear view and branch A1 (SW 12-pin socket casing) to control unit C.
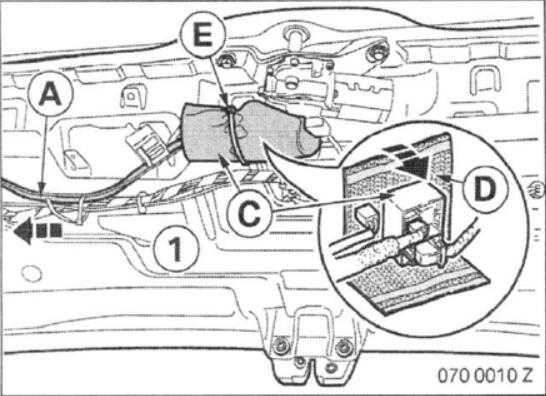
8.To route and connect the rear view wiring harness
Wrap control unit C in protective strips D.
Use cable tie E to attach control unit C to the web of the tailgate (1).
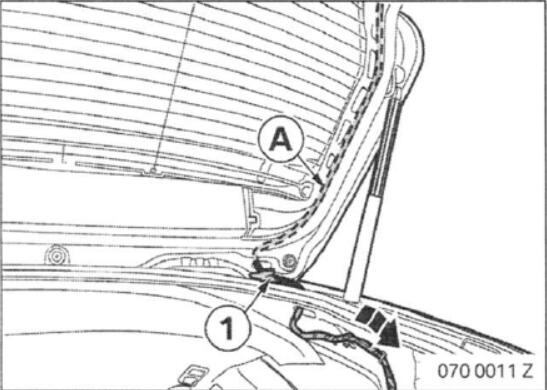
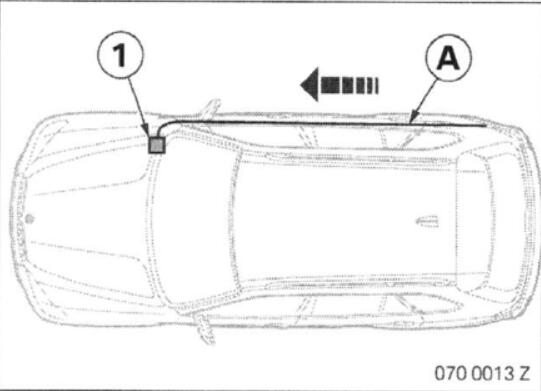
Route rear view wiring harness A along the standard wiring harness to the right-hand side of the tailgate (1).
The headlining must be lowered slightly at the rear right for routing the cable, i
Route rear view wiring harness A along the standard wiring harness through the grommet (1) into the luggage compartment.
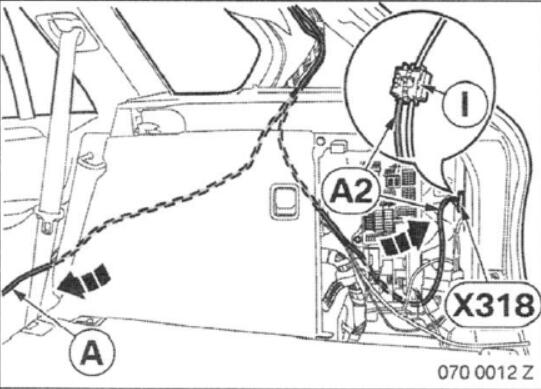
Route branch A2, GN cable, to the right rear light.
Before connecting, check whether the reversing light signal is present on the BL/GE cable, i
Use miniature connector I to connect branch A2 to the 巳L/GE cable from socket casing X318 (PIN 1).
Route rear view wiring harness A along the standard wiring harness into the footwell on the driver’s side.
Route rear view wiring harness A along the standard wiring harness into the footwell on the passenger’s side (1).
9.To connect the power supply and connection cable
Prepare LVDS wiring harness K as follows:
-Remove the contacts (1) from branch K1,巳R cat>le, and branch K2, RT cable
Cars with ASK only
-Cut the cable loop (2), GE cable -Insulate the cut cables
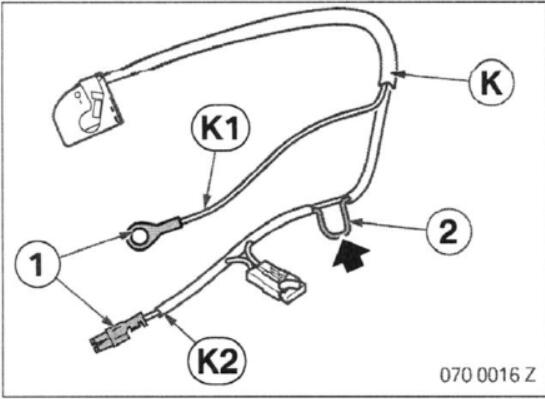
All cars
Connect branches K1 and K2 as follows to socket casing X13822 (SW12-pin) on the Control Display (1) using miniature connectors R:
-Branch K1,BR cabile, to R cable from PIN 3
-Branch K2, RT cable, to RTA/I cable from PIN 1
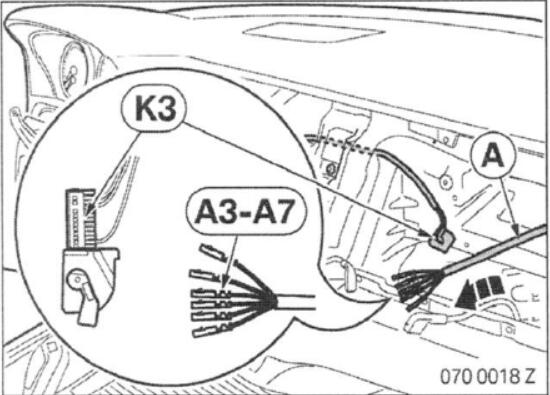
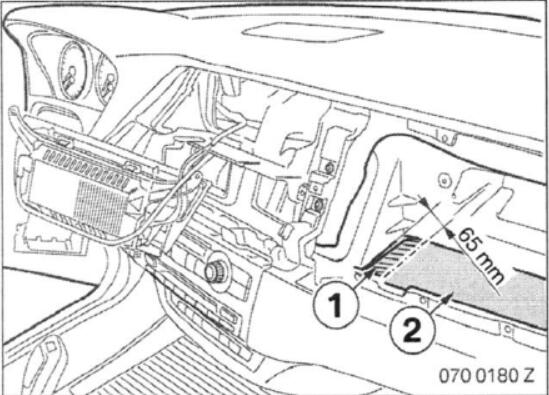
Route branch K3 (BL 18-pin socket casing) into the cutout of the glove compartment.
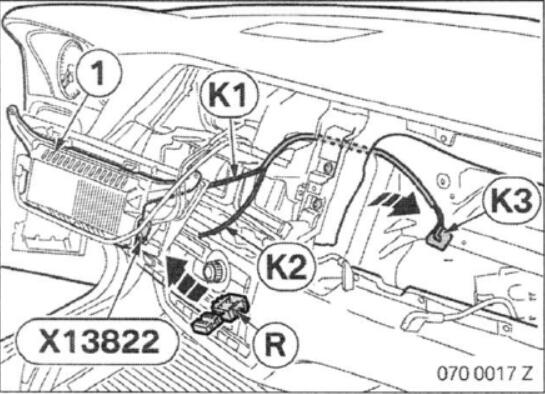
Disconnect the existing signal cable (2) from the Control Display (1).
Route the socket casing (3) on the existing signal cable (2) into the cutout of the glove compartment (3).
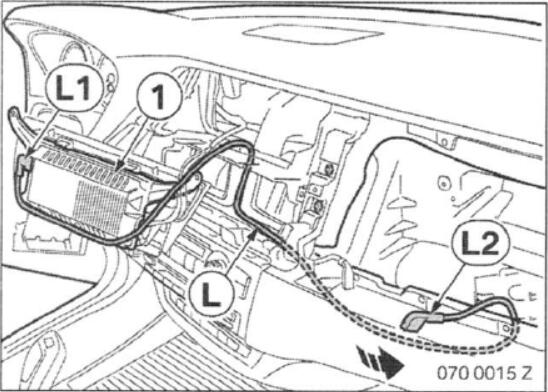
Connect branch L1 (V110-pin plug) on connection cable L to the Control Display (1).
Route branch L2 (WS 10-pin socket casing) into the cutout of the glove compartment.
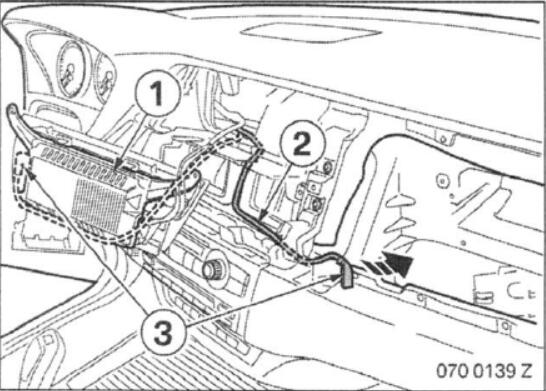
9.To connect the power supply and connection cable
Route rear view wiring harness A into the cutout in the glove compartment and connect as follows to branch K3 (BL 18-pin socket casing):
-Branch A3, TR cable, to PIN 9
-Branch A4,BR/SW cable, to PIN 18
-Branch A5, RT cable, to PIN 4
-Branch A6, BR cable, to PIN 6
-Branch A7, GN cable, to PIN 10
10.Installing and connecting the LVDS converter
Mark the specified dimension on the existing polystyrene insert (2), if necessary.
Separate and remove section (1).
Use the coding (1) on the plugs to connect them correctly, i
Connect the plugs on LVDS converter M:
-Socket casing (2) on the existing signal cable (VI 10-pin)
-Branch K3 (BL 18-pin socket casing)
-Branch L2 (WS 10-pin socket casing)
Wrap underside of LVDS converter M with protective strips N.
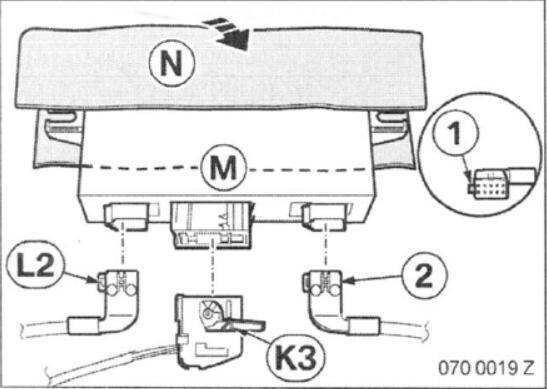
Secure LVDS converter M to instrument panel (1) using cable ties P.

This retrofit system does not require coding.
-Connect the battery
-Conduct a brief test
In most cases, after installation of the retrofit, repairs or a software update of the car, an image misalignment appears on the Control Display. In order to correct the picture offset the LVDS converter M must be initialized.
The initialisation is to be carried out as detailed in the separate initialisation instructions 01 29 0 432 055.
Check the function of the rear view as follows:
-Switch on the ignition
-Engage reverse, a picture must appear on the Control Display -Disengage reverse gear; the Control Display must switch over after approx. 5 seconds
-Re-assemble the car
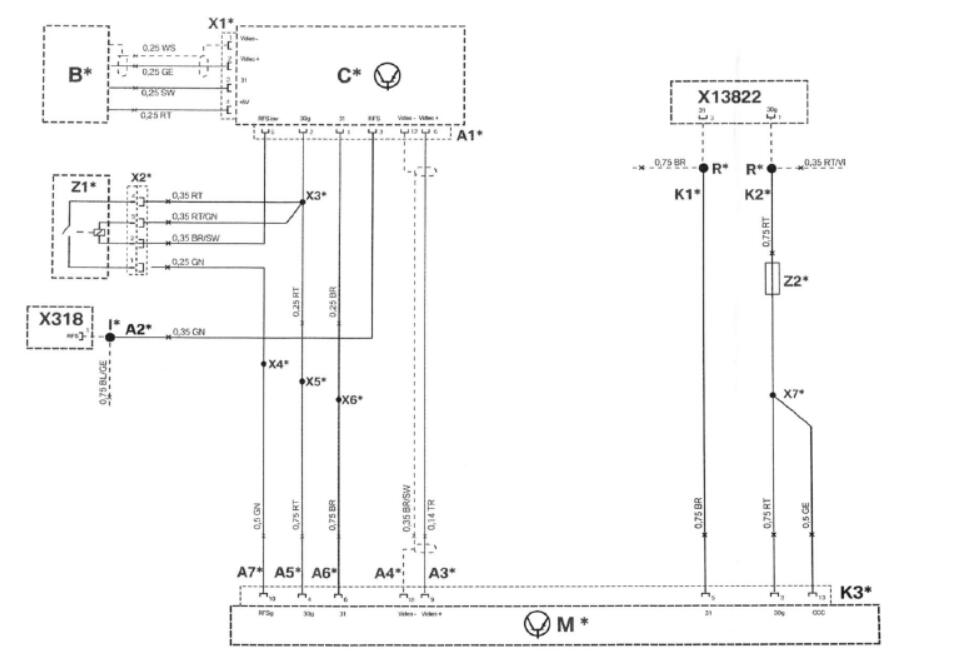
| Legend
A1* |
SW12-pin socket casing |
| A2* | Open cable, RFS terminal pick-up |
| A3* | Socket contact |
| A4* | Socket contact |
| A5* | Socket contact |
| A6* | Socket contact |
| A7* | Socket contact |
| B* | Rear view |
| C* | Control unit |
| I* | Miniature connector |
| K1* | Ring eyelet M6, terminal 31 pick-up |
| K2* | Double flat spring, terminal 30g pick-up |
| K3* | BL 18-pin socket casing |
| M* | LVDS converter |
| R* | Mini3tu「6 connector |
| X1* | SW 4-pin socket casing |
| X2* | WS 4-pin miniature relay plug connector |
| X3* | Terminal 30 connector |
| X4* | Terminal RFSg connector |
| X5* | Terminal 30g connector |
| X6* | Terminal 31 connector |
| X7* | Terminal 30g connector |
| X318 | SW 6-pin socket casing, terminal RFS pick-up |
| X13822 | SW 12-pin plug, terminal 30g and terminal 31 pick-up |
| Z1* | Miniature relay |
| Z2* | Fusible element 1 A |
All the designations marked with an asterisk (*) apply only to these installation instructions or this circuit