Weeks ago,car-auto-repair.com show you guide on how to setup/configure XENTRY Diagnosis VCI to Xentry diagnostic software.Some blog readers ask the method for SDconnect.Here share you how to configure SDconnect to Xentry by cable operation.
Preparations:
2024.03 Benz Xentry.OpenShell.XDOS Diagnostic Software Free Download
How to Install Benz Xentry 2024.03 Diagnostic Software
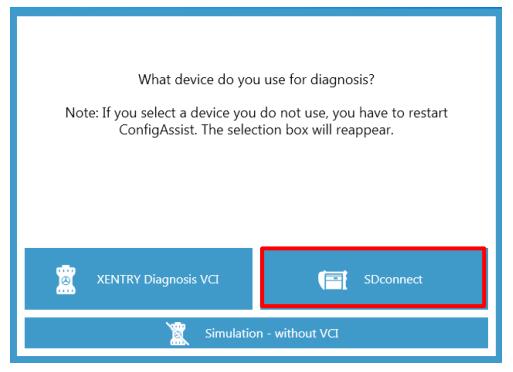
You can operate XENTRY Diagnostics Open Shell using the SDconnect, too. To configure this hardware,please proceed as follows:
Start ConfigAssist by clicking on the button with the same name on your desktop (if you have restarted your system, the hardware selection window will appear first).
Select “SDconnect” if you are asked for the used hardware:
A conventional crossover Ethernet cable is required for connection of the SDconnect with the system via LAN. A suitable cable (green) is provided in the scope of delivery.
There are two possibilities for connecting the SDconnect and the system via the Ethernet cable:
– direct connection between two Ethernet connections (see section 3.2.2)
– connection with the help of a USB2LAN adapter to the system or via a USB2LAN cable
The LAN connection of the SDconnect is located on the right side under a protective cap.
Note:
Please ensure that the SDconnect is restarted before configuration and not in sleep mode. It is best to fully charge the SDconnect beforehand
Configuring a direct Ethernet connection
For the configuration of the LAN connection use the following values (static TCP/IP):
IP address on the PC (LAN connection on the PC to the SDconnect): 172.29.127.X (“X” stands for a number between 1 and 254).
Please note that the number automatically given for the SDconnect 172.29.127.129 cannot be used for the PC.
The PC subnet mask (LAN connection on the PC to the SDconnect) has the IP address 255.255.0.0 and should not be modified.
Important: Please configure your firewall to permit the communication of your system with the SDconnect (you will normally be prompted to do so the first time you connect the SDconnect via a cable connection). Please note that in the case of a direct Ethernet connection the LAN port can no longer be used for another connection!
When using DoIP, please also observe the additional firewall settings for the DoIP connection.
Configuring a USB2LAN connection
For a cable connection via the USB2LAN adapter, this adapter must be configured in Windows.
We differentiate between
– The installation or modification of the drivers for the USB2LAN adapter
– The configuration of the network connection via the USB2LAN adapter
The driver for the adapter must be installed using Windows dialogs. Any changes to the driver also need to be carried out using Windows processes and dialogs.
For the initial configuration of the adapter or when modifying the driver setup, basic knowledge of how to work with Windows components and drivers is required. Please consult your local
IT administrator in case of any uncertainty! The support centers for the XENTRY Diagnostics Open Shell systems cannot provide support for the configuration of drivers or Windows!
Installation of the USB2LAN adapter driver
To install the driver for the USB2LAN adapter, start by connecting the adapter to the computer without connecting the green cable to the SDconnect at the other end. Make sure that the computer is online,i.e. that the Internet connection is working properly.
Automatic driver installation – first-time installation
If you want to connect the adapter to the computer for the first time, start the automatic Windows driver installation (Windows 7 and later versions). The driver only needs to be installed once the first time that you connect the adapter. Please proceed with caution since communication is not possible if the configuration of the USB2LAN adapter between the computer and SDconnect is absent or incorrect. The drivers for the adapter may need to be uninstalled and reinstalled or reconfigured manually.
Important: It may not be immediately clear whether Windows is attempting to install the driver for the first time or whether the system immediately uses the driver after (repeatedly) reinserting the adapter, since Windows hides these status messages in the Windows tray in the default setting.
With the first connection attempt, Windows will attempt to identify the driver software and download it from a website containing drivers online. Windows will display a notification for a number of seconds in the Windows tray during these actions:
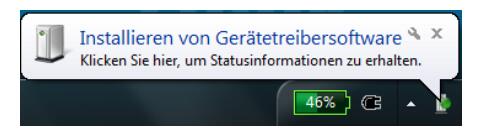
If you do not promptly click the dialog balloon, Windows will hide the symbol in the windows tray behind the small arrow symbol:
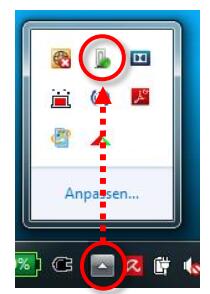
After clicking the symbol, Windows will show additional information:
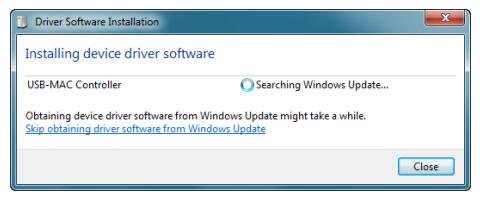
It is important to install the driver for the device “USB-MAC Controller”.
Please wait until Windows has identified and downloaded the required drivers online.
This can take some time – do not terminate the process!
At the end of the process Windows will notify you of the results of the driver installation:
– Installation successful, device is ready for use
– Installation unsuccessful
After a successful installation, you can start to configure the adapter immediately
Automatic driver installation – later installation
If you accidentally terminated installation the first time you plugged in the adapter or if the installation failed (e.g. because the computer was offline), you need to install the drivers again. This may also be necessary after you have connected the adapter to a different USB port than the port first used.
To install the driver at a later stage, you will need to click on “Devices and Printers” in the Windows Control Panel, then “Other Devices” (or potentially “Network Adapters”) and “USB-MAC Controller”. The entry “USB-MAC Controller” will very likely be shown with a yellow exclamation point, since there is a driver problem.
If the USB2LAN adapter has been partially installed (incorrectly), it can be found in the Device Manager under “Network Adapter” and otherwise under “Other Devices”.
Important: The “USB-MAC Controller” only appears under “Other Devices” or “Network Adapter” when it is plugged in!
Right-click on the entry “USB-MAC Controller”. The context menu will open. Here, select “Update driver software”:
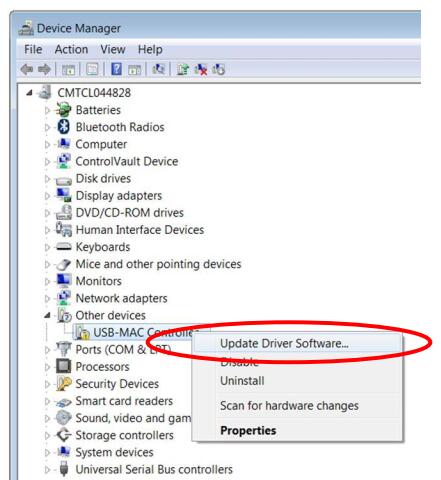
When you select “Update driver software” in the context menu, if the computer is online you
can choose “Search automatically for updated driver software”. Otherwise, please select “Browse my computer for driver software”:
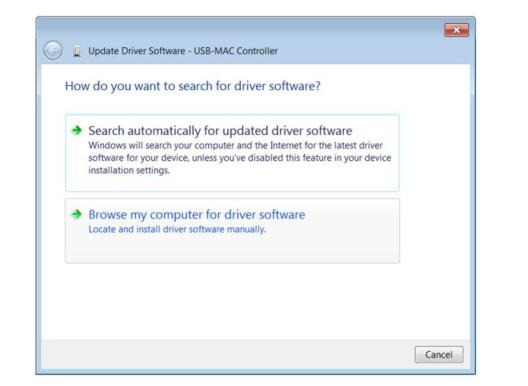
Selecting “Search automatically for updated driver software” will run the automatic installation process as described above.
Manual driver installation – later installation
If the initial automatic driver installation failed or the later automatic installation was also unsuccessful or if the system is generally not online, the drivers for the USB2LAN adapter
must be installed manually.
Note: The driver software for the USB2LAN adapter is supplied on every update DVD/BD.
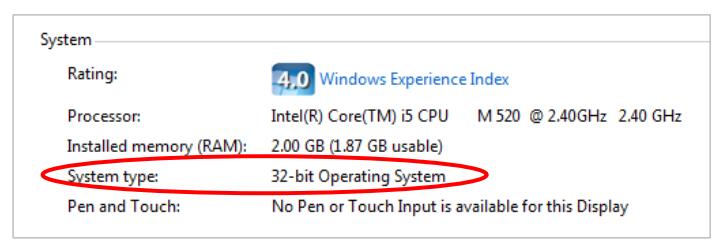
Start by determining whether you have a 32-bit or 64-bit version of Windows 8.1 or Windows 10. Go to the “Control Panel” and “System” in the Windows Start Menu. There you will find information on the system type:
As described above for the “Automatic driver installation – later installation”, open the menu item “Update driver software” for the USB2LAN adapter in the Windows Device Manager.
In the dialog, select “Browse my computer for driver software”, insert the installation DVD/BD and browse the disc manually to locate the following folder:
– “USB2LAN Driver\Windows 7\64 bit” (for Windows 7 64-bit) or
– “USB2LAN Driver\Windows 7\32 bit” (for Windows 7 32-bit).
Please select your specific Windows version if not “Windows 7” when applicable.
Windows then installs the driver offline from the selected folder.
Normally you only need to select the folder and Windows will automatically find the required driver files. If this should fail, please select the corresponding *.inf file in the folder (“netmosu.inf” for 32-bit, “USBMAC64.inf” for 64-bit).
Configuration of the USB2LAN adapter and SDconnect for cable operation
Before configuring the USB2LAN adapter, the driver installation must be completed successfully. Make sure that the adapter is connected and that no error is indicated in the Windows tray (yellow exclamation point, installation of device drivers, etc.)
Please note:
Always plug the USB2LAN adapter into the USB port used to install the driver.
The USB2LAN adapter may not be recognized by a different slot.
Switch on the SDconnect and wait until it has started up. Ensure that the SDconnect is connected to an external power supply or to the vehicle via the OBD cable to receive power.
The SDconnect must not go to sleep during configuration!
The configuration consists of three main steps:
– Establishing the connection
– Assigning a manual IP address to the USB2LAN adapter
– Configuring the connection via SDconnect Administration.
Establishing the connection
Connect the green Ethernet cable to the SDconnect and then to the USB2LAN adapter.
Windows will now attempt to establish a network connection between the computer and SDconnect via the adapter and the cable. This may take a few moments.
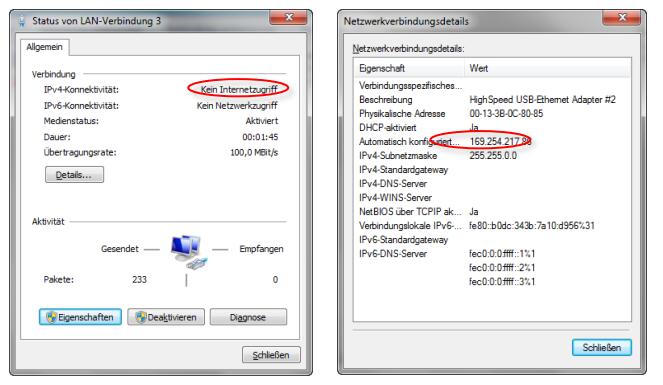
The connection status is not immediately visible. To check the status, you may go to the Windows Control Panel > Network and Internet > Network Connections. With a successful connection,the LAN connection of the “High Speed USB-Ethernet Adapter” will be fully functional (i.e. no red “X”; no yellow exclamation point). If you use the context menu to call up the “Status” for this adapter and “No Network Connection” is shown, an IP address should still be entered under “Details…” and “Auto configuration …“
Assigning a manual IP address
Call up the connection properties of the using the USB2LAN adapter from the Windows Control Panel >Network and Internet > Network Connections (Adapter “HighSpeed USB-Ethernet Adapter”) by doubleclicking or using the context menu (“Properties”).
Select the “Internet protocol Version 4 (TCP/IPv4)” and click “Properties”. Select “Use the following IP address:” and enter this information:
IP address: 172.29.127.X
Subnet mask: 255.255.0.0
Please note that “X” stands for a number between 1 and 254. The default address automatically assigned to the SDconnect 172.29.127.129 cannot be used for the adapter!
Leave all other entries in the window the same and close the dialogs with “OK”.
If Windows determines that the assigned static IP address is already in use, please choose a different IP address, i.e. a different number for the “X” above.
Connection configuration
If the connection with the manual IP address has been established, you still need to assign a specific number to the SDconnect.
Call up the SDconnect Administration (Start > All Programs > Mercedes-Benz). Click on the SDconnect entry with an unknown or not yet assigned number and wait for the SDconnect data to be loaded. Under “Select name” choose any number that is NOT assigned to a different SDconnect in your workshop. Use the number clips included with delivery to label the device.
Save your entry by clicking “Start” and exit the SDconnect Administration after confirming that the program has applied the data.
After successful configuration of the cable connection to the SDconnect:
Numerous icons in the Windows tray show the status of the SDconnect (system restart may be required).If an SDconnect is connected, the icons display the number of the SDconnect (here: 10), the connection type (Wi-Fi) as well as a padlock icon:

You may have to adjust the settings of the Windows tray in order to see these icons.