PSA Interface Checker Free Download
Interface Checker and driver
http://depositfiles.com/files/yiokrtfjz
Driver install DiagBox
http://depositfiles.com/files/7a3cy0a0r
Download The Txt File from
Depositfiles
http://depositfiles.com/files/l2u92mu59
or
Rapidshare
https://rapidshare.com/files/4023691405/Rar Code.txt
https://rapidshare.com/files/3616630225/PSA_Interface_Checker_V2.9.rar
Mega download link:
https://mega.nz/file/jVVQSYLQ#AOadR15rv3eR8CL9Xaim7rvKVmfid-WBKL8lNvmbIy8
PSA Interface Checker Installation:
Just double click PSA interface Checker to install with default option.
How to Use PSA Interface Checker?
this is the instruction to reflash your lexia interface:
(1) install the [ PSA Interface Checker Install.exe ] , after installation you will get 3 new shortcuts on desktop
(2) connect your lexia interface to your computer by USB cable , no need to connect to car, install the driver for the interface automatically
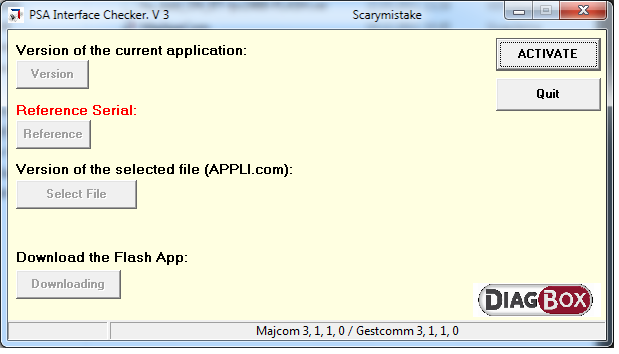
(3) run the [ PSA Interface Checker ] from desktop, click ACTIVATE,
(4) click Version of the selected file (APPLI.com), select vci_updater.com file, click Download the Flash App, wait for a few seconds untill the flash is done (when the flash is done successfully, the greem light/LED on your lexia interface will keep flashing )
*** This step is for reflashing which will change the serial number of your lexia interface from Revision B to Revision C also with the original Evolution Driver !
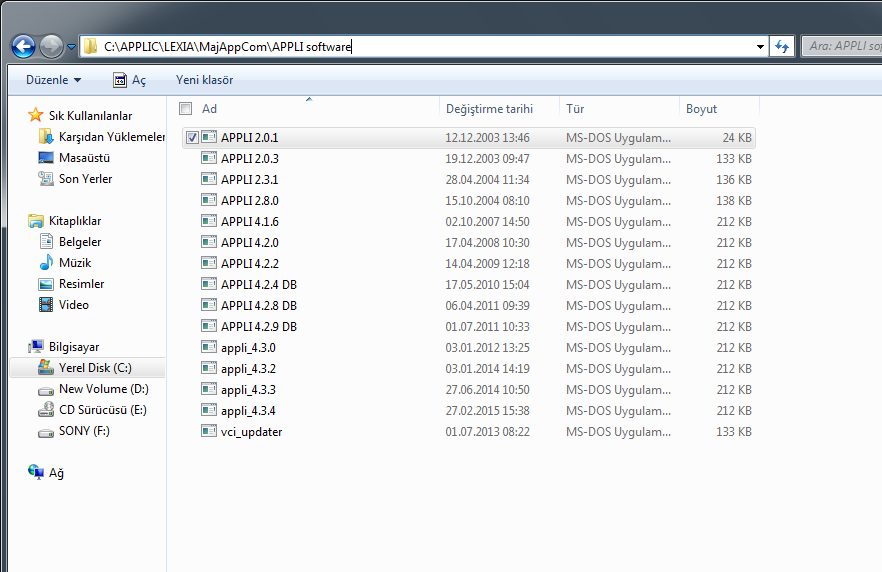
*** If the reflashing procedure only takes 1 second in your side , usually that means the
reflashing fails, you need to make a special handling as follows:
1) copy the vci_updater.com file and appli.com file to MajAppCom folder located in C:\APPLIC\LEXIA\MajAppCom
2) do the step 4 again and select vci_updater.com file and appli.com file from the MajAppCom folder located in
C:\APPLIC\LEXIA\MajAppCom
PSA Interface Checker Feedbacks:
Feedback 1:
It will works with both
The only thing that you have to do when you want to use Lexia/PP2000 the old platforme is to downgrade the firmware to 4.2.2
When you’ll use the Diagbox this will upgrade then automatically the firmware
PSA Interface Checker is use to downgrade the firmware
Lexia/PP2000 and Diagbox cannot be installed in the same partition ( but you allready know I suppose )
Diagbox include the old lastest Lexia/PP2000 versions
Feedback 2:
Well, there are two pieces of firmware here:
1- The firmware that is flashed at the start of DiagBox (v4.2.8 as shown in the snapshot), it is basically a middle-ware flashed by DiagBox.
2- The firmware that comes with the Hardware and sets on the board permanently (963830 B in your case).
PSA remotely upgraded all genuine VCIs to Revision C and released DiagBox v5.30+ to only work with it, in an attempt to ban clones. Hence, DiagBox v5.29 is that last that works with Rvesion B VCIs. To utilize DiagBox versions higher than v5.29 you need to update from Revision B to C, for this.
DiagBox usually checks the firmware (1) on the VCI ,every time it starts, and upgrade/downgrade as necessary. But this (checking) functionality has been disabled in maitresox releases. I normally leave it enabled and wrote a post on how to restore this automated function (together with the necessary files). However, you can use PSA interface checker to perform it manually.
Every few DiagBox releases, firmware (1) gets an update as well, this is to fix certain issues or to enable new functionality, the last firmware version (4.3.4) was released with DiagBox v7.67 and v8.02. I posted a table of the DiagBox, Lexia and PP2000 versions and the corresponding firmware.