This instruction show you guide on how to remove fuel injection pump for Perkins 800D series engine.
Related Contents:
Perkins EST 2024A & 2023A & 2019A Software Free Download
Perkins SPI2 2018A EPC+Service Manual Free Download
Procedures:
1 Ensure that number one piston is at the top center position on the compression stroke. Refer to Systems Operation, Testing and Adjusting, “Finding Top Center Position for No. 1 Piston”.
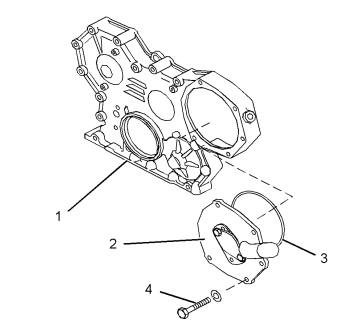
2 Remove bolts (4).
3 Remove plate (2) from front housing (1).
4 Remove O-ring seal (3) from plate (2).
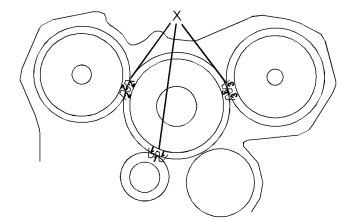
5 Ensure that Timing marks (X) on the teeth of the gears are aligned or make temporary marks on the gears for installation purposes.

6 Loosen bolt (7).
7 Remove fasteners (8), bolt (10) and bracket (9).
8 Support fuel injection pump (6) and remove bolt (7).
9 Remove the assembly of housing (5) and fuel injection pump (6).
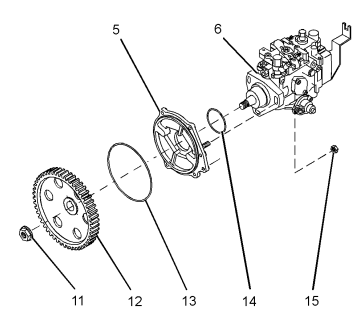
10 Remove O-ring seal (13) from housing (5).
11 Loosen nut (11).
Note: Do not remove the nut at this time.
12 Use Tooling (A) to loosen gear (12). Remove nut (11) and gear (12).
13 If the original fuel injection pump will be installed, mark the flange of fuel injection pump (6) and housing (5). Remove nuts (15).
Note: Refer to Systems Operation, Testing and Adjusting, “Fuel Injection Timing – Check” for the correct method of setting the fuel injection pump timing after installation.
14 Remove housing (5) from fuel injection pump (6).
Remove O-ring seal (14) from housing (5).
More trouble repair case for Perkins,pls refer to:Perkins Trouble Repair