This instruction show you guide on how to remove and replace joystick controllers for JCB 3CX, 4CX, 214e, 214, 215, 217 & VARIANTS backhoe loader.
Related Content:
WinEEM4s JCB Service Tool 2.7.2 2.6.1 Free Download
2024 JCB ServiceMaster 4 v24.3.1 Free Download for Win 10 Win11
2017 JCB Parts Plus+ and Repair Service Manual Free Download
Procedures:
Notice:
Hydraulic fluid at system pressure can injure you. Before disconnecting or connecting hydraulic hoses, stop the engine and operate the controls to release pressure trapped in the hoses. Make sure the engine cannot be started while the hoses are open.
Note that the procedure shows the left hand joystick controller. The removal and replacement procedure for the right hand joystick controller is identical.
Removal
1 Park the machine on firm level ground, engage the parking brake and set the transmission to neutral.
Lower the attachments to the ground and stop the engine.Before attempting to remove a joystick controller, vent the pilot circuit accumulator hydraulic pressure as follows:
2 With the operator seat locked in the rear facing position and with the arm rests raised forward (for backhoe operation), switch the starter to ON without starting the engine. Operate the joystick controls several times to vent the hydraulic pressure from the servo system and backhoe rams. Turn the starter switch to the OFF position and remove the key.
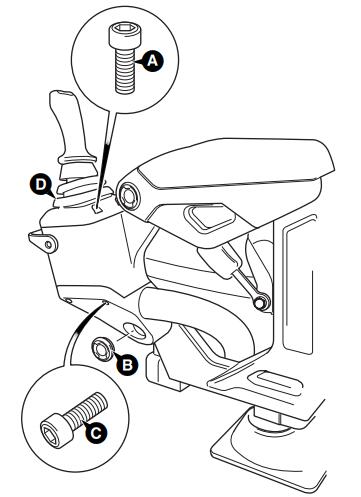
3 Remove the screws A (4 off) and lift off the top retaining plate as shown.
4 Using a screwdriver, carefully prise out the plastic cap B. Remove the screws C (2 off) and take off the lower cover to reveal the connections at the valve block.
5 Disconnect the electrical harness connector for the joystick handle switches.
6 Disconnect all hydraulic hoses from the valve block and plug the ports to prevent ingress of dirt. Label each hose before disconnecting to ensure correct replacement. Plug hose ends to prevent ingress of dirt.
7 Carefully prise back the rubber gaiter D to reveal the fixing bolts (4 off) securing the valve to the arm rest.
Remove the fixing bolts and lift the valve assembly from the seat.JCB ServiceMaster 4 2023
Replacement
Replacement is the reverse of the removal sequence.
Note: All hydraulic adaptors that are installed together with a bonded sealing washer must also have JCB Threadseal applied to the threads of the adaptor.
More repair case for JCB,please refer to:JCB Trouble Repair