This instruction show you guide on how to replace valve cover gasket for BMW 740 E38 M62 engine.For more repair case of BMW,please check BMW Trouble Repair.
Note that the other 7-series cars may have different top ends because of the VANOS changes that BMW made thru the years. As such, this document is specific to cars built after 9/98, but I’d
be willing to venture that earlier cars are not much different. Also, make sure you read this whole document before you start anything. This is a pretty advanced DIY task.
Depending on the state of your valve covers, you may need access to equipment or services that are beyond the average DIYer. Specifically, I needed access to a bead blaster to clean the sealing surfaces of my valve covers. Realizing this is not something most people have access to, I’d highly recommend you read this procedure in its entirety (Steps 16 & 17 in particular) before you commit to anything that may leave your engine open for several days.
Related Contents:
2024.08 BMW Rheingold ISTA+ 4.48.40 4.23.14 ISTA-P 3.71 Free Download
Tools You’ll Need:
• 10mm socket (1/4 drive)
• 1/4 socket extender
• 1/4 ratchet
• Small flathead screwdriver (#1)
• Medium flathead screwdriver (#2)
• T-25 Torx & Driver
• Needle nose pliers
• Cutters
• Hammer
• Drip pan
• Shop vac
• Sharpie felt pen
• Drinking straw
• Metal coat hanger
Disposables You’ll Need:
• Rags
• Engine cleaner (Gunk, for example)
• Glycerin USP (pure glycerin)
• Q-tips
• Masking Tape
Parts You’ll Need:
• 11 12 9 071 589 Passenger Side Gasket Set (1x)
• 11 12 9 071 590 Driver Side Gasket Set (1x)
• 11 12 1 437 395 Rubber Washers (22x)
• Permatex 599BR Sensor Safe RTV Sealant (1 tube, many equivalents)
Procedure: Passenger Sid
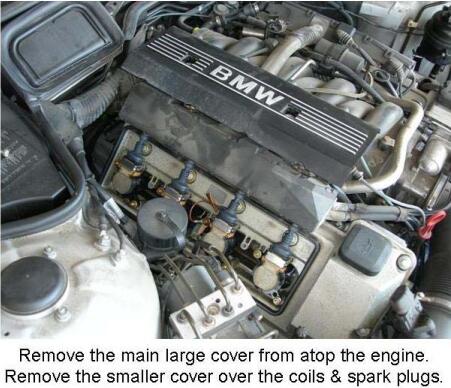
1.Remove the cover from the top of the engine. To do this, individually push down on one of the four buttons while lifting that corner. I used the back side of a Sharpie (felt pen) to push the
buttons without scratching them.
2.Remove the two small square covers from the black plastic BMW logo’d cover. (This cover hides the ignition coils and spark plugs.) I used a small screwdriver to pry them off. Remove the two bolts with a 10mm socket.
3.Remove the ignition coil cover from the valve cover. There’s a gasket between the two which will likely stick the two together. Grab either end of the plastic cover and peel it away from the gasket.
4.Number each of the coils so that you can put them back in the same place.I numbered 1-4, starting with 1 at the back of the engine. I’m not sure this is a critical step, since I don’t see why it would matter where you put them back. But,better safe than sorry.
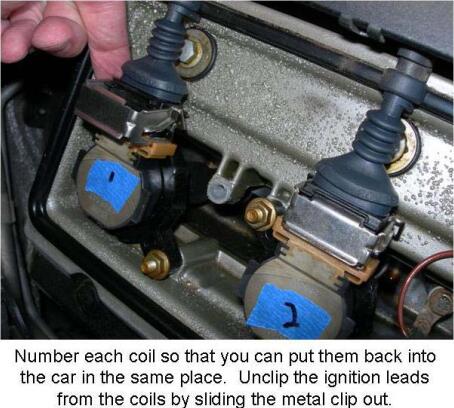
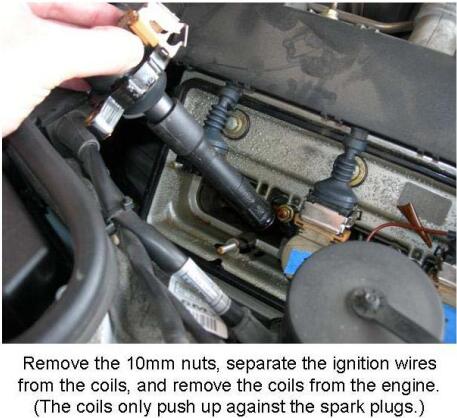
5.Slide the metal clips forward to unlock the wires from the coils. Remove the 10mm nuts from each of the coils and pull the coils out from the engine, disconnecting the wires as you pull.
Note that the coils connect to the spark plugs by simply pushing up against them with spring force
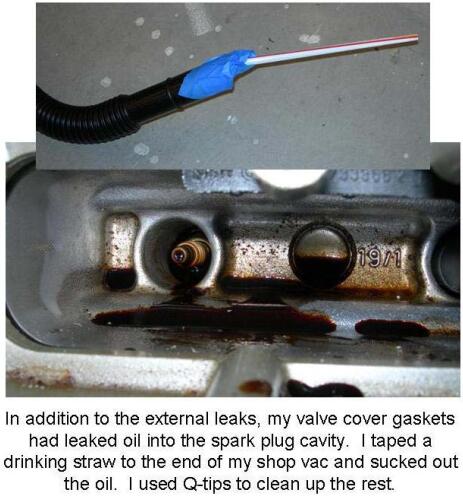
6.Check your spark plug valley for oil that may have leaked past a bad inner gasket. I had a relatively minor leak into the rearmost spark plug area that was not causing me any ignition problems. I removed the oil by taping a drinking straw to my shop vac (i.e., mini-shopvac) and poking around by the spark plug. I used Q-tips to do the rest of the cleanup. The coils may also need some attention to get oil out of them.
7.Clean your engine as good as you can to keep junk from falling inside once you remove the cover. Blow the engine off to clear any dirt or other chunks. Carefully apply Gunk engine cleaner (or equivalent) around the outside of the valve cover, trying your best to avoid all things electrical. After letting Gunk soak for 15 minutes, I wiped off the engine with rags to get 90% of the crud. I then used my garden hose at the lowest flow I could muster to rinse off the engine. I used a large drip pan under my engine to catch all of the filthy run-off. (A word of warning: In California and perhaps other states, it is ILLEGAL to wash your engine in the driveway or street,and cops will happily give you a ticket if they catch you. Make sure you catch all the run-off and dispose of it properly, and not let it flow into the ground or down a storm drain.)
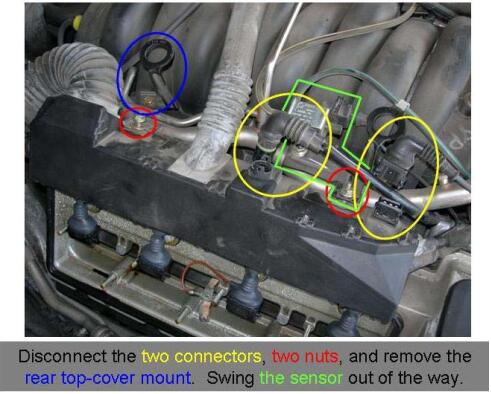
8.Disconnect the two electrical connectors to the wiring box. The circular connector just pulls out. The rectangular connector has a metal retainer that you need to pull out to remove the connector. Remove the two nuts that screw the box to the engine. Swing the sensor bracket from under the front nut out of the way onto the top of the engine. Remove the rear top cover mount with a 10mm wrench. Prepare to do battle.
9.The TIS would have you believe that you can simply fold the wiring box over the top of the engine to give you access to the cover. The TIS is wrong. Very wrong. The passenger side wiring box is a huge pain for two reasons: First,it connects to the chassis via a large flexible conduit, so you can’t really ever swing it out of the way. The second – and much larger – problem is the fuel injectors. The wiring box sits on top of the fuel injectors and is attached to them via four plastic connectors. Unfortunately,each of the four connectors is individually retained to its corresponding fuel injector with a small metal clip.
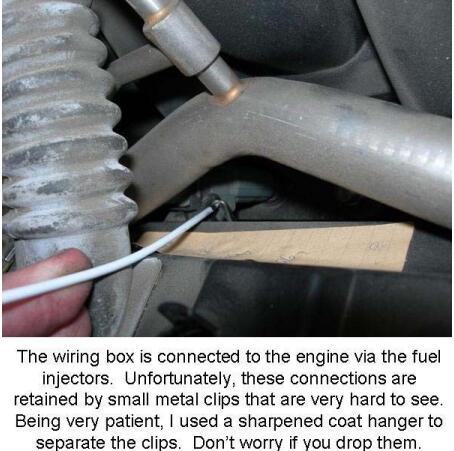
To remove the clips, cut the long straight section out of a coat hanger and sharpen one end.Visually locate each of the four clips by looking down between the wiring box and fuel rail (the~1” diameter silver pipe). You have to thoroughly separate each clip from its connector, making sure you get both sides of each clip free.Use your sharpened coat hanger to stab at the clips, prying them away from the connector untilthey fall free. (In most cases I was able to completely free the clip by prying from only one side.) Don’t worry if you drop the clips since you’ll be able to find them pretty easily. And,don’t worry if you bend them… you’ll have an opportunity to reshape them once the box is loose.
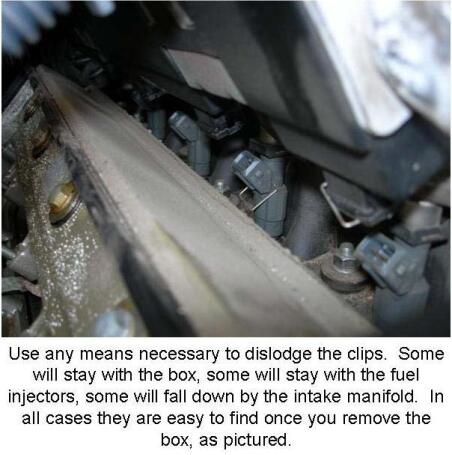
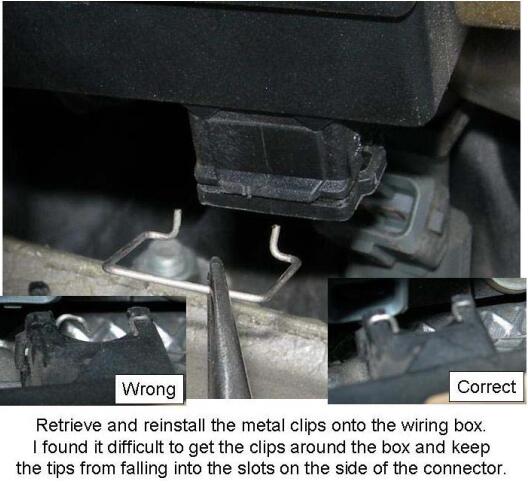
10.With the clips removed, pull the box off the engine. If you find that it is sticking, you probably didn’t get a clip fully dislodged from both sides. Once off, locate all the clips and reinstall them onto the wiring box. I found this to be the hardest part of the task, since the clips will tend to fall through the connector, rather than wrap around it.
It’s very useful to have a helper hold the box for you while you get these clips back in place.
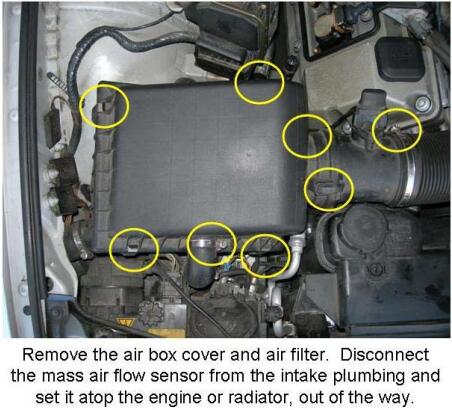
11.Remove the air box cover and air filter. I took this opportunity to blow off my air filter,getting rid of all the little rocks that the road kicks up. Disconnect your mass air flow (MAF) sensor from the plumbing to the engine. Swing it up and out of the way of the forthcoming valve cover.
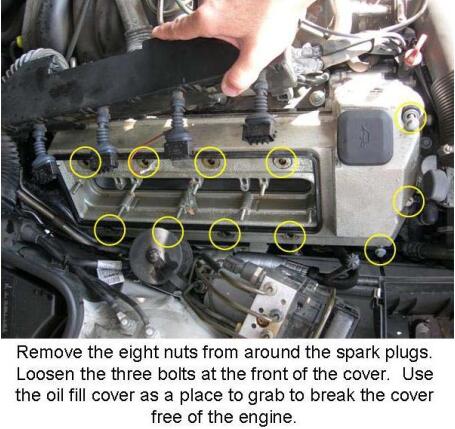
12.From the valve cover, remove the eight nuts around the spark plugs, and the three bolts from the front of the engine. The metal & rubber washers and the bolts will probably remain stuck to the cover. Leave the oil fill cap in place, as it will be needed in the next step.
13.The valve cover will be tenaciously stuck to the engine and will require considerable force to remove. Grab the oil fill cap with both hands and rock the cover back and forth to break it free. It took me about five minutes of wholecar-rocking to get the cover to start to separate.
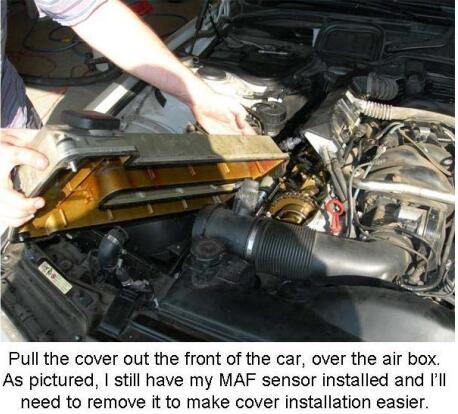
Once the seal is partially broken, you can sorta peal the cover away from the engine. Pull the separated cover out the front of the car over the air box.
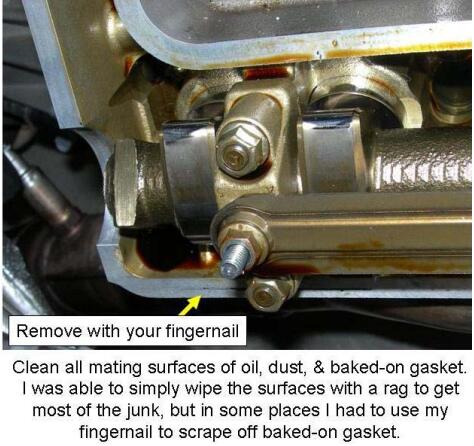
14.Clean the engine’s inner and outer sealing surfaces thoroughly. Start by wiping them with a rag to remove oil and dust. Remove any old sealant from around the half moons at the back of the engine, and from around the timing chain cover interface at the front of the engine.
Scrape any burned-on gasket from the sealing surface with your fingernail. Try to keep anything from falling into the open engine.
Large things like clips, tools, etc., must-mustmust be removed from the engine. Smaller stuff like dust, a bit of sealant, etc., is not ideal,but won’t hurt anything if you can’t get it out.
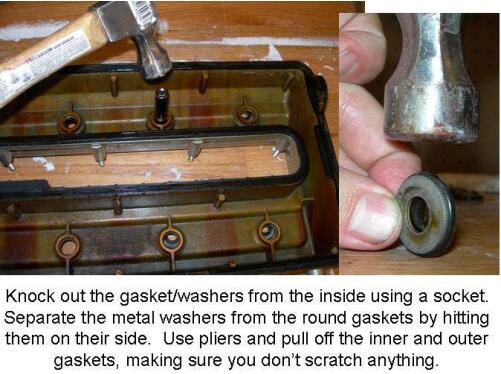
15.Most likely your valve cover will require significant cleaning before it can be reinstalled. Start by removing the rubber washers from the cover. I found this easiest by simply using a socket and popping them out from the inside. Separate the metal washers from the rubber washers by gently hitting them on edge. Pull the inner and outer gaskets off the cover using pliers.
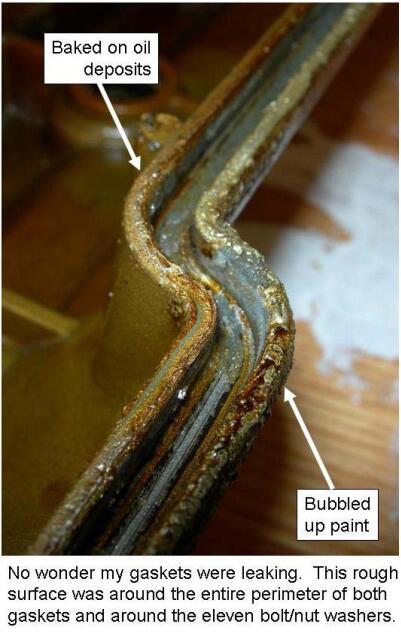
16.My valve cover’s sealing surfaces were just awful.The T-shaped gasket sits down inside the valley between the two sealing surfaces. The inner sealing surfaces were covered with bubbled, rough, bakedon oil deposits. The outside sealing surfaces were covered with more of the oil, but also the bubbly coating that BMW puts on the outside of the covers.
My guess is that these rough surfaces matured with time and are ultimately responsible for the leaks I had. I felt I had to smooth these surfaces before I could put the cover back in the car and feel confident it would seal.
17.Remove the oil fill cap and the gasket from around the spark plug valley (keep both) so that your valve cover is now only metal. Clean off the sealing surfaces for the gaskets and rubber washers. I started by putting the cover in a big trash can and Gunking it. This got off a good portion of the crud on the inside of the cover but did nothing for the sealing surfaces. I then repeatedly washed the cover in a bucket with car wash. This cleaned it a bit better, but still didn’t touch the sealing surfaces. Next, I tried a 320 grit sanding block on the sealing surfaces, then
steel wool. This made a minor improvement. So here’s the bad news: I finally got them clean by taking the cover to work and using a bead blaster to take off the crud around both the inside and outside perimeter, as well as around the eleven mounting holes. I’m sure 99% of you don’t have access to a bead blaster, so I’m not sure what to tell you. Maybe there’s a different solvent that would take the crud off. However, if you have time to kill with your engine exposed to the world, I’d highly recommend taking the cover to a powder coating place and having them redo the finish in its entirety. They should be able to get the cover clean, and put a nice new finish (that won’t bubble) on the outside of the cover.

18.The TIS calls for the new gaskets to be lightly coated in glycerin, supposedly to make them seat move evenly in the valve cover. I like the idea of the glycerin making the gasket slick and better able to seat, but I’m not sure why I couldn’t have used motor oil, which would have been much easier to locate. I had a hard time finding pure glycerin, but finally found it in the “skinned knee” section of a mom-and-pop pharmacy. Put a small puddle of the stuff in your hand and then drag the two gaskets thru to coat them. Once coated, gently install the new gaskets into the cover, making sure they are not stretched. (The internal gasket can be installed in either rotation.) With rubber gaskets, you should only push straight down on them and not drag your finger around the perimeter. This keeps stretching to a minimum.
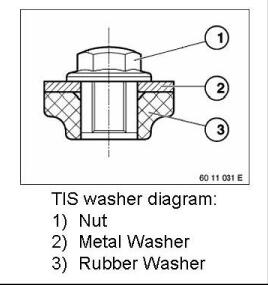
19.Prepare the retaining hardware by assembling your new rubber washers and the old metal washers as nuts. The metal washer should be in contact with the nut, and the rubber washer should have its flat side against the metal washer. The bolts are analogous.
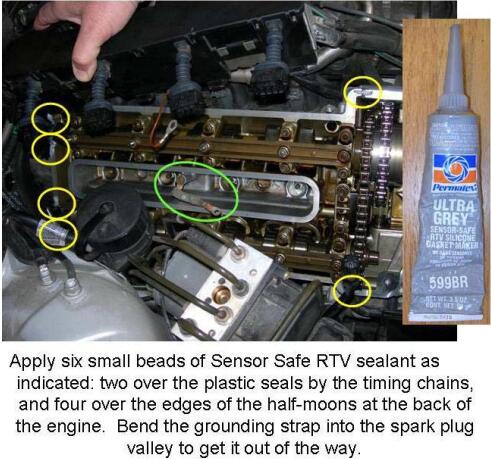
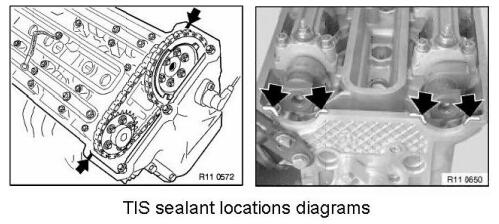
20.Prepare the engine for the valve cover by fold the grounding strap over into the spark plug valley to get it out of the way. Apply six small beads of Sensor Safe RTV sealant.Four of the beads go at the sharp transitions of the half moons to flats at the back of the engine. The other two go over the exposed rubber ends of the timing chain cover gaskets at the front of the engine. Make the beads about 1/8” diameter by 1” long each,split evenly across the “events” at each location. I got a bit of the goop on my timing chain and on the top of the cam towers, but I wiped it off as best I could and crossed my fingers for an effective oil filter… the car still runs just fine 4 weeks later.
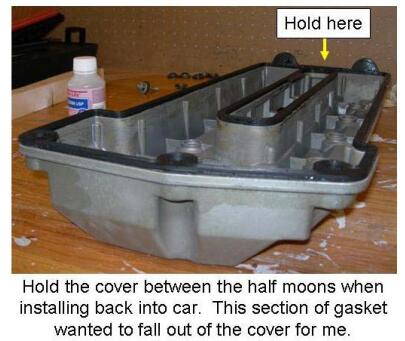
21.Grab the cover between the half moons in back and under the front edge. I found that the glycerin does indeed do a good job of letting the gasket float, so much in fact that it wants to fall out when you invert the cover. Hide the children, queue up your pirate vocabulary, and put the cover on the engine, releasing explicatives as you repeatedly drop the gasket. I found it very useful to have a helper hold the wiring box up and out of the way during this step. Even so, it took me about five tries to finally get the cover into position, all the while making a real mess with the RTV goop. To ensure a good seal, make sure you redo the RTV sealant if you mess it up too bad. Once you finally get the cover into place, make sure the half moons (and the rest of the gasket) are properly seated. Hold the cover in place with one nut and bolt (there’s a picture of this for the driver side below in Step 35) while you get the rest of the hardware started.
22.The TIS calls for the cover nuts and bolts to be tightened to 10-15 Nm, tightening them sequentially from the inside of the cover outward. I used a torque wrench to determine what 10-15Nm felt like (10Nm is the lowest reading on my torque wrench, so I take it with a grain of salt). Basically, it feels tight without having to lean into the wrench. Install the nuts and bolts and take about three laps around the group with your wrench, with the last lap being where they all get tightened to 10-15Nm. See the diagram for my recommended tightening pattern.
23.Make sure all the clips are still on the wiring box from Step 10 and press the box back down onto the fuel injectors. Check to make sure that all of the clips have properly engaged and the
grey fuel injectors have a good connection with the wiring box.
24.Reposition the metal tabs on the wiring box over the threaded studs. Reinstall the bracket mounted sensor over the stud and reinstall the washer (rear only) and nuts. Plug the two
connectors back in and reinstall the locking clip on the rectangular one. Reinstall the rear cover
mount. Hand tighten the bolt.
25.If you removed it when cleaning the covers, reinstall the gasket that goes around the spark plug valley.
26.Reinstall the ignition coils. Reconnect the grounding wires to the third coil’s rearward stud between the coil and the nut. (The grounding wires must not be installed between the coil and engine or the coil won’t make proper contact with the spark plug.) Install the 10mm nuts and hand tighten. Reconnect the ignition wires to the coils by pulling the metal slide the locking tab toward the engine. Remove the masking tape numbers from the coils.
27.Reinstall the MAF sensor, air filter, and air box cover.
28.Reinstall the cover over the coils, making the bolts hand tight. Reinstall the little square covers.
29.Give everything a good visual once over, making sure nothing is pinched, the electrical connections are all back together, and the gasket is seated properly. Check to make sure you’ve collected all of your tools from the various places you set them down in the engine compartment.
30.Give the wiring box and coil covers a nice wipe down with Armor All to make them black again. Heck, give anything and everything made out of black plastic a wipe down.
31.Start the car and listen for anything that sounds wrong. Pull the car out into open air (if you’ve been in the garage) and let it idle for 15 minutes with the hood open. The engine cleaner will smoke and stink as the engine warms up and burns it off.
Procedure: Driver Side
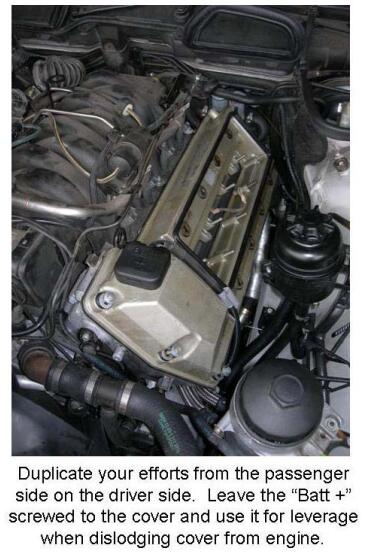
32.Let the engine cool down completely before you start the opposite side. The passenger side is certainly the tougher of the two sides and you’re already done with that, so you’re definitely on the downhill side of this project. The driver side procedure is analogous to the passenger side, but there is no electrical umbilical to the chassis that prevents you from swinging the electronics box completely out of the way. (You will have to deal with those damn clips for the fuel injectors…) Make sure you follow the same steps as before and use common sense.
Clean the engine properly, disconnect and unscrew as you see fit, and work with your brain, not these instructions. Remove all the same stuff you did before, but leave the positive battery terminal connected to the cover to act as a grip.
22
33.Once you’ve broken the cover free, use a T-25 Torx wrench and unscrew the “Batt +” box from the cover. Close the lid to the cover to protect the positive terminal inside and swing it out of the way.Make sure that none of the metal in the positive terminal is able to contact anything outside the box:the entire car is the negative terminal, so sparks will fly. In fact, you can weld with a car battery, so imagine the damage if the positive terminal came in contact with a sealing surface, the fuel rail, your paint… you get the picture. Baaaaad things.
23
34.Remove the valve cover from the car and clean it up as before. When I installed the gasket on the driver side I put the RTV sealant on the gasket instead of the engine. I don’t think it matters which surface gets it, so long as it’s in the right place.
24
35.After you’ve made sure your gasket is in position, hold the cover in place with a nut and screw while you get the rest of the hardware in position. Tighten the hardware as you did for the other side.
36.Reinstall everything (you’re a pro now) and give the engine compartment a once over to look for loose connectors, tools,ill-seated gaskets, etc. My guess is that you did a good job.
37.Run the engine in open air to burn off the cleaner, then reinstall the top cover. You’re done!
25