AIPDN has consolidated kingpin replacement kits to a single type of kit. This kit comes with two (2) thin kingpin thrust bearings. If the vehicle you are servicing arrived equipped with a thicker kingpin thrust bearing on the passenger side, you will have to install a spacer in order to utilize the new thinner bearing in the kingpin replacement kit.
Related Contents:
ISUZU US-IDSS II 2024 2019 Diagnostic Software Free Download
2023 2019 Isuzu G-IDSS Export Diagnostic Software Free Download
Isuzu recommends replacing all the kingpin thrust bearing spacers with new parts anytime a new kingpin replacement kit is installed. These spacers are not included in the kingpin replacement kits.
This bulletin also addresses a number of concerns that may arise when installing kingpin replacement kits.
INSTRUCTIONS
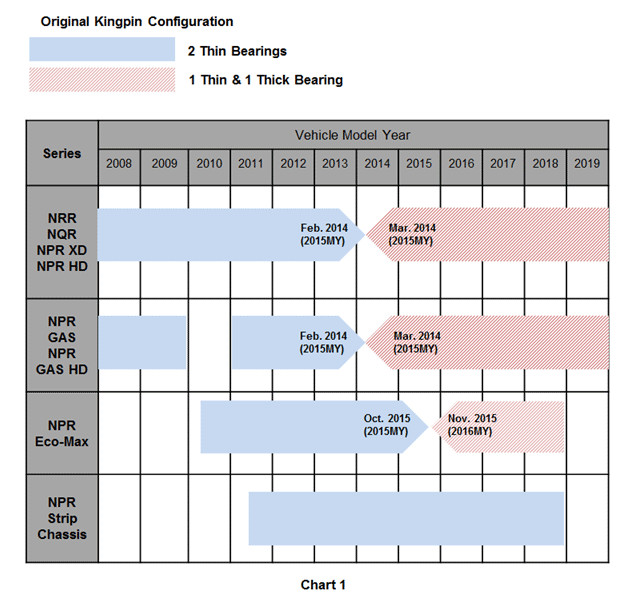
Original Thrust Bearing Configuration
2008 and newer N-Series vehicles may be equipped with two different thrust bearing configurations, depending on the model and production date (see Chart 1). Use this chart to determine if you will need a spacer to complete the repair, as AIPDN will be providing kingpin replacement kits that come only with two thin thrust bearings.
NOTE: Isuzu recommends replacing any spacers with new parts (P/No.8-94168-490-0) anytime a kingpin replacement kit is installed.
NOTE: If your dealership has any of the original kingpin replacement kits that were applicable to the vehicle you are servicing in stock, continue to install those kits until you exhaust the stock.
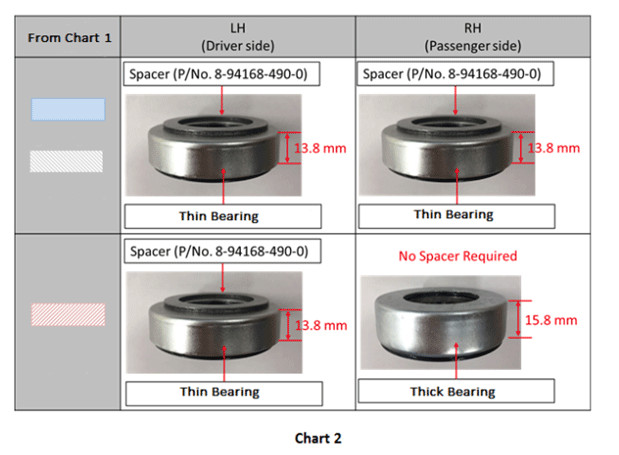
Thrust Bearing Differences and Locations
Depending on model year and production date 2008MY – current N-Series kingpin thrust bearings were originally configured in two (2) different ways:
- With thin (13.8mm) bearings and a spacer on both the left and right hand sides.
- With a thin bearing and spacer on the LH (Driver) side and a thick (15.8mm) bearing on the RH (Passenger) side.
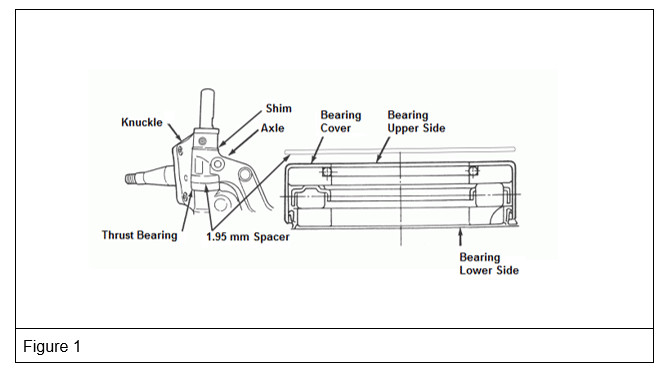
Spacer Installation
When installing the thinner (13.8 mm) thrust bearings, a 1.95 mm spacer must be installed on the top of each bearing. (See Figure 1.)
Refer to Chart 2 for clarification.
IMPORTANT: 1.95mm spacers (P/No. 8-94168-490-0) are not included in the kingpin kit. Dealerships must order these spacers separately.
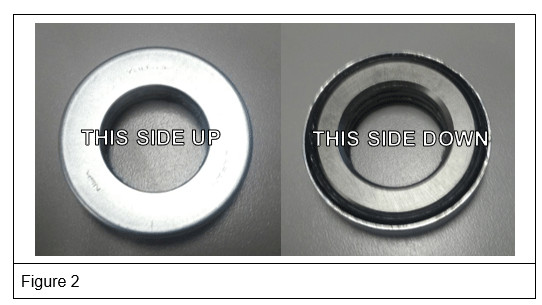
Thrust Bearing Installation Direction
When the thrust bearings are installed, the seal on the bearing should be facing downward.
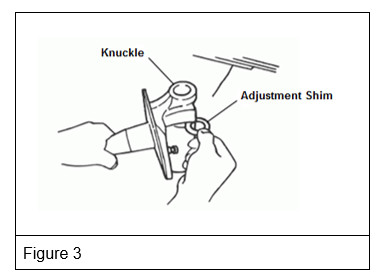
Shim Installation
Shims are used to adjust the steering knuckle to axle clearance. (See Figure 3.) The shims are installed on the top of the axle as shown in Figure 3. Shims are available in different thicknesses. No more than two (2) shims should be installed. (See Figure 4 for an illustration of incorrect spacer and shim usage.) Refer to the applicable Isuzu Workshop Manual (WSM) for further instructions and clearance specifications.
These shims are not included in the kingpin replacement kit. Isuzu recommends replacing these shims with new ones whenever the kingpin is replaced.

Grease Seal Installation
The grease seals for the kingpins are installed in the underside of the top flange of the steering knuckle
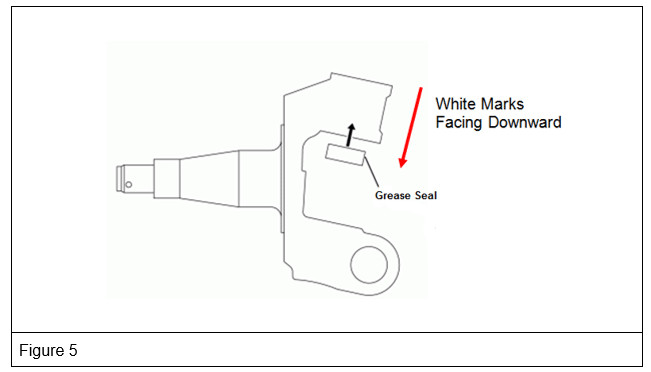
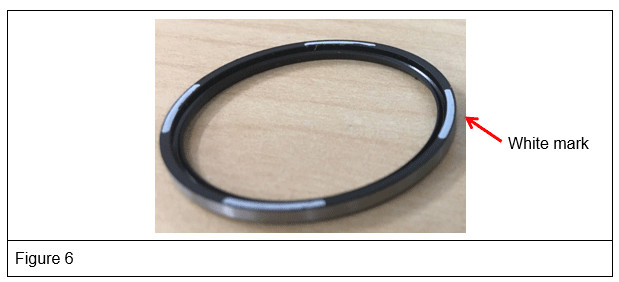
It is important to install these grease seals in the proper direction to allow grease to be discharged. Each seal has white marks on the downward side of the seal. (See Figure 6.)
IMPORTANT: Be sure to install these seals with the white marks facing down.
Kingpin Bushing Installation
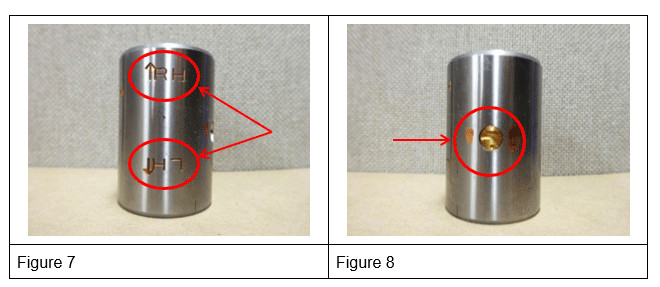
Each kingpin bushing must be installed in the proper direction. Therefore, all new bushings are clearly marked ? LH (for the left/driver side) and ? RH (for the right/passenger side). (See Figure 7.) The arrows must be facing upwards for the applicable side when the bushings are installed.
Additionally, each bushing has a hole in the side (see Figure 8) that allows the entry of grease from the grease fitting installed on the steering knuckle. When installing the bushings, ensure that each hole in the bushing aligns with the grease fitting opening on the steering knuckle.
Use special tools grip CH 50439 and bushing repair tool CH 50440 (A) for removal of the kingpin bushings. Use special tools grip CH 50439 and bushing repair tool CH 50440 (A) and (B) for installation of the kingpin bushings.
Lower Sealing Plug Installation
Before installing the kingpin sealing plug in the bottom of the knuckle, apply Three Bond 1215 (Isuzu Part Number 2-90067-710-0 or equivalent) to the sealing plug.
Upper Seal Installation
Kingpin Replacement Kits may come with one of two different upper seals: a smaller diamater seal with a 14mm head retaining bolt, and a revised, larger diameter seal with a 21mm retaining bolt.
Tighten the smaller 14mm retaining bolt to 32 N·m (24 lb·ft).
Tighten the larger 21mm retaining bolt to 45 N·m (33 lb·ft).
Grease Fittings Installation
Over time grease fittings can become clogged with debris and dried grease. Therefore, kingpin kits all come with four (4) new grease fittings. Make sure to replace all four (two on each side) grease fittings with the new fittings.
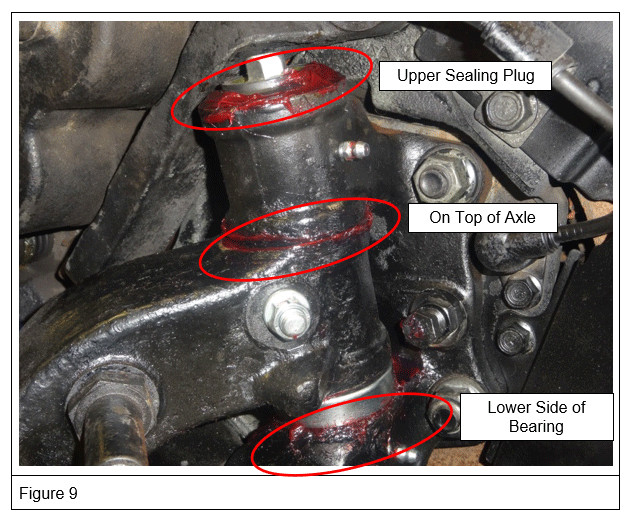
Lubricating the Kingpins
When the installation of the kingpins is completed, use a grease gun to inject grease at each of the four (4) grease fittings. Continue to inject grease until new grease is seen in a complete circle around each kingpin upper sealing plug and at each pivot point (two per side).
For more guide about ISUZU,please refer to:ISUZU Trouble Repair.