Here is a instruction show you guide on how to remove the auxiliary section in chassis for fuller heavy-duty Eaton transmissions TRSM1500.
Related Contents:
2022 EATON ServiceRanger 4.10 and 4.2 + Activator Free Download
Special Tools
• See Tool Information (see Table 6)
• Item T2: Auxiliary section hanger
• Item T14: Auxiliary section removal adapter plate
• A hoist with lifting chain
Procedure –
1.Drain the transmission oil.
2.Disconnect the driveshaft and U-joint from the output yoke.
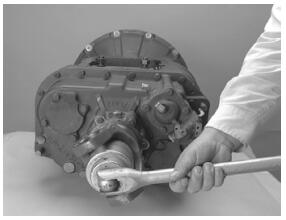
3.If the auxiliary section is to be disassembled, remove the output nut. To prevent the output shaft from rotating while removing the nut, engage the transmission into two gears or use a yoke holding tool.
4.Disconnect the vehicle air supply line from the filter regulator assembly.
5.Mark the locations and disconnect the large rubber air lines placing them aside.
6.Label and remove the small air lines.
7.Remove the four (4) capscrews and the auxiliary countershaft rear bearing cover, gasket, and rear bearing shim.
8.Install the auxiliary countershaft retaining straps with 2-3/8″
NC x 1″ and 1-3/8″ NC x 1-1/2″ clean capscrews.
Note: Do not use an air gun. Tighten by hand until the capscrews are snug.
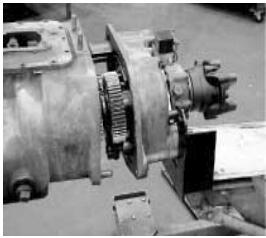
9.Drive the two dowel pins forward, and remove them.
10.Remove all but one capscrew that secure the auxiliary section to the main section. Leave one capscrew to secure the housing until it is ready to be removed.
Note:Capscrews are different lengths. Note their locations for reassembly purposes.
Use the proper equipment with safety chains attached to remove the auxiliary section. The auxiliary section can slide rearward and could fall, causing you serious injury and/or
damage to the auxiliary section.
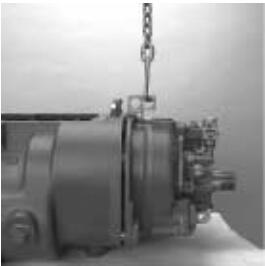
11.Attach a chain and lifting device to the auxiliary section hanger, or attach the support jack to the auxiliary section (as shown in the pictures to the left).
12.With the support device in position, remove the remaining capscrew. If necessary, 3 capscrews can be installed into the three threaded holes in the auxiliary section flange. When threaded in they will push the auxiliary section rearward.
Clean the holes of rust, paint, and other debris by threading a 3/8-16 tap into each hole. Thread each capscrew in evenly to prevent damage to the auxiliary housing.
The weight of the auxiliary section must be supported during removal to avoid damage to internal transmission parts.
13.Support the weight of the auxiliary section with a lifting device or support jack and move the auxiliary section rearward until it is free from the front section of the transmission.
More repair case for Eaton,please refer to:Eaton Transmission Trouble Repair