This article tells how to retrofit the smart opener to a 2011 BMW 5 series (F10). The smart
opener is a way to open the boot (trunk) by waving your foot under the bottom of the bumper.
Model year 2012 cars with comfort access have this feature as standard but early F10’s do not have this feature. However it’s possible to install the components and retrofit this feature.
2024.08 BMW Rheingold ISTA+ 4.48.40 4.23.14 ISTA-P 3.71 Free Download
Firstly,big thanks to the bimmerfest member riku2,this post is written originally by him,at end article i will put the original website link.
What is the smart opener?
Smart opener is known by many names, all are the same thing. You will see many different names
even in BMW material and tools such as Rheingold:
Smart opener
Kick to open trunk
Non contact rear lid opening
Contact-free tailgate opening
Smart opener only works in conjunction with comfort access (option SA322). F10’s with comfort
access from model year 2012 (built late 2011 onwards) have smart opener as part of their comfort access system. Cars before model year 2012 with comfort access did not have the smart opener feature.
Smart opener cannot be ordered separately. It’s included with comfort access. For this reason you will not find it listed as a separate option code.
Smart opener is not related to powered trunk lid (option SA316 automatic trunk lid mechanism).
That refers to a motor opening and closing the lid. Smart opener is compatible with both
motorized/un-motorized versions. In the powered version the lid opens slowly with a motor, without option SA316 the lid springs up without motor assistance.
Adding smart opener to non-comfort access cars is very hard (without comfort access anybody
would be able to kick their foot under the boot to open it), so it only works in conjunction with
comfort access. Retrofit of comfort access is quite difficult and most postings say it’s almost
impossible due to the number of changes needed.
For model year 2014 onwards there is a smart close feature: the reverse of smart opener and by
waving your foot under the bumper the lid will close but this does need option SA316 since the
motor will CLOSE the trunk. Smart close is not discussed here.
How do you use smart opener and how does it work?
Behind the rear bumper there are two strip sensors about 1metre long mounted above each other.There is also a small control unit which interfaces to the footwell module and from there to the car access system (CAS).
The picture below shows the sensors in a cross section view of the rear bumper.
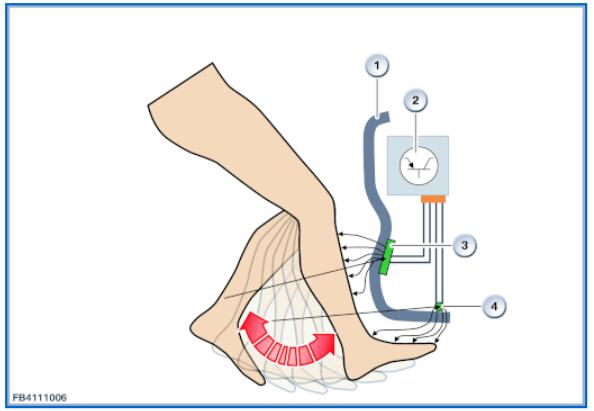
- Bumper
- Evaluation electronics for contact-free tailgate opening
- Top sensor
- Bottom sensor
For the lid to open, the following three conditions must be satisfied:
- The key fob has to be close to the rear of the car (less than about 1 metre). Normally it will
be in your pocket.
- The top sensor has to detect something close to it (approx. less than 30cm from the
bumper). This is normally your shin.
- The bottom sensor must detect nothing under it, then briefly something under it such as
your foot. The foot should be there for less than a second. Longer than that and the action is
not recognized.
All three conditions are needed for the opening to work. If you do the action right then it works
almost 100% of the time. It’s not affected by cold weather or snow on the bumper (I live in Finland and -30 degrees and lots of snow are common). Your foot does not have to touch the bumper at any time.
Here are some reasons the action will not work
You do not have the key with you (does not satisfy condition #1). Even if the car is unlocked the
smart opener still needs the key to be near the rear bumper.
You keep your foot under the bumper too long or move it from side to side. This does not satisfy
the “briefly” part of condition #3.
You walk up to the car and immediately put your foot under the bumper. This does not satisfy
condition 2. This is probably to avoid triggering by animals such as cats walking under the car.
About the retrofit I added the smart opener to my car because it was a March 2011 build and had comfort access but not the smart opener feature. Since my previous car was a 2012 build I really missed the smart opener. Since my 2011 car had comfort access I thought it might be possible to add the smart opener feature and with the right parts it is possible.
You will need to add the parts under the rear bumper and then run a cable from the control unit
under the bumper into the front of the car and wire in the control unit. You must then update the
software for the footwell module (FRM) to enable the smart opener feature.
Parts details
You can find details of parts on these two sites
Parts needed (5 series F10)
There are five main parts needed under the rear bumper. Part numbers can vary by model. Use the resources above to check the exact part numbers. The part numbers also change over time.
| Part | Part number | Cost new euros |
| Sensor lead,Smart Opener,top | 61357391042 | 23 |
| Sensor lead,Smart Opener,bottom | 61357391043 | 15 |
| Control unit,Smart Opener | 61357422700 | 170 |
| Adapter | 51127299970 | 20 |
| Repair kit,socket housing | 61132359997 | 15 |
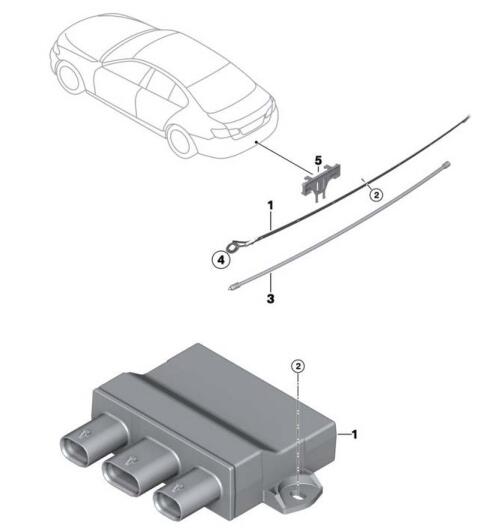
The pictures below show the parts. The first picture shows the top sensor (item 1) and bottom
sensor wires (item 3). Part #5 is part of comfort access and not related to smart opener. Some clips are needed for the top sensor and those can be found on the parts diagram at realoem.
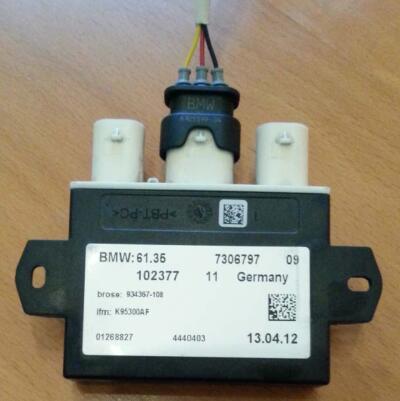
In the second picture is the control module itself. It has three sockets for the footwell module
connection and upper and lower sensors. The sensors come with cable and plug attached but you
will need to make a cable from the control module to the footwell module and for that you will need the connector (“socket housing” in the parts list above).
The top and bottom sensors have slightly different connectors so it’s impossible to plug them into the control unit the wrong way around.
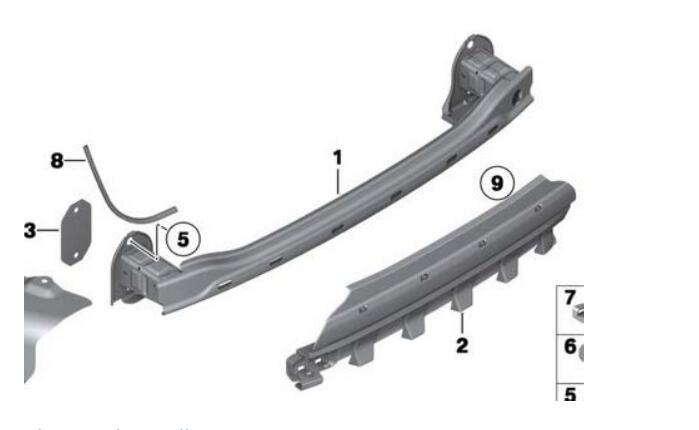
Finally under the bumper is a black plastic support about 50cm wide (item #2 below, called
“adapter” in the parts list). This holds the sensor cables and control unit. For cars like mine (MY
2011) you need to change this part to a more recent one that has clips for the sensor cables and
control unit. In the parts picture below the non-smart opener compatible version is shown. Photos later in the document show the smart opener compatible version. The adapter is listed under“carrier rear” in parts lists.
It was not obvious that the “adapter” was needed since it’s not listed as part of comfort access. But by checking the dates it seems this part is changed in 09.2011 so probably every car made since thenhas the adapter with clips ready for smart opener, regardless of whether comfort access is fitted or not.
Electrical installation
I will cover the electrical installation first because before fitting the parts it’s worthwhile checking that they work and that you can update the car’s software to recognize them.
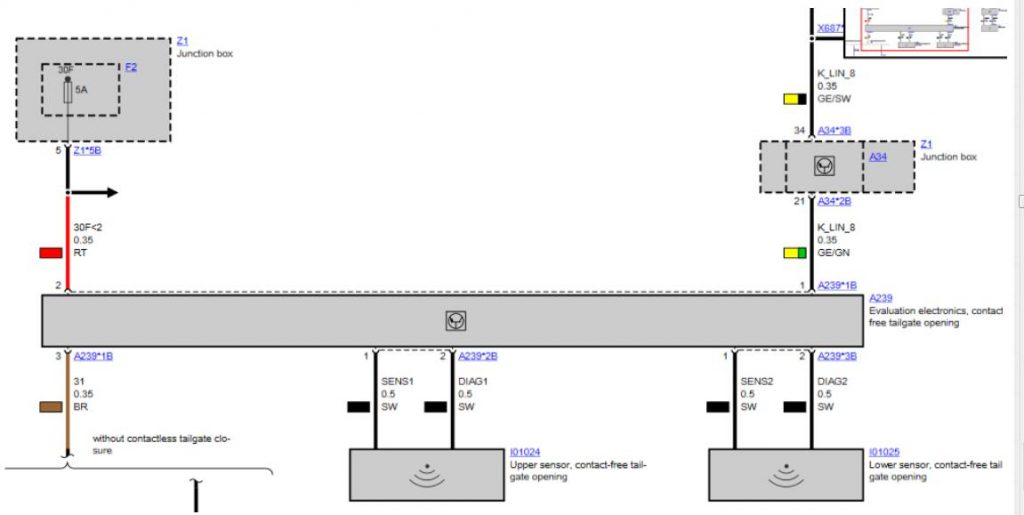
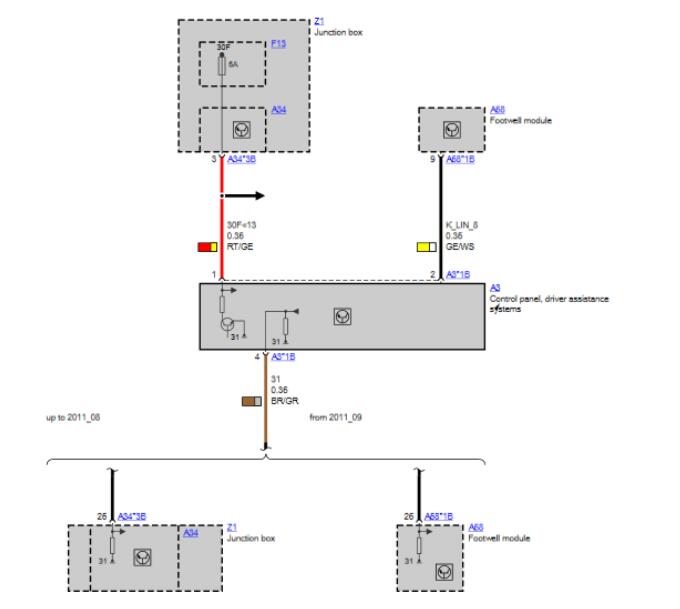
The following picture shows the wiring for the smart opener (called here evaluation electronics
contact-free tailgate opening). The two connectors to the upper and lower sensors come with the
sensors themselves and will present no problem but you will need to wire the three pin connector to the footwell module’s LIN bus (yellow and green wire in this picture).
In the picture below you can see this middle connector in place connected to the control module. I have used different colours to the factor colours but they are similar.
| Cable | Factory colour | My colur |
| 12v power | Read | red |
| Ground | Brown | black |
| K_LIN_8(LIN BUS) | Yellow/Green | yellow |
You can see the order of the cables in the picture below (yellow, red, black).
The reverse of the connector has a catch to hold the connector in place.
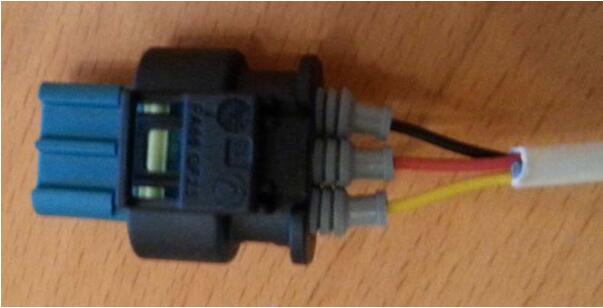
When you buy the connector the pins are separate, so connect those to the cables and push them into the connector in the alignment shown below (I have soldered them instead of crimping). They will click into place once you have pushed them in far enough (you will need a small screwdriver to push them fully into place). Once all three pins are in place snap down the blue plastic catch on the right.
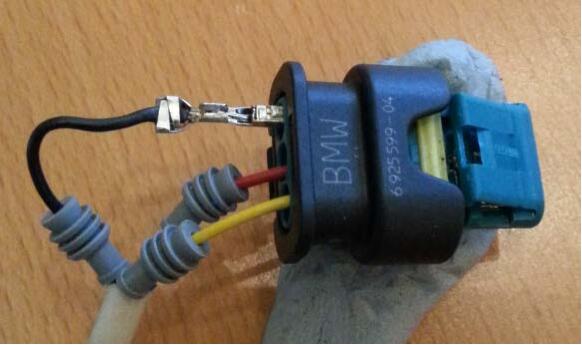
Later I discovered I had installed the three rubber boots the wrong way around. They should be
installed in the reverse orientation to the photo above.
Connecting the control unit cable
For this step will you need access to the wiring diagrams for your car. By doing this I realized the
same LIN bus connection was also used for the driver assistance module underneath the light switch (this is for heads up display, lane change warning etc). It has identical 12v, ground and K_LIN_8 connections. This made wiring the smart opener control unit really easy since those wires are easy to access. Later I found out that the light switch has the same three cables (12v, ground, LIN bus) available and if your car does not have driver assistance then you can use those wires instead.
For temporary testing you can lever off the light switch and driver assistance panel and access the cables behind. Wire in the cable (either temporarily if testing or permanently) to the appropriate connections. The colours are vaguely similar at both ends of the car (red, brown, yellow) so it should not be too hard to match them up.
Coding/software changes
Before the module works you must update the footwell module software. There are two changes
needed and you can do both of them using E-Sys software:
- You must have firmware in the footwell module new enough to recognize the smart opener
(updating this is sometimes called flashing an ECU)
- You must enable the smart opener sensor (known as “coding”)
Start with step #2 and check the footwell module (FRM) and find setting 3000 SMART_OPENER_VERBAUT and set this to aktiv.
Here are some article about BMW FRM:
BMW FRM Module Reset: Short Circuit Counter
How to Remove BMW FRM Footwell Module
BMW FRM Module Repair Guide (Not Need Replacement)
FRM Footwell Module Knowledge All Here
If you can’t find this setting then your footwell module software is too old and you must do step #1 above to update the firmware. Once you update the firmware you will have a new cafd file and the smart opener setting should be there and then you can try step#2 again. By chance my 2011 car had already been updated sometime during its life and it had 2013 software and step#1 was not needed. Only step #2 was needed for my car.
You can read some information about step #1 in bimmerfest coding forum here: Flash all ECU’s with E-Sys This step is not the same as coding. With coding you update the setting for something
controlled by an ECUs. In step #1 you update the software (firmware) of the module itself. Hopefully you will not have to update too many other modules (since there are sometimes dependencies between one module and another). One post I read said that a new footwell module (FRM) was needed for this change but this doesn’t seem necessary, only new firmware for your existing FRM module.
If you have connected the smart opener control unit and sensor cables and done the coding then
you can try out the smart opener (even if it’s not installed on the rear bumper yet). For this kind of testing you must not hold the smart opener panel itself since the system would recognize your hand and kicking it would not work. Rest the panel against a wall and kick sideways and it should
recognize your foot. If it works you are all set for installation under the bumper itself.
Installation of the parts under the bumper
This step takes several hours since you must remove the rear bumper and then route the cable from the smart opener control unit to the front of the car.
To remove the rear bumper takes approximately two hours. There are good instructions and
pictures here: How to remove rear bumper
I recommend you clean the car before doing this since too much dirt in the bumper seams might
cause scratches while you prise the bumper from the car.
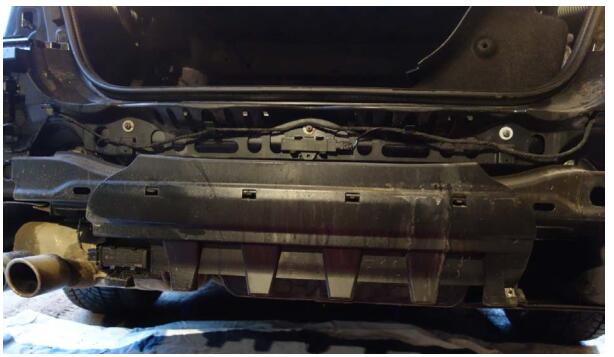
Once the bumper is removed you will see the support panel clipped to the body of the car. This
support is the old kind that does not have clips for the smart opener. The module on the left of it is for tire pressure monitoring (RDC) and might not be present on all cars. The module in the centre above the support panel is the antenna for comfort access (if you don’t have this then you are in trouble since smart opener only works if you already have comfort access).
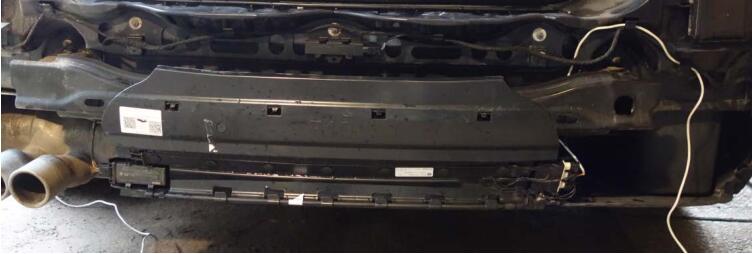
Below you can see the two adapter types. The bottom one is the original one and the one at the top is the one compatible with smart opener. You can see the two sensor cables already installed. The control module is not yet fitted (it will go on the right side of the adapter).

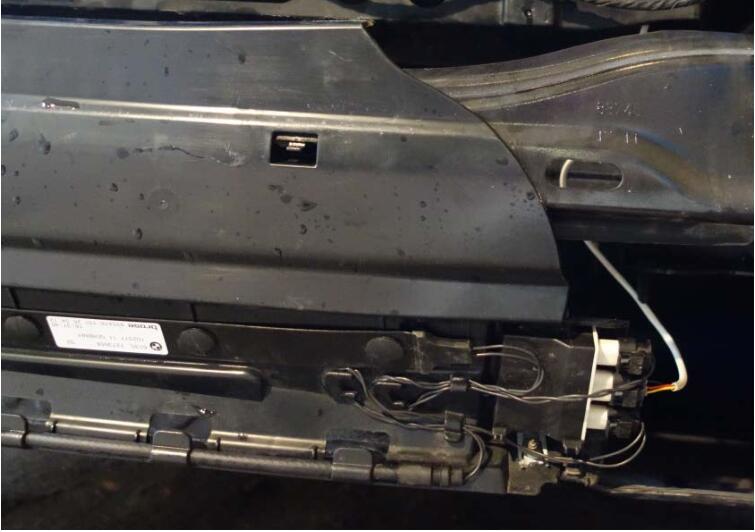
The support panel is easy to clip/unclip from the body of the car and below you can see the new
panel clipped into place with cable ready for testing. It’s sensible to test the smart opener well
before putting the bumper back in place.
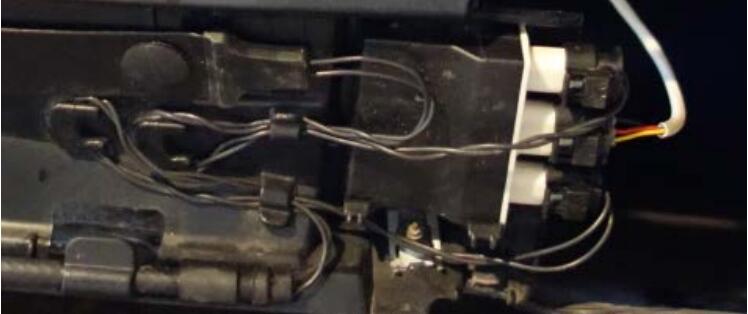
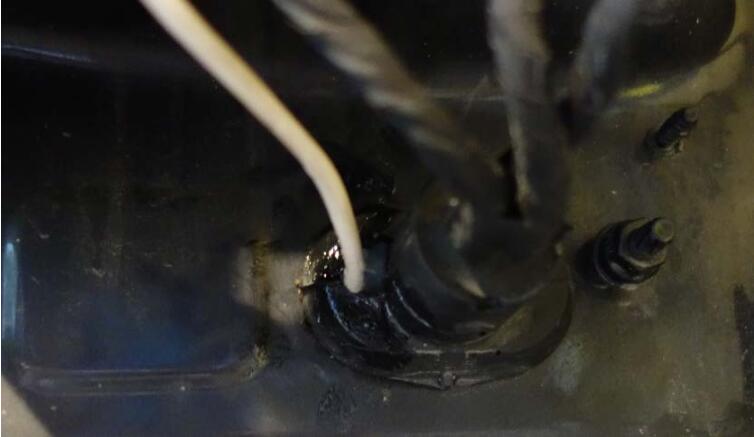
Below you can see the control module in place with my white cable installed.
Once you have installed and tested the module you need to run the cable through the car to the
footwell module. I drilled a small hole in the rubber grommet leading into the boot of the car. Use some silicone sealant to seal around the cable to prevent any water getting into the car.
Once the cable is inside the boot run it alongside the existing cables in the car. There are some
convenient cable trunks already installed and you can use those.
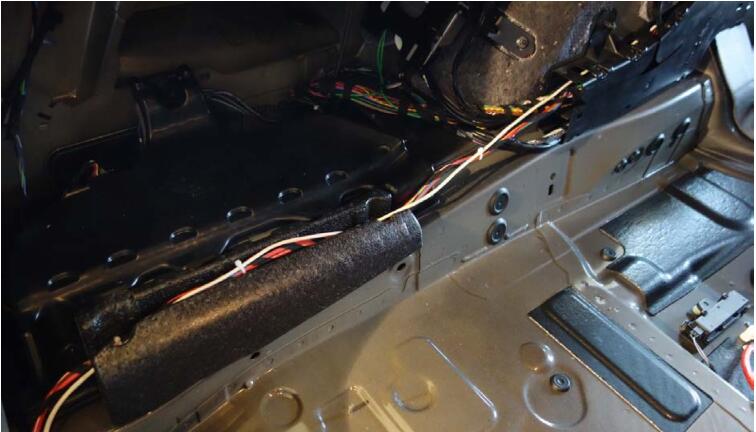

From there pull up the door trim covers and run it under the carpet and eventually next to the
footwell module. From there you can permanently connect to the driver assistance panel or light
switch as appropriate.
Test the action of the smart opener thoroughly before you put all the parts of the car back together.Bumper work takes about 4 hours and wiring to the front of car another 1-2 hours.
Original post:http://www.bimmerfest.com/forums/showthread.php?t=835896