The initial charging of the A/C system is performed from the high-pressure side with the engine stopped.And next, this method must be followed by charging from the low-pressure side with the engine running.More repair case for Suzuki,please refer to:Suzuki Trouble Repair
Related Contents:
2019 2014 Suzuki Worldwide Automotive EPC Free Download
Procedures:
1)Check to make sure that hoses are routed properly after evacuating the system.
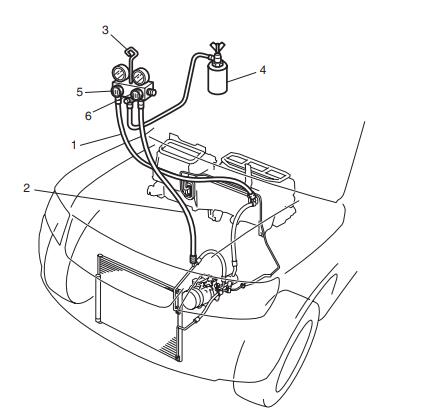
2)Connect low charging hose (1) and high charging hose (2) of the manifold gauge set (3) in position.
Thus open refrigerant container valve (4) to purge the charging line.
3)Open the high-pressure side valve (6) and charge refrigerant to system.
4)After a while, open the low-pressure side valve (5) and close the high-pressure side valve (6).
Make sure that high pressure-side valve is closed securely.
5) Start engine and keep engine speed at 1,500 rpm.
Then, operate A/C system.
6) Charge A/C system with refrigerant in vapor state. At this time, refrigerant container should be held upright.
7) When refrigerant container (3) is emptied, the use following procedure to replace it with a new refrigerant container (3).
a) Close low pressure valve.
b) Replace empty container (3) with a refrigerant container which has been charged with refrigerant. When using refrigerant container tap valve (4), use the following procedure for
replacement.
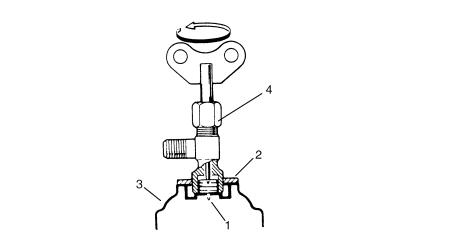
i) Retract needle (1) and remove refrigerant container tap valve (4) by loosening its plate nut (2).
ii) Install previously-removed refrigerant container tap valve (4) to a new refrigerant container (3).
c) Purge any air existing in center charging hose.
When using refrigerant container tap valve, use the following procedure to purge air.
i) Once fully tighten refrigerant container tap valve and then loosen (open) plate nut slightly.
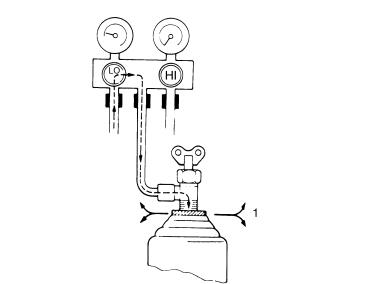
ii) Open low pressure valve of manifold gauge set a little.
iii) As soon as refrigerant comes out with a “hiss” (1) through a clearance between refrigerant container and tap valve, tighten plate nut as well as manifold gauge set low pressure valve.
iv) Turn handle of tap valve clockwise so that its needle is screwed into the new container to make a hole for refrigerant flow.
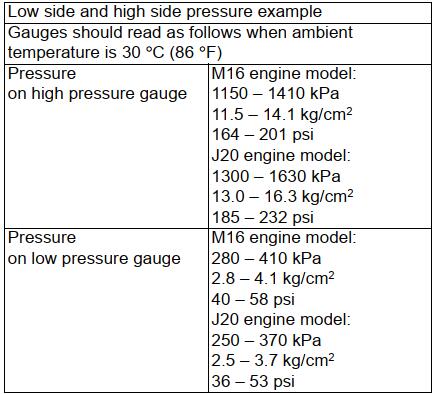
8) After the system has been charged with specified amount (570 ± 30 g) of refrigerant or when low pressure gauge and high pressure gauge have indicated the following specified value, close low pressure side valve on manifold gauge set.