To use Servicemaster connect your laptop computer to the machine CANbus. Connection is made using Data Link Adapter (DLA) C and the applicable cables.
Related Contents:
2024 JCB ServiceMaster 4 v24.3.1 Free Download for Win 10 Win11
2017 JCB Parts Plus+ and Repair Service Manual Free Download

| A | USB PC Cable | 718/20235 |
| B | Serial PC Cable | 718/20236 |
| C | USB DLA | 728/26500 |
| D | Machine Cable | 718/20237 |
1 Make sure the machine ignition system is OFF.
2 Connect the ‘USB PC Cable’ A to the DLA and a free port on your laptop computer.
Note: Connect the USB cable directly to the laptop computer. DO NOT connect the cable via a USB hub.
Note: Older DLAs and laptop computers may not be compatible with USB ports. Use the serial PC cable B to connect the DLA to the laptop serial port.
3 Connect the ‘Machine Cable’ D to the DLA. The ‘Machine Cable’ has a 15-way D-type connector on one end and a 9-way CAN connector on the other.
Plug the 15-way connector into the DLA and tighten the thumb-screws.
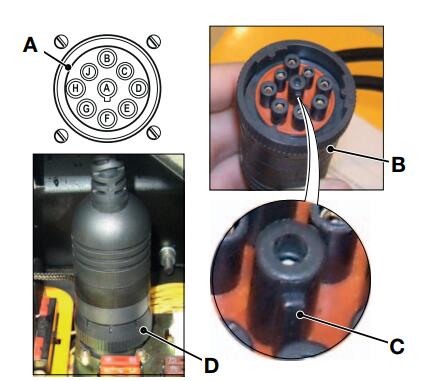
4 Connect the 9-way CAN connector into the machines’ Diagnostics Connector A as follows: a Position the CAN connector B to align the centre pin location tab C with the diagnostics connector
A.
b Couple the connectors. Turn the locking ring D clockwise to secure the connectors