It is necessary to remove ECM when you need do ECM flashing,ECM replacement.So here car-auto-repair.com show you guide on how to remove and install ECM for HITACHI ZX890-7 excavator.
Related Contents:
Hitachi MPDr v2.56 v2.25 Diagnostic Software Free Download
Hitachi Excavator ZX-7 Service Repair Workshop Manual 2021
Hitachi Dr.ZX Excavator Diagnostic Tool Cable
Procedures:
Removal of ECM
1.Set the machine position for inspection and maintenance. (Refer to Preparation before Inspection and Maintenance in the separate Workshop Manual.)
IMPORTANT
2.Set the key switch to the OFF position. Wait 5 minute or longer, and then set battery disconnect switch to the OFF position.
Set the battery disconnect switch to the OFF position.
3.Remove the DCU.(Refer to “Removal of DCU”T5-1-31)
4.Disconnect connectors (19) (2 used).
5.Remove bolts, washers (21) (4 used). Remove the ECM (16) assembly.
6.Remove bolts, washers (18) (4 used). Remove ECM (16) from brackets (15, 17).
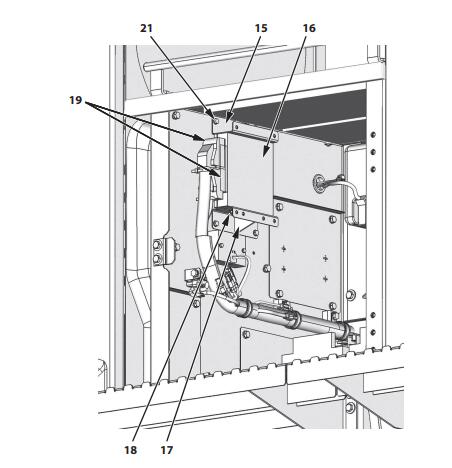
Installation of ECM
1.Install ECM (16) to brackets (15, 17) with bolts, washers (18) (4 used).
2.Install the ECM (16) assembly with bolts, washers (21) (4 used).
4.Install the DCU.(Refer to “Installation of DCU”T5-1-33)
5.Set the battery disconnect switch to the ON position. (Refer to “Precautions for Inspection and Maintenance”T5-1-5)
6.Perform the Aftertreatment Device Forcible Manual Regeneration Control and Differential Pressure Sensor Zero Point Calibration functions.
More repair cases for Hitachi excavator,please refer to:Hitachi Excavator Trouble Repair.