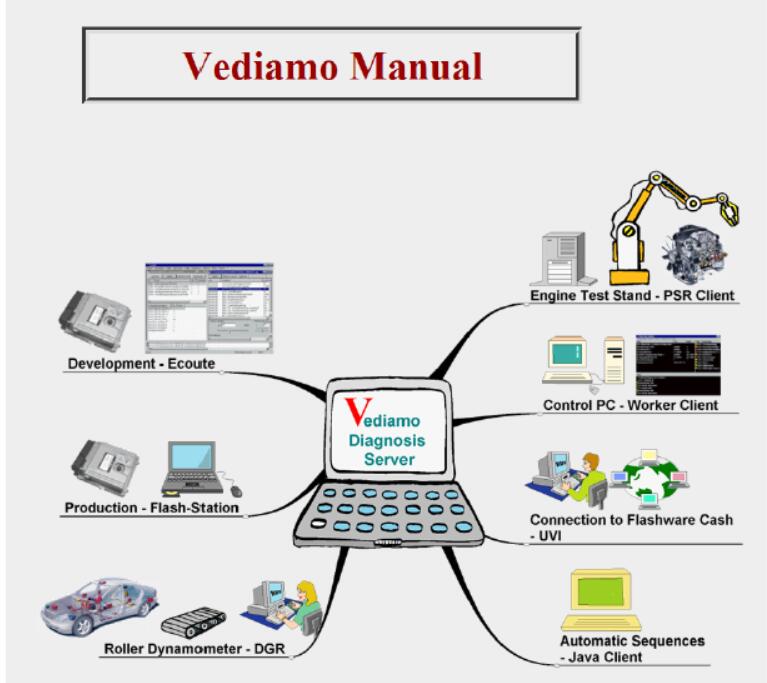
This illustration show you guide on how to install Mercedes Benz Vediamo software.Vediamo is based on the Mercedes-Benz DCDI standard communication platform CAESAR and hence supports all communication hardware such as, e.g., Part C, Part A, Part Y, etc. DIOGENES data, used by all diagnostics applications in the company and which can be drawn from the central TAMINO data base, can be used as diagnostics data.
Preparations:
Benz Vediamo Database Mercedes Free Download
System Requirements
- Pentium-III-PC with 1 GHz (1.5 GHz recommended)
- Windows 2000 or Windows XP or WIndows 7
- 1024 MB RAM memory
- 250 MB available hard disk space for Vediamo in addition to hard disk space for diagnostic data (5 GB recommended)
- Depending on the communication hardware to be used, either a free PCI or ISA connector, a USB interface, COM port or PCMCIA slot is required.
- A network connection must exist for distributed application (server and clients on separate computers).
- A network connection or serial interface (COM port) is used for communication with the test bench controller.
The diagnostic hardware and if necessary the drivers, have to be installed separately either before or after installing Vediamo. The appropriate entries have to be made in the Vediamo.ini settings file after installation to allow the hardware to function with Vediamo.
Lower PC performance characteristics or a loading from other processes (open applications, SMS services, virus scanners, etc.) can reduce Vediamo’s performance
Earlier Versions
Dependent on the client-server architecture, no two Vediamo versions can be installed at the same time. If an earlier version is installed, it must be uninstalled first before the new version can be installed. However, a copy of the settings( Vediamo.ini) as well as files generated by the user (system files BSB, measurement and controller groups, etc.) are not deleted.
If a new version is installed in a directory an earlier Vediamo version was installed, the Vediamo.ini settings file found there is taken over so that the new Vediamo generally works exactly like the old one.
Possible changes in the file formats for the new Vediamo version are automatically applied to the files if required.
Installation Procedure
Vediamo is always delivered as a separate setup program. All system components are attuned to one another and may not under any circumstances be mixed with components from other versions (not even release and debug versions with the same version number). To install, you need admin privileges. If you work with Windows 7, the setup should be started “As Admin”.
During installation, setup checks whether *.ini or *_ini.old settings files are in the specified path. If this is the case, all settings which are still valid for the new version are taken over and only new ones are entered. All setting can be modified subsequently using the INI-Editor.
To uninstall, follow the directions given by Startmenu / Settings / System Control / Software → Uninstall Vediamo.
Alternative Default Settings for Data Paths
The default paths for diagnostic data and for short test data can be overridden by optional INI files. These files must be stored separately for CAESAR and MVCI usage and they can contain the following items:
[SERVER] SystemPfad=[path to diagnostic data (VSX, SMR-x etc)] [ECOUTE] ShortTestDataDir=[path to special set of diagnostic data (VSX, SMR-x etc) for short test]
To overwrite the mentioned paths, start the Vediamo Setup with command line parameters as follows:
VediamoSetup050100.exe /v”OPT_INI_PATH_C=<alternative INI file for CAESAR>” /v”OPT_INI_PATH_M=<alternative INI file for MVCI>”
“C” and “M” mean Caesar and MVCI.
It is also possible to pass only one file as parameter.
Important
If you change the default or legacy data path, a new directory will be created, but your data files will not be moved there automatically. This must be done separately.
Installation Options / Parameters
All the user’s inputs during installation can be logged. The resulting answer file can be used to perform silent installations, i.e., Vediamo can be installed on other computers automatically without user interaction. The selections are then made on the basis of the log file.
To log the user inputs in the file vediamo.iss, start setup with the following parameter:
VediamoSetup.exe /r /f1″c:\temp\vediamo.iss”
This answer file can be used on other computers to execute setup automatically without user interaction:
VediamoSetup.exe /s /f1″c:\temp\vediamo.iss”
It is not necessary to enter the filename. In this case, the file “Setup.iss” in the Windows system directory is created/read.
Important:
If a filename is entered, the complete path must be included even if the file is in the current directory. No path or relative paths lead to unforeseen results.
For a complete pre-configuration, it is recommended to combine the silent installation with a pre-installed Vediamo.ini, i.e., generate a batch file which:
- Generates the installation path with a subdirectory BIN.
- Copies a prepared Vediamo.ini into the BIN subdirectory.
- Starts setup with the parameters listed above.
Tips on Silent Installation
- Delete/rename any previous answer files when logging a new answer file.
- Do not use answer files from previous Vediamo installations.
- The setup process varies depending on whether an INI file is available or not. An answer file with INI should therefore only be use with an INI.
- An InstallShield icon is displayed in the Windows taskbar during silent installation. If this is missing or disappears much too quickly, the installation is not running.
Installing and Checking the eCom Hardware (Part P)
- To use the eCom Hardware with “USB2LAN Adapter” a driver must be installed. You find the driver on the Vediamo Homepage “DCDI Treiber”. Alternatively you can get the driver directlly from ASIX (http://www.asix.com.tw/products.php?op=pItemdetail&PItemID=97;71;101&PLine=71) .
- Interface configuration: o Switch on the power supply for the eCom Hardware.
o In Network find the correct connection (“ASIX AX88772A USB2.0 to Fast Ethernet Adapter” or so) and edit the properties. In TCP/IP properties enter the following fixedIP-Address: § IP-Address 169.254.255.40
Subnet Mask. 255.255.0.0
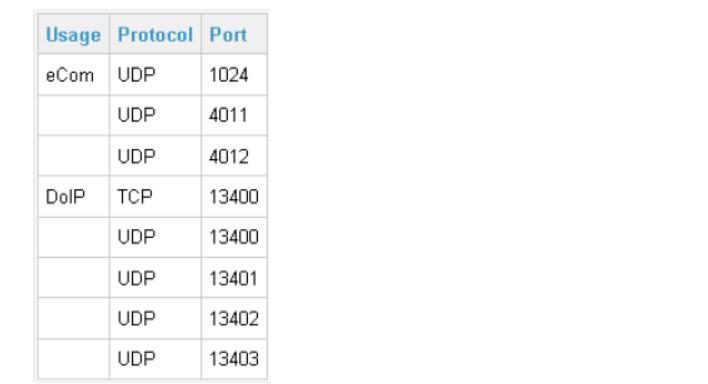
- Firewall Settings: o depending on the used firewall, check if the following ports are opened. More info is available on the Diagnose Homepage under Tools|Diagnose Hardware|Driver & Installation eCOM
Function check: o Switch on the power supply for the eCom Hardware.( the green LED on eCom Hardware must burn)
Plug in the USB to LAN adapter
in …\Program Files\Vediamo\Caesar\driver\eCom\I+ME Actia GmbH\XS D PDU API execute the program IME_D_PDU_API_Tester.exe. At the top select for “D-PDU API DLL” the PDUAPI_I+ME_ACTIA_XS.dll, press the START button at the bottom. If everything works fine, all check boxes in the list should be marked after some time..
o The eCom should be recognized by the Vediamo Start-Center now (otherwise check if eCOM Part P is selected)
Other Required Hardware/Software
DCDI Hardware
Forms and ordering process are included on the VEDIAMO intranet homepage under Ordering Information / CAESAR Hardware.
Further information on the diagnostic hardware can be found on the Diagnostics Portal.
Driver (DCDI)
Can be found on the VEDIAMO intranet homepage under Downloads / DCDI Driver
Diagnostic Data (VSX, SMR-x & Co.)
Are on the VEDIAMO intranet homepage under Downloads / Diagnostic Data.
Java Development Environment
If you like to program your own Java routines, you will need a development environment. You can get one free of charge from Eclipse and from Oracle.