Many people struggle with resetting short circuit counters in FRM modules,so I share the guide on how to reset the short circuit counter.FRM1 and FRM2 short circuit counters can be resetted successfully by this method.And we need to thank to member fdriller9 in bimmerfest forum,thanks to his selfless share.
BMW Coding/Flashing/Progrmming PDF+Video Guide
Note: Proceed at your own risk, this is just my interpretation for educational/entertainment value only. I am not responsible for you blowing up your car or damaging your modules. Im serious!
First off, these are the files that correspond to their respective FRM revisions. These group files can be used for any chassis that uses an FRM module. Unfortunately, I do not know the group files for the LM modules but this can be quickly and easily found through trial and error. The default location for these files can be found here: C:\EDIABAS\Ecu\
For FRM1, use FRM_87.prg
For FRM2 or FRM3, use FRM_70.prg
NOTE: I have not reset a short circuit counter on an FRM3 module yet but the same group file is used in INPA to read/erase faults, run activations, display live data, etc. So I’m assuming this group file will work for FRM3 modules. You will probably know right away because Tool32 might not even load the tables after opening the group file in step 3. It will probably result in an IFH-0018 error if it cannot load the group file/connect to the module properly. Please confirm if you get it to work. TIA!
Some readers ask me for BMW FRM Dump bin file collection,here i you can download it here:
BMW FRM Dump Data File Download
Step 1: Connect your cable. Interface does not matter (ICOM, DCAN, ADS, ENET, etc.) as long as it’s setup properly in the EBIABAS.ini configuration file. You MUST be connected to the car to load SGBD or Group files! Otherwise, you will get IFH-0018 or IFH-0009 com errors and blank windows.
Step 2: Open Tool32.
Step 3: Load the SGBD or Group File. This can be done one of 3 ways described below. After the file has been loaded, you should see 4 different windows open. A photo of the 4 windows is attached at the bottom of this post (1 Open.jpg)
3a. File, Load SGBD, Group File
3b. Press F3
3c. Select the small button in the top left corner that looks like a folder with a curved
arrow over it.
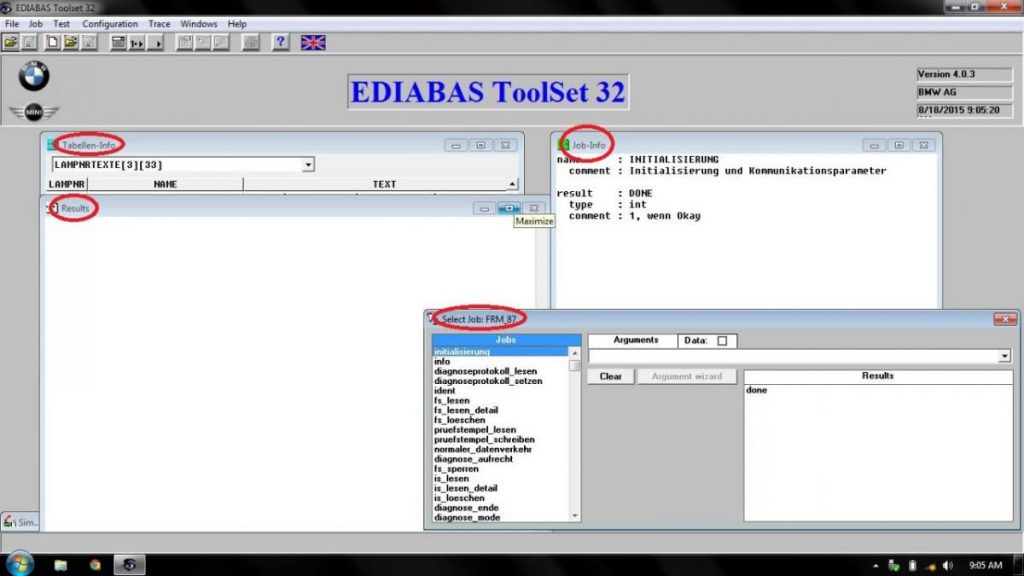
Step 4: Navigate to the window labeled “Tabellen-Info.” In the drop down menu, select “LAMPNRTEXTE[x][xx].” [x][xx] maybe different for you. Mine was [3][33] but this doesn’t matter at all. This table lists the lamp fixtures (right) and their corresponding IDs (left). These IDs are the arguments you need to enter to execute your job. Note the lamp ID(s) for the fixture(s) that is(are) out. I have attached this list below and translated it into English for the FRM_87.prg group file. FRM_70.prg IDs may be different but the translations should be the same.

Step 5: Once you have your lamp ID(s) ready, you can select the “Select Job:FRM_XX” window and on the left side, you will see the available jobs for your control unit. About a 1/3 of the way up from the bottom, select the job “_reset_kurzschluss_sperre.”
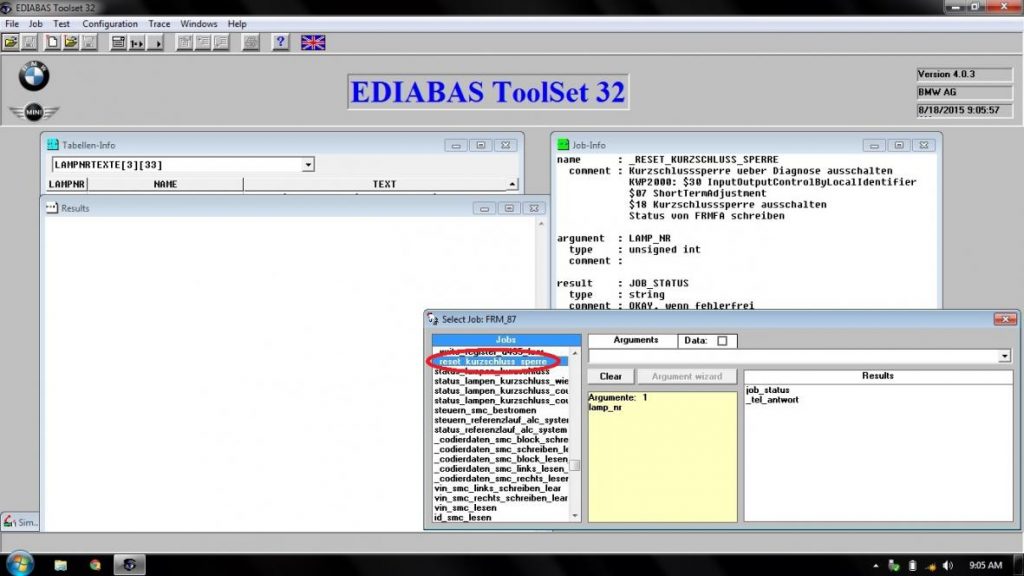
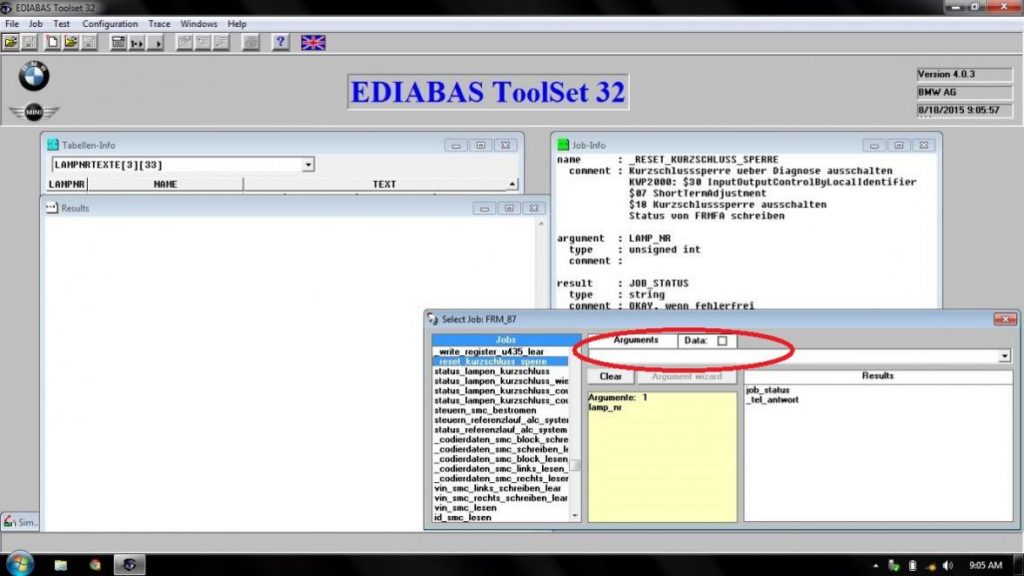
Step 6: Now enter your lamp ID or “argument” into the field. The checkbox for “Data” does NOT need to be checked off. If the job does not execute properly, you can try ticking this box.
Step 7: Run the job. This can be done 2 ways. Once the job runs, another window will be brought to the front of the screen and will indicate job status. You are looking to get the result, “OKAY.” Any other response indicates that the job did not execute successfully.
7a. Job, Start Job once only
7b. Press F5
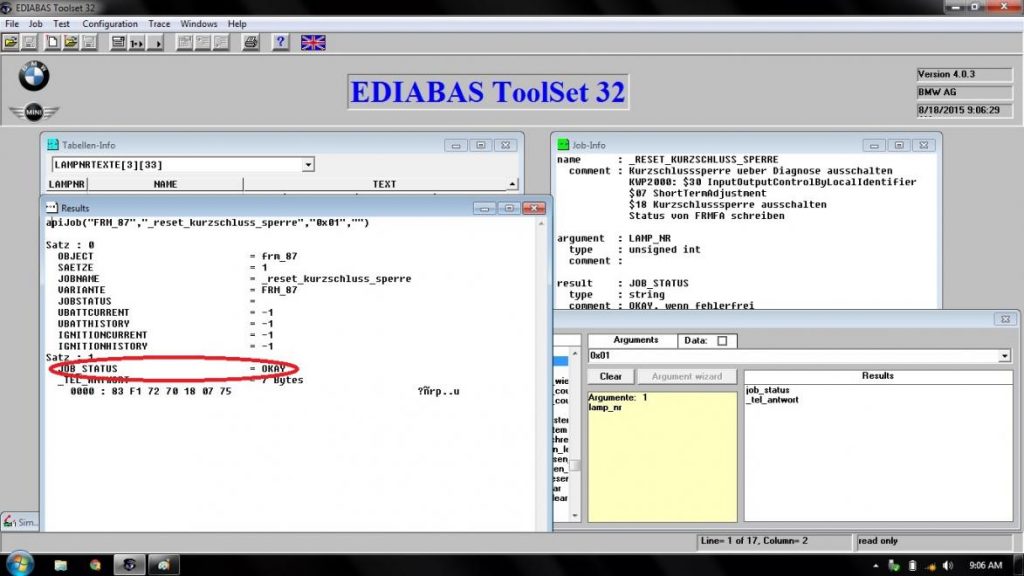
Step 8: After you have received an “OKAY” response, you can close Tool32 and use INPA or whatever program/method you use to clear any remaining faults.
Now, you should no longer have a short circuit fault and power should be restored to your fixture; granted there are no physical shorts in the harness or any other issues.
If you guys run into any issues, please let me know by replying to this thread. Please do NOT PM me. This way, all issues can be documented here in the thread.
Lamp ID Lamp Fixture
0x00 High Beam, Left or E92/3 Cornering Light
0x01 High Beam, Right or E92/3 Cornering Light
0x02 Low Beam, Left
0x03 Low Beam, Right
0x04 Parking Light, Left
0x05 Parking Light, Right
0x06 Fog Light, Left, Front
0x07 Fog Light, Right, Front
0x08 Turn Signal, Left, Front
0x09 Turn Signal, Right, Front
0x0A Turn Signal, Left, Rear
0x0B Turn Signal, Right, Rear
0x0C Unassigned 1
0x0D Lighting WBL Button?
0x0E Brake Light, Left
0x0F Brake Light, Right
0x10 Brake Light, Center
0x11 Taillight/Brake Light, Left 1 or E92/3 Daytime Running Light
0x12 Taillight/Brake Light, Right 1 or E92/3 Daytime Running Light
0x13 Taillight/Brake Light, Left 2
0x14 Taillight/Brake Light, Right 2
0x15 Licence Plate Lighting
0x16 Interior Lighting
0x17 Fog Light, Left, Rear
0x18 Fog Light, Right, Rear
0x19 Reverse Light, Left
0x1A Reverse Light, Right
0x1B Brake Force Display, Left
0x1C Brake Force Display, Right
0x1D Clamp 58g
0x1E LED Driving Lights Control
0x1F LED Front Field Illumination
0xFF Unknown Lamp