This article show the guide on how to perform TIS2000 remote service programming system (SPS).Hope this article is helpful to your works.
TIS 2000 Software Free Download
Notice:
Prior to performing SPS, it is important to heed the following precautions:
Using an outdated version could damage vehicle modules. The Tech 2 and the terminal must have the latest software.
Make sure the vehicle battery is fully charged. Battery voltage for SPS should be between 12.5 and 14 volts. However, make sure a battery charger IS NOT connected to the vehicle when using the Tech 2.
Make sure the cable connections are secure. A disconnected cable could cause controller failure.
Remote SPS Programming
The Remote SPS method is a three-step process that involves:
1.Connecting the scan tool to the vehicle and obtaining information from the controller.
2.Connecting the scan tool to the PC and downloading a new calibration file from the PC to the scan tools memory.
3.Reconnecting the scan tool to the vehicle and uploading the new calibration file to the controller.
IMPORTANT:
TIS 2000 supports Service Programming with the Tech 2 scan tool only.
Off-Board Programming
Off-Board Programming is used when a reprogrammable control module must be programmed away from the vehicle. This method requires the use of an Off-Board Programming Adapter (OBPA), J41207-C.
Performing Remote SPS by TIS2000 Procedures:
Step 1: Obtain Vehicle Information ( Request Info. )
NOTE: ECU to be programmed must be installed in the vehicle before beginning this process. Make sure the battery is fully charged.
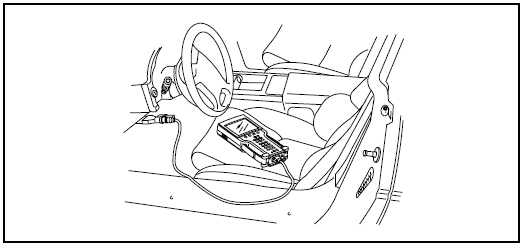
1.1 With the Tech 2 and vehicle both off, connect the Tech 2 to the vehicle DLC
1.2 Power on Tech 2. At the Tech 2 Title Screen, press Enter.
1.3 Turn the vehicle ignition to ON (engine not running).
1.4 At the Tech 2 Main Menu, select F1: Service Programming .
1.5 Press Request Info (F0:) on the Tech 2.
NOTE: If a VIN was previously stored in the Tech 2, press Request Info again (soft key), and follow the On Screen directions.
1.6 Follow the On Screen directions. After the vehicle description is entered, turn off all power consuming devices, then press Continue (soft key).
1.7 The Tech 2 reads the VIN, then displays the VIN and calibrations. The Tech 2 will ask Is this VIN correct?Select Yes. (If the answer is No, write down the VIN number).
1.8 When complete, press Exit, power down, and disconnect the Tech 2 from the vehicle. Turn the vehicle ignition OFF.
Continue with step 2, Transfer Data from the PC to the Tech 2.
Step 2: Transfer Data from the PC to the Tech 2
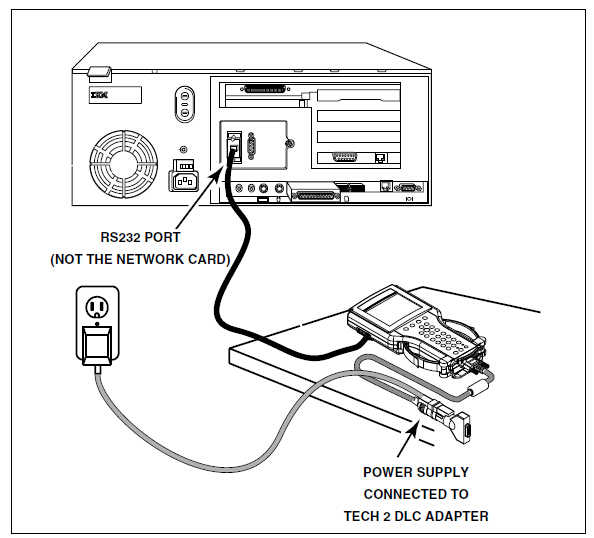
2.1 Connect the Tech 2 to the terminal, as shown in Figure I-5.
2.2 At the terminal, launch TIS 2000.
2.3 From the TIS 2000 main screen (refer to Figure I-1), select the Service Programming System icon.
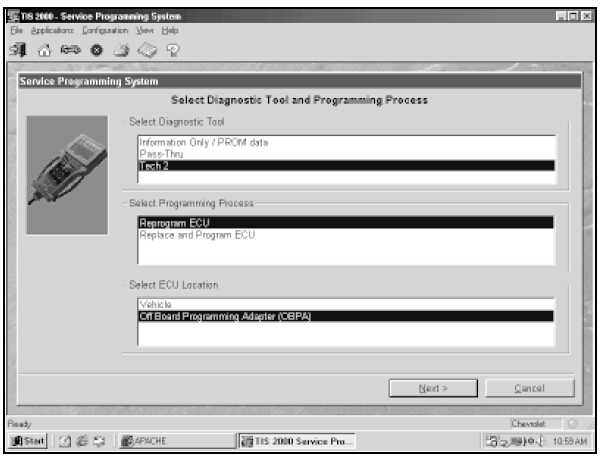
2.4 At the Select Diagnostic Tool and Programming Process screen (Figure I-4), make the appropriate selection for your procedure:
Under Select Diagnostic Tool, select Tech 2. The Information Only is used to get calibrations for a particular vehicle without using the Tech 2. It also provides PROM data for vehicles that are not programmable. Pass-Thru performs SPS without disconnection from the vehicle or the terminal.
Under Select Programming Process, identify whether an existing module is being reprogrammed or a module is being replaced with a new one.
Under Select ECU Location, identify whether on-vehicle or off-board programming is being performed.
2.5 After making selections, select Next.
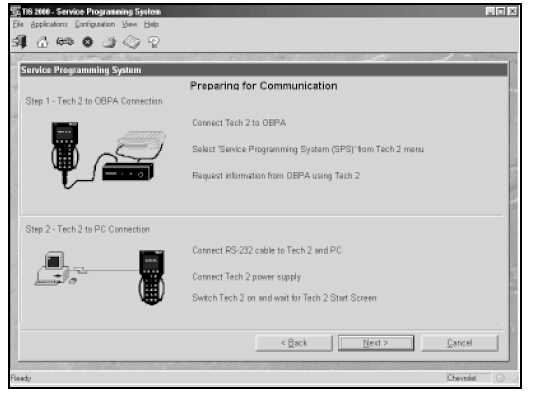
2.6 A reminder screen will appear for making the appropriate connections (Figure I-6). Select Next after confirming connections.
NOTE: If you answered NO to the VIN Number is step 1.7, a box may appear stating The ECU could be a service ECU. Click OK .
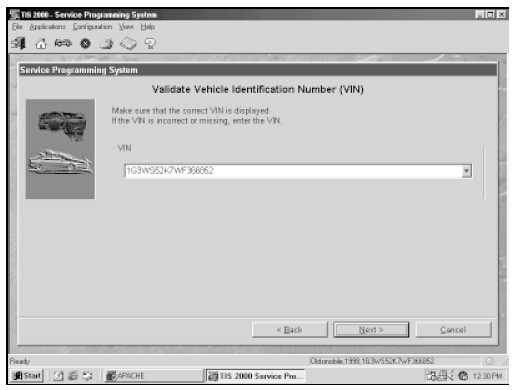
2.7 A screen will appear asking to confirm the VIN (Figure I-7). After confirming/entering the correct VIN,select Next.
2.8 A Supported Controllers screen (Figure I-8) will appear asking to identify the type of controller being programmed. Some vehicles may have more than one programmable controller examples include PCM,BCM, IPC. Select the appropriate controller for the vehicle being serviced.
- After selecting the controller to be programmed, identify the type of programming to be performed.
– Normal is used for updating an existing calibration or programming a new controller.
– VCI (Vehicle Configuration Index) is also used for updating an existing controller or programming a new controller, but is used for newer vehicles whose VINs aren t yet in the database. For these
vehicles, you will need to contact Vetronix Technical Support, at 1-800-321-4889, for assistance.
– Reconfigure is used to reconfigure a vehicle, such as a truck, for changes in tire size and axle ratios.
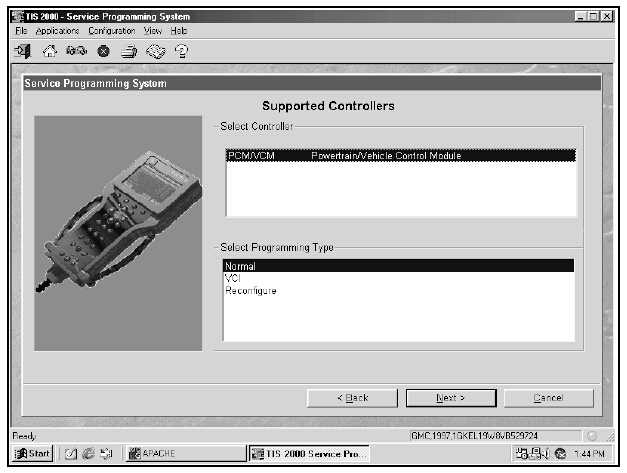
2.9 After making selections, select Next.
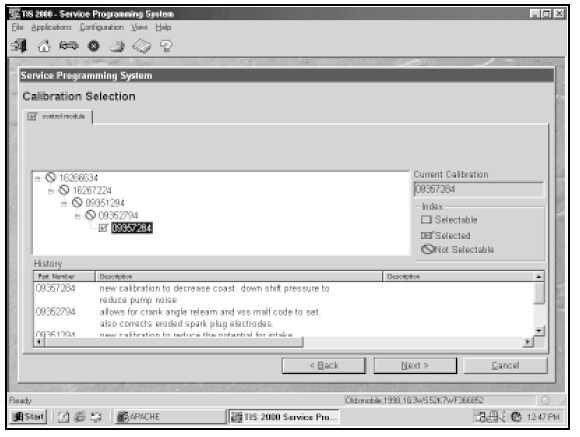
2.10 A Calibration Selection screen will appear showing the calibration file history for the vehicle/controller being serviced. There are explanations of each calibration file. Based on the descriptions, select the appropriate file.
- Vehicles with PCMs will display a screen similar to the one shown in Figure I-9 (shown on previous
page). It contains a single tab that summarizes all calibration files for the vehicle.
- Vehicles with VCMs will display a screen similar to the one shown in Figure I-10. It contains multiple
tabs one for each distinct calibration file contained in the VCM. With these vehicles, it is necessary to
make a selection within each tab, otherwise the system will display the message like the one shown in
Figure I-11 indicating that not all selections have been made. (Notice the unchecked box in the System
tab.)
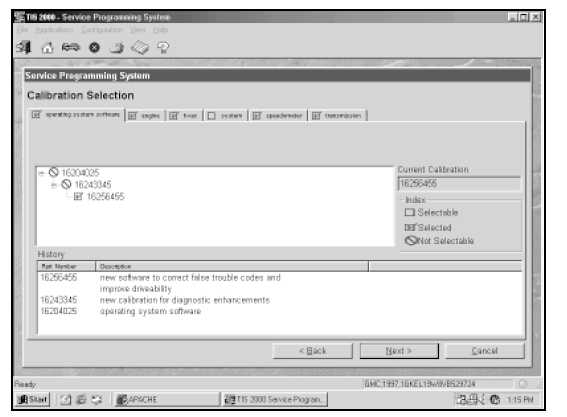
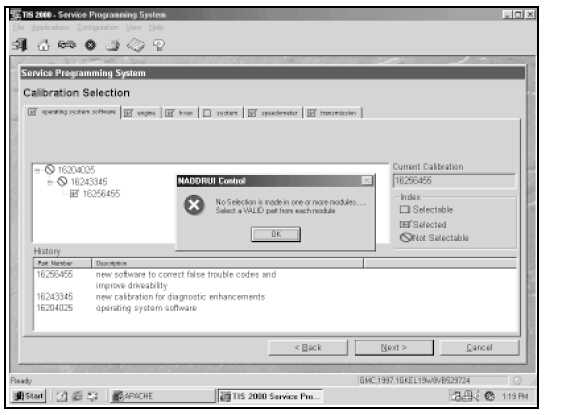
The following icons appear on the calibration selection screen(s):
- A circle with a slash ( ) indicates a file that is not selectable.
An open box ( ) indicates a file that is selectable.
- A box with a check mark ( ) indicates a valid file/option that has been selected.
- If service bulletins are listed along with the calibration files, the bulletins should be referred to beforeservice programming is performed.
Then select Next.
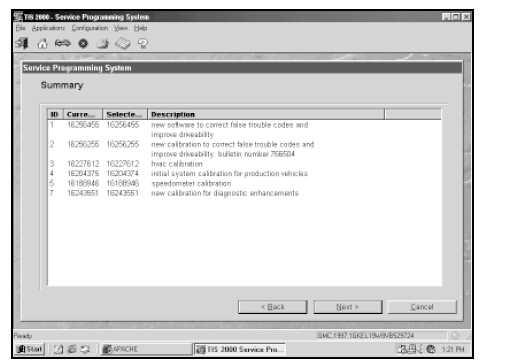
2.11 After making the necessary selections, a Summary screen will appear (Figure I-12) allowing you toconfirm your selection. Select Next to continue. If calibrations are the same, you get an NAODRUI control box stating Important: The calibration selected is already the current calibration in the control module. Reprogramming with the same download is not allowed. Click OK and back out, or click Cancel.
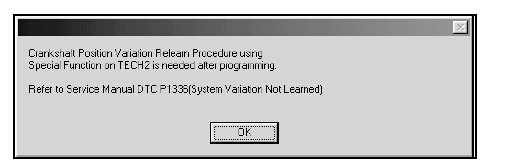
2.12 Most GM vehicles will require the Crankshaft Position Variation Relearn Procedure (Figure I-13) be performed after reprogramming the PCM/VCM. A box should appear directing you to use the Special Functions feature of the Tech 2 scan tool to perform this procedure. It may be necessary, even if this box does not appear during the reprogramming procedure. If Crankshaft Position Variation Relearn Procedure is listed under Special Functions, you need to perform the procedure. Click OK.
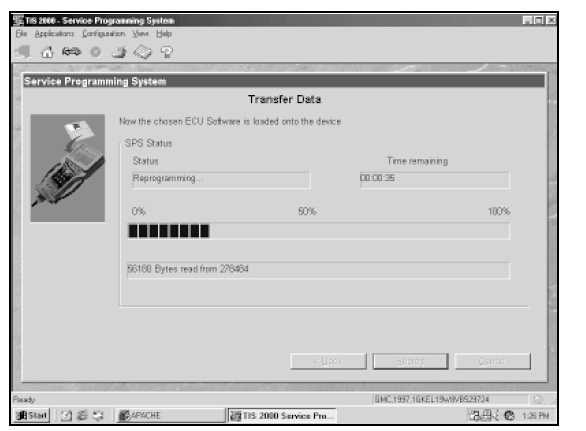
2.13 A Transfer Data screen will appear (Figure I-14). The application will automatically initiate the download of the new calibration file to the Tech 2. The screen will track the progress of the download.
2.14 After the download is complete, a screen will appear with instructions for connecting the Tech 2 to the vehicle to complete the programming process (Figure I-15). Close the application to return to the TIS 2000 Application Selection screen, then power down and disconnect the Tech 2 from the PC.

Continue to step 3, Transfer Data from the Tech 2 to the Control Module.
Step 3: Transfer Data from the Tech 2 to the Control Module
3.1 With the Tech 2 and vehicle both off, connect the Tech 2 to the vehicle DLC (refer to Figure I-3).
3.2 Power on the Tech 2. At the Tech 2 Title Screen, press Enter.
3.3 Turn the ignition ON (engine not running).
3.4 At the Main Screen, select F1: Service Programming System .
3.5 Select the Program ECU Enter key or F1 key on the Tech 2. The Tech 2 will display VIN and calibration numbers. Verify, then select Continue (soft key) . Follow the on screen directions then press Continue (soft key) . The Tech 2 screen will display programming, line data, and a bar graph.
3.6 When the transfer is complete, the Tech 2 will display the message Programming was Successful. Press the Continue soft key to exit the program. Turn the vehicle ignition off first, then turn the Tech 2 off and disconnect it from the vehicle.
Be sure to verify successful reprogramming. Refer to the recommendations below.
Verifying Programming
After any kind of control module programming, verify that programming was successful:
Turn the ignition off, wait at least 30 seconds, then start the vehicle to confirm that reprogramming wassuccessful. If the vehicle does not start or starts but runs rough, repeat the SPS procedure.
Important:
Some vehicles will require that Idle Learn, TP Learn, Theft Deterrent Relearn, or Crankshaft Variation Learn procedures be performed after programming. Consult the appropriate service information for these procedures.