CNH DPA5 diagnostic kit support all RP1210A, RP1210B, and RP1210C compliant applications that support J1708/J1587,CAN/J1939, J1850 VPW (GM Class II) and the ISO15765 protocols. The DPA also works with applications that were specifically written to use the DG non-RP1210-compliant native drivers for other protocols, such as GM UART and ISO9141. This post shows how to configure the most common RP1210-compliant diagnostic applications to work with the DPA 5.
Related Contents:
2024 CNH EST 9.10 9.2New Holland Diagnostic Software Free Download
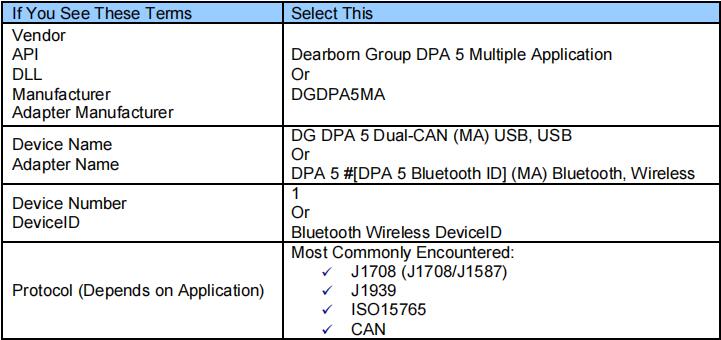
Notes on Selecting an RP1210 Compliant Adapter
Selecting a RP1210 adapter, commonly referred to as a Vehicle Datalink Adapter (VDA) varies widely from application to application; however, the terminology remains pretty much the same. The following table helps to introduce you to the terminology and helps you to make the correct selections the first time.
You must set up every application (in their own individual way) to use the DPA!
Not all OEM applications save the adapter configuration! Some make the user select the adapter to be used every time the application is opened.
Configuring Applications to Use the DPA 5
The following examples show how to select your DPA 5 device using the USB cabling method.
1.Start program.
2.Click Connect to Vehicle.
3.Select the Correct Transmission Type.
4.Uncheck Smart Connect.
5.Click Connect.
6.Click Advanced Setup.
7.Select vendor of Dearborn Group DPA 5 Multiple Application.
8.Select protocol of J1939 or J1708.
9.Select correct device of DPA 5 Dual CAN USB (or DPA 5 #[DPA 5 Bluetooth ID] Bluetooth).
10.Click OK.
NOTE: DO NOT RUN Bendix ABS Diagnostics until you have done the following:
1.Start program.
2.If Diagnostic Interface Selection dialog box does not appear, click on Vehicle Interface Adapter icon.
a.Select RP1210A Device Using J1708 Line: DPA 5 Dual CAN USB (or DPA 5 #[DPA 5 Bluetooth ID] Bluetooth).
3.Click OK.
Caterpillar Electronic Technician
1.Start Program.
2.Click Utilities–> Preferences–>Communications from the menu bar.
3.Click on Communication Interface Device dropdown box.
4.Select RP1210 Compliant Device.
5.Click Advanced
6.Select DPA 5 Dual CAN USB (or DPA 5 #[DPA 5 Bluetooth ID] Bluetooth) in the RP1210 Communication Adapter Device box.
7.Click OK
8.Check Enable Dual Data Link Service
9.Click OK.
Cummins Insite
1.Start Program.
2.Click on File–>Connections–>Add New Connection.
3.Click Next.
4.Click radio button for Datalink Adapter and click Next.
5.Select correct device DPA 5 Dual CAN USB (or DPA 5 #[DPA 5 Bluetooth ID] Bluetooth), and protocol you want to use, J1708/J1939.
6.Click Next and a Connection Name screen appears.
7.Click Next and a screen prompts you to indicate whether you want to make this connection active or set up another connection.
8.Click on make this connection active.
9.Click Finish.
Detroit Diesel Diagnostic Link
From Inside DDDL
1.Tools–>Options–>Connections–>Tab–>SID Configure.
2.Select DPA 5 Dual CAN USB (or DPA 5 #[DPA 5 Bluetooth ID] Bluetooth).
3.Click OK.
Detroit Diesel Diagnostic Link Version 6.47
There are two ways to open v6.47, depending on your installation.
A.If you have the Detroit Diesel Electronic Tool Suite on your desktop:
1.Select Detroit Diesel Electronic Tool Suite icon from desktop.
2.Select Configure button.
3.Select DG DPA 5 Dual-CAN (MA) USB, USB, select OK button.
4.Select Refresh button.
5.Click on highlighted DDDL 6 item.
6.Select Look at active and inactive faults.
B.If you have the Diagnostic Link icon on your desktop:
1.Select Diagnostic Link icon from desktop.
2.Select Look at active and inactive faults.
3.To change the adapter, select Tools | Options | Interface
4.Select DG DPA 5 Dual-CAN (MA) USB, USB from Local Communication Interface drop-down list.
5.Select OK button.
Dana Diagnostic Tool 2.x.x
1.Start program
2.Under Adapter Selection, choose Dearborn Group RP1210A:DG DPA 4/4 Plus USB, USB
3.Select Connect J1708 or Connect J1939 or Connect PLC as appropriate for your controller.
1.Start Program
2.Click Tools–>Settings–>Connection.
3.Under Driver choose Dearborn Group DPA 5 Multiple Application
4.Select DPA 5 Dual CAN USB (or DPA 5 #[DPA 5 Bluetooth ID] Bluetooth) for both the J1708 and J1939 device.
5.Click OK.
Freightliner ServiceLink (Including Cascadia Model – Dual CAN Channels)
1.Start program.
2.From the top menu bar, choose Admin.
3.Click on Show All Devices.
4.Vendor = Dearborn Group DPA 5 Multiple Application
5.J1708 Device = DG DPA 5 Dual-CAN (MA) USB, USB
6.J1939 Device = DG DPA 5 Dual-CAN (MA) USB, USB
7.CAN Device
a.Click Configure
b.Select DG DPA 5 Dual-CAN (MA) USB, USB
8.Click Save Settings.
International Truck and Engine
Master Diagnostics (MD Fleet)
1.Start program.
2.Choose File–>MD Settings–>COM Device–>Window with general VDA selection
3.Select Dearborn Group DPA 5 Multiple Application è Window with specific port DPA 5 Dual CAN USB (or DPA 5 #[DPA 5 Bluetooth ID] Bluetooth).
Navistar Hydraulic ABS
1.Start program.
2.Choose File–>Hydraulic ABS Settings–>COM Device–>Window with general VDA selection
3.Select Dearborn Group DPA 5 Multiple Application è Window with specific port DPA 5 Dual CAN USB (or DPA 5 #[DPA 5 Bluetooth ID] Bluetooth).
Navistar IPC
1.Start program.
2.Choose File è Settings è COM Device è Window with general VDA selection
3.Select Dearborn Group DPA 5 Multiple Application è Window with specific port DPA 5 Dual CAN USB (or DPA 5 #[DPA 5 Bluetooth ID] Bluetooth).
1.Start program.
2.Choose Tools–>Select Com Link–>Listing of adapters
3.Select Dearborn Group DPA 5 Multiple Application–>Listing of ports DPA 5 Dual CAN USB (or DPA 5 #[DPA 5 Bluetooth ID] Bluetooth).
Service Assistant (The new MD Fleet)
1.Start program.
2.Press third button from the top along the left side (has an icon that looks like a miniature interface cable.)
a.A window comes up that says Communication Device Selection and has two drop down boxes.
b.Select Dearborn Group DPA 5 Multiple Application è DPA 5 Dual CAN USB (or DPA 5 #[DPA 5 Bluetooth ID] Bluetooth)
1.Select ServiceMaxx icon from desktop
2.Enter username and password (if required)
3.Select Tools Select COM Link–>Dearborn Group DPA 5–>Multiple Application–>DG DPA 5 Dual-CAN (MA) USB, USB–>select J1708 or J1939 depending on engine type.
4.”Searching for Engine” appears
5.Select engine type when prompted and click OK button.
1.Start Program.
2.Click System Setup; then select COM Port.
3.Select Dearborn Group DPA 5 Multiple Application; the protocol to use is J1939 or J1708.
4.Select DPA 5 Dual CAN USB (or DPA 5 #[DPA 5 Bluetooth ID] Bluetooth) and click OK.
Volvo/Mack VCADS Pro
From Initial VCADS Setup
1.When prompted to configure a Communication Unit select RP1210A adapter.
2.When prompted for the adapter, select DPA 5 Dual CAN USB (or DPA 5 #[DPA 5 Bluetooth ID] Bluetooth).
3.Select USB for the Port.
4.Select J1708 for the protocol.
5.When prompted for the Electrical Systems.
a.Click Volvo Trucks – VERSION2 and select RP1210A Adapter
b.Click Volvo Trucks – Vehicle electronics ‘98 and select RP1210A Adapter
c.Click Mack Trucks – V-MAC I/II/III, ITC and select RP1210A Adapter
d.Click Volvo Trucks – V-MAC IV and select RP1210A Adapter
6.Continue with installation.
From Inside VCADS
1.Start Program.
2.Click the Tools menu and choose Options.
3.Select the Comm. Unit Configuration tab.
4.Select RP1210A Adapter and then select DPA 5 Dual CAN USB (or DPA 5 #[DPA 5 Bluetooth ID] Bluetooth).
5.Select USB for the Port.
6.Select J1708 for the protocol.
7.Go to the Comm. Unit Selection tab.
a.Click Volvo Trucks – VERSION2 and select RP1210A Adapter
b.Click Volvo Trucks – Vehicle electronics ‘98 and select RP1210A Adapter
c.Click Mack Trucks – V-MAC I/II/III, ITC and select RP1210A Adapter
d.Click Volvo Trucks – V-MAC IV and select RP1210A Adapter
8.Click Ok.
Volvo/Mack Premium Tech Tool (PTT)
1.Start Program.
2.Select Settings from the PTT menu.
3.Go to the Communication Unit configuration tab:
a.It is here that you select the settings for each adapter that you may use. For example, if you have an RP1210A adapter, it is here that you select which adapter, port, and protocol.
b.NOTE: This identifies the settings for each adapter. It does not select which adapter the PTT application will use to communicate with the vehicle.
4.Go to the Comm unit selection tab:
a.It is here that you identify which adapter is to be used by the PTT application to communicate with the vehicle. You may have to change this selection depending upon the vehicle.
b.For example, if you typically use an 88890020 adapter in direct mode, when you need to communicate with an older vehicle you will need to change to RP1210A adapter or the 9998555
adapters, depending upon the vehicle.