This illustration show you guide on how to remove crankshaft for 2015 Kobelco ISUZU 4JJ1 XASK-02 engine.
Related Contents:
ISUZU E-IDSS 2024 2019 Engine Diagnostic Service System Free Download
Procedures:
1 Battery Ground Cable Disconnect
Disconnect the battery ground cable from the battery.
Caution: Do not disconnect the battery cable for 3 minutes after turning OFF the ignition switch.
2 Coolant Drain
Drain coolant from the radiator.
Caution: Do not loosen or remove the radiator cap when the coolant is hot.
Caution: Steam and boiling water can burst out, possibly causing burns or heat related injuries.
Caution: When opening the radiator cap, place a thick cloth over the cap when the coolant is cooled, and turn it gradually to release the pressure before opening it.
Note: Loosen the water drain plug on the rear right side of the engine, as well as the radiator drain plug.
Note: Completely drain the coolant.
Note: After completely draining the coolant, securely tighten the drain plug.
3 Engine Oil Drain
Drain the engine oil from the oil pan.
Note: After draining the oil, tighten the drain plug to the specified torque.
tightening torque: 78 N・m { 8.0 kgf・m / 58 lb・ft } Drain plug
tightening torque: 70 N・m { 7.1 kgf・m / 52 lb・ft } Drain cock
Caution: Do not forget to tighten the drain plug or drain cock.
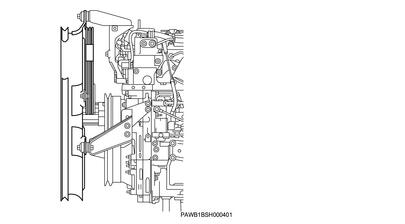
4 Fan Shroud Removal
Remove the fan shroud from the bracket.
Note: Remove the fan shroud and fan guard as a unit.
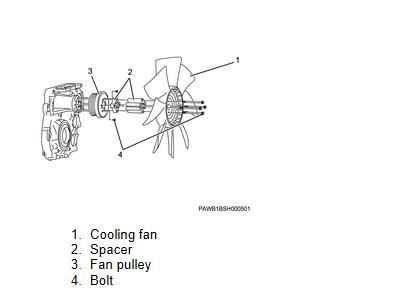
5 Cooling Fan Removal
Remove the cooling fan from the fan pulley.
Note: Remove the spacer at the same time.
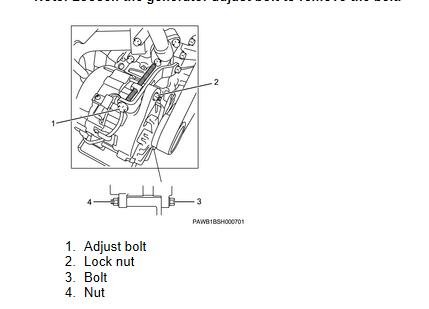
6 Cooling Fan Belt Removal
Remove the cooling fan belt from the pulley.
Note: Loosen the nuts fastening the bolts.
Note: Loosen the generator adjust bolt to remove the belt.
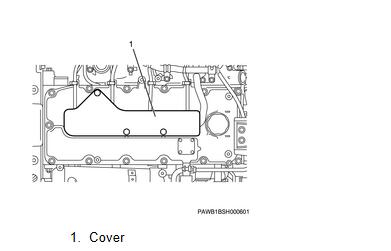
7 Fuel Hose Removal
Remove the cover from the cylinder head cover.
Remove the harness connector from the injector.
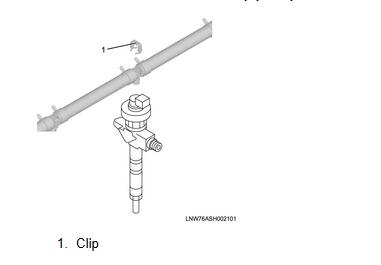
Remove the nozzle leak off pipe from the injector.
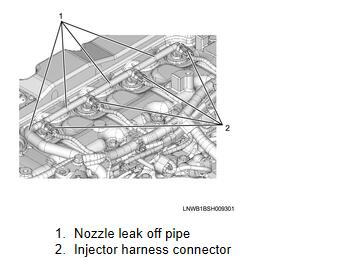
Caution: Do not reuse the leak-off pipe clip.
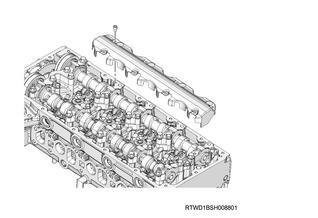
8 Cylinder Head Cover Removal
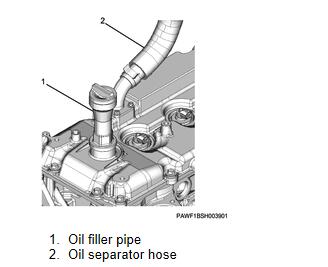
Disconnect the PCV hose from the cylinder head cover.
Disconnect the oil separator hose from the cylinder head cover.
Note: Disconnect the PCV hose or oil separator hose.
Remove the oil filler pipe from the cylinder head cover.
Note: The specifications of equipment vary depending on the machine.
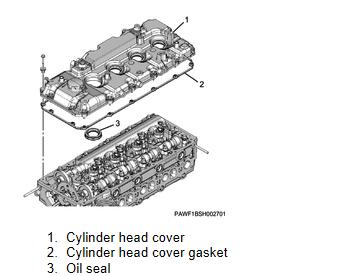
Remove the cylinder head cover from the cylinder head.
Caution: Take care not to damage the lip section of the oil seal with the injector connector.
9 PCV Hose Removal
Remove the PCV hose from the engine assembly.
Note: Remove the clamp.
10 Generator Removal
Disconnect the harness from the generator.
Note: Disconnect the harness connector and B-terminal cable.
Remove the generator from the generator bracket.
Note: Remove the nuts at 2 locations, pull out the bolts, and remove the generator.
11 Water Pipe Removal
Remove the water pipe from the engine assembly.
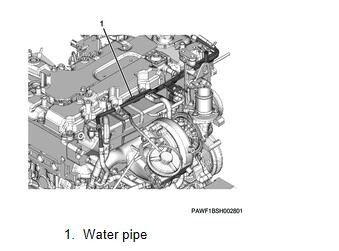
Note: Because the plastic pipe is easily damaged during hose removal, do not remove from the side of the plastic pipe if possible.
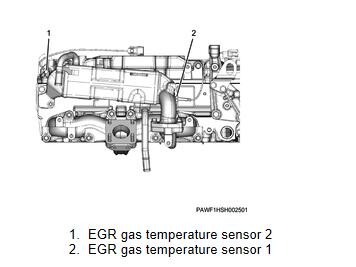
12 EGR Gas Temperature Sensor 1 Removal
Disconnect the harness connector from EGR gas temperature sensor 1.
Remove EGR gas temperature sensor 1 from the EGR cooler.
13 EGR Gas Temperature Sensor 2 Removal
Disconnect the harness connector from EGR gas temperature sensor 2.
Remove EGR gas temperature sensor 2 from the EGR cooler.
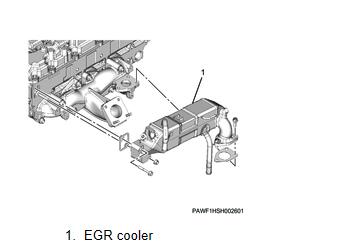
14 EGR Cooler Removal
Remove the EGR cooler from the exhaust manifold and cylinder head assembly.
Note: Remove the IN side and OUT side of the rubber hose for the water pipe and remove the EGR cooler and gasket.
Caution: Do not hold the water pipe section when removing the EGR cooler.
Caution: Because the plastic pipe is easily damaged during hose removal, do not remove from the side of the plastic pipe if possible.
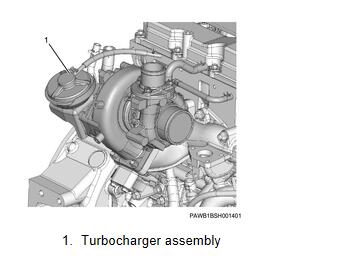
15 Turbocharger Assembly Removal
Remove the water feed pipe from the oil cooler assembly.
Disconnect the oil feed pipe from the turbocharger assembly.
Remove the oil feed pipe from the oil cooler assembly.
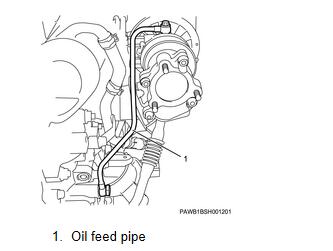
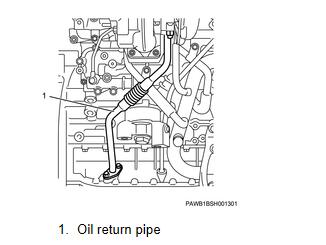
Disconnect the oil return pipe from the turbocharger assembly.
Remove the oil return pipe from the crankcase.
Remove the turbocharger assembly from the exhaust manifold.
Note: Remove the water feed hose and water return hose together.
Caution: Do not hold the actuator rod.
Caution: Do not reuse the gasket.
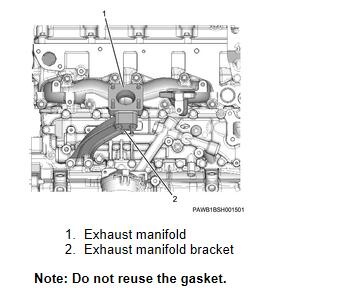
16 Exhaust Manifold Removal
Remove the exhaust manifold bracket from the exhaust manifold and the oil cooler assembly.
Remove the exhaust manifold from the cylinder head.
17 Intake Throttle Valve Removal
Disconnect the connector from the intake throttle valve.
Note: Pull the red claw to release the lock.
Remove the intake throttle valve from the inlet manifold.
Note: Remove with the adapter pipe as a unit.
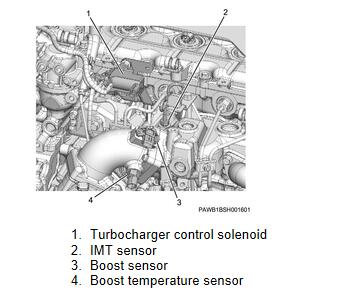
18 Turbocharger Control Solenoid Removal
Disconnect the harness connector from the turbocharger control solenoid.
Disconnect the vacuum hose from the turbocharger control solenoid.
Remove the turbocharger control solenoid from the inlet manifold.
Note: Remove together with the bracket.
19 Oil Level Gauge Guide Tube Removal
Remove the oil level gauge from the oil level gauge guide tube.
Remove the oil level gauge guide tube from the crankcase.
20 Injector Safety Information
Caution: Including the inside of the injector, the holes and gaps that are to be used as the fuel paths for the fuel system have an extremely precise finish.
Caution: Because there is the possibility of damage due to foreign material contamination, cover the cap after removing parts, etc., to prevent the intrusion of foreign material.
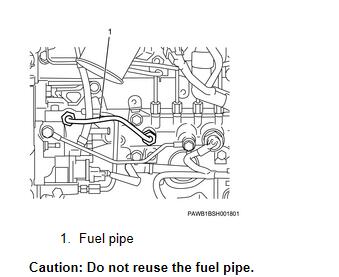
21 Fuel Pipe Removal
Remove the fuel pipe from the fuel supply pump and the common rail assembly.
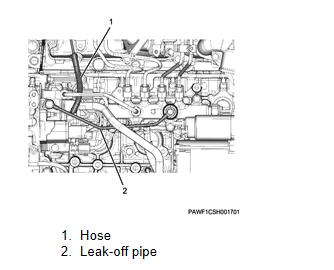
22 Leak-Off Pipe Removal
Remove the fuel leak-off pipe from the fuel supply pump and common rail assembly.
Caution: Do not reuse the gasket.
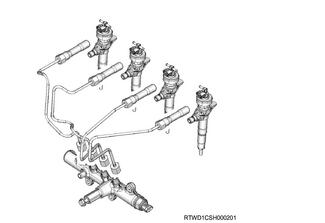
23 Injection Pipe Removal
Remove the clip from the injection pipe.
Remove the injection pipe from the injector and the common rail assembly.
Caution: Do not reuse the injection pipe.
24 Timing Chain Lower Cover Removal
Remove the timing chain lower cover from the gear case cover.ISUZU G-IDSS Diagnostic Software
25 Timing Chain Upper Cover Removal
Disconnect the harness connector from the CMP sensor.
Remove the timing chain upper cover from the cylinder head.
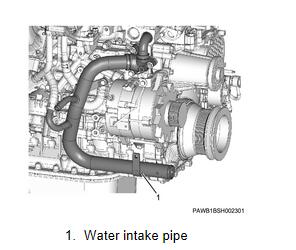
26 Water Intake Pipe Removal
Disconnect the water intake pipe from the oil cooler.
Caution: Do not reuse the gasket or O-ring.
Remove the water intake pipe from the cylinder block.
27 Injector Removal
Remove the injector from the cylinder head assembly.
Remove the injector gasket from the injector.
Remove the O-ring from the injector.
Caution: Do not reuse the clip, injector gasket, or O-ring.
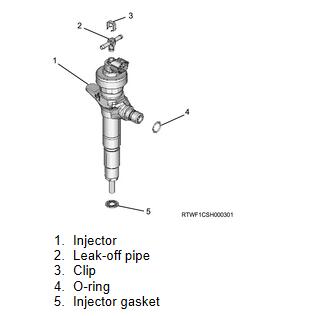
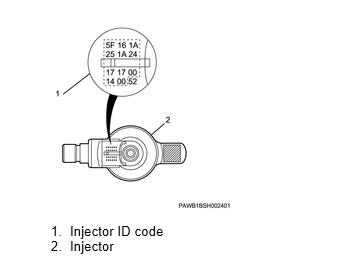
Caution: The injector ID code identifies the injectors.
Caution: Do not remove the injector ID codes from the injectors.
Caution:Absolutely never touch the injector solenoids because that can hinder their performance or cause damage.
Caution: Store the removed injector with the cylinder number on it.
Caution: When the injector has been replaced, erase the ID code of the replaced cylinder number on the injector ID code label using a black pen, etc.
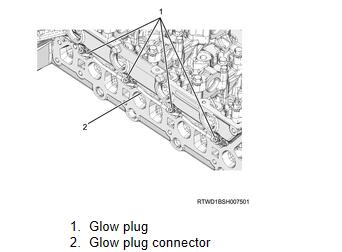
28 Glow Plug Connector Removal
Remove the glow plug connector from the glow plug.
29 Glow Plug Removal
Remove the glow plug from the cylinder head assembly.
30 Baffle Plate Removal
Remove the baffle plate from the cylinder head.
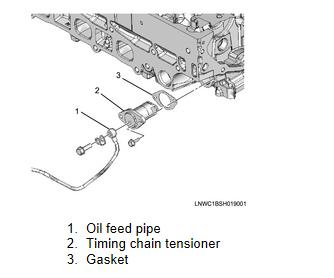
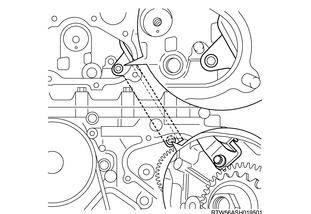
31 Timing Chain Tensioner Removal
Remove the timing chain tensioner from the cylinder head.
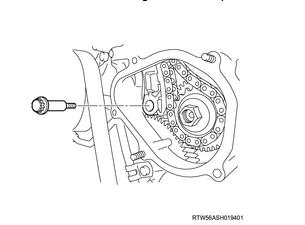
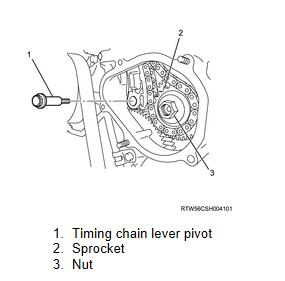
32 Timing Chain Lever Pivot Removal
Remove the timing chain lever pivot from the timing gear case.
33 Timing Chain Removal
Remove the sprocket from idle gear D.
Remove the timing chain from the cylinder head.
Note: Remove the timing chain and the idle gear side sprocket as a set from the supply pump side sprocket.
34 Timing Chain Guide Removal
Remove the timing chain guide from the cylinder head.
35 Camshaftbracket Removal
Remove the camshaft brackets from the cylinder head.
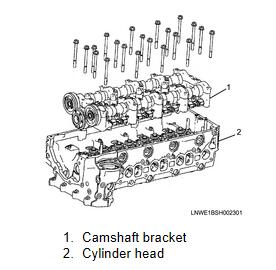
36 Cylinder Head Assembly Removal
Remove the bolt from the timing gear case.
Remove the nut from the timing gear case.
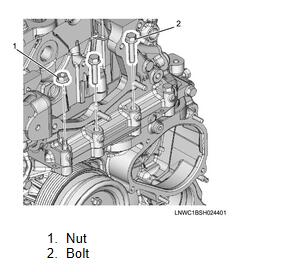
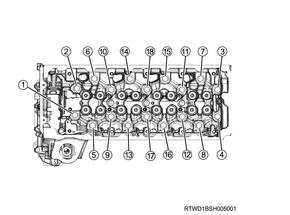
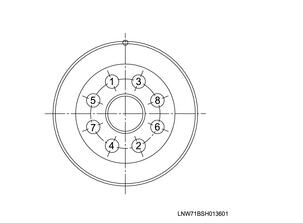
Remove the head bolts from the cylinder head.
Note: Loosen and remove in the order indicated in the diagram.
Caution: Do not reuse the head bolts.
Remove the cylinder head from the cylinder block.
Note: Remove with the inlet manifold.
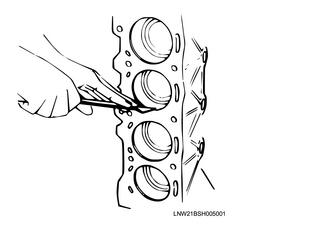
37 Cylinder Head Gasket Removal
Remove the cylinder head gasket from the cylinder head.
Caution: Do not reuse the gasket.
38 EGR Water Pipe Removal
Remove the EGR water pipe from the oil cooler.
Note: Remove the pipe clip installation bolt.ISUZU E-IDSS Diagnostic Software

39 Oil Cooler Assembly Removal
Remove the oil cooler from the cylinder block.
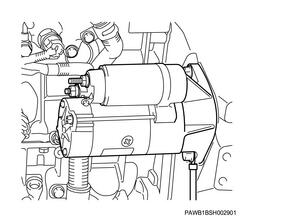
40 Starter Motor Removal
Disconnect the earth cable from the starter motor.
Disconnect the S-terminal from the starter motor.
Disconnect the B-terminal from the starter motor.
Remove the starter motor from the flywheel housing.
41 Water Pump Assembly Removal
Remove the water pump from the timing gear case.
Note: Remove the water pump installation nut and bolt.
Note: Remove the water pump assembly and gasket.
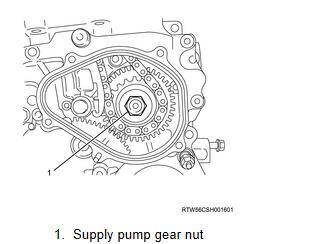
42 Supply Pump Gear Nut Removal
Fasten special tool to flywheel housing.
Note: Install the crankshaft stopper to the flywheel housing starter installation section and ensure the crankshaft does not rotate.
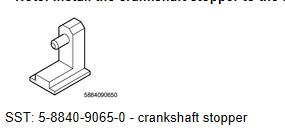
Caution: Verify that the stopper is installed and securely bites into the ring gear.
Turn the nut.
Note: Loosen the nut of the supply pump gear.
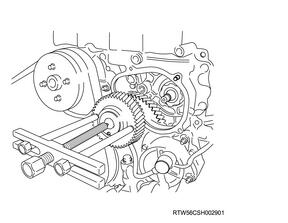
43 Sprocket Removal
Remove the nut from the sprocket.
Remove the sprocket from the supply pump gear.
44 Supply Pump Gear Removal
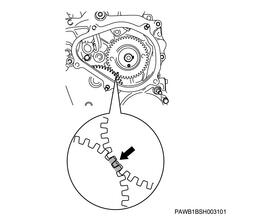
Check alignment mark of the supply pump gear.
Remove the supply pump gear from the fuel supply pump.
Note: Remove the supply pump gear using a gear puller.
45 Fuel Supply Pump Removal
Disconnect the harness connector from the fuel supply pump.
Note: Disconnect the harness connector of the suction control valve and fuel temperature sensor.
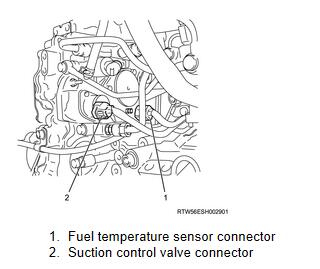
Remove the supply pump bracket from the cylinder block.
Remove the fuel supply pump from the timing gear case.
Note: When removing the fuel supply pump, do not hold the high pressure pipe of the pump instead of the handle.

Remove the O-ring from the fuel supply pump.

46 Crankshaft Pulley Removal
Remove the crankshaft pulley from the crankshaft.
Caution: Do not reuse the crankshaft pulley bolt or washer.
Note: When fastening, remove using the removal bolt hole of the crankshaft pulley.
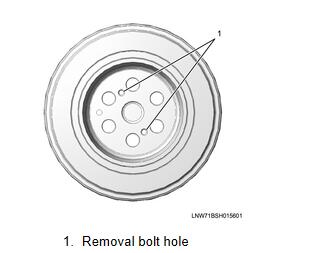
Note: Remove using a removal bolt with a diameter of 5 mm {0.1969 in}, a pitch of 0.8, and a stem length of 20 mm {0.7874 in} or more.
Caution: Take care as removing the pulley forcibly by not using a removal bolt may cause the oil seal to break and fuel to leak.
47 Crankshaft Front Oil Seal Removal
Install the bolt to the crankshaft.
Note: Install the crankshaft pulley bolt and 17 mm {0.67 in} collar or equivalent to the crankshaft to secure the crank gear.
Note: When removing the slinger, take care to prevent the crank gear from falling out.
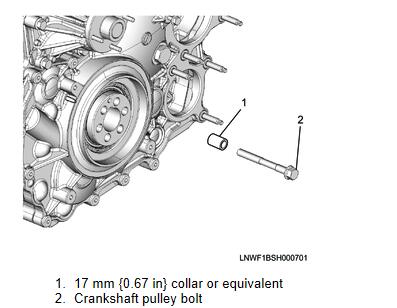
Remove the crankshaft front oil seal from the crankshaft using the special tool.
Note: Remove the crankshaft front oil seal and slinger as a set.
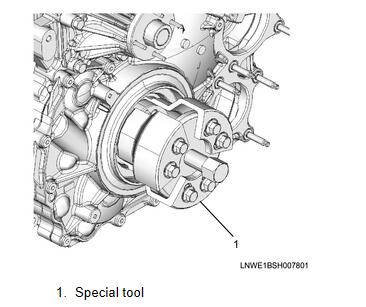
Caution: Do not forget to take out the installed bolts.
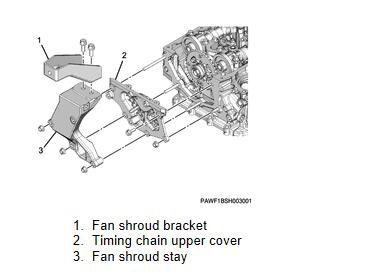
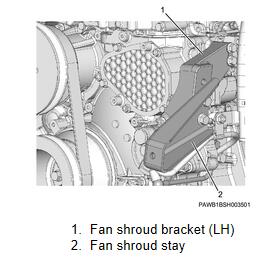
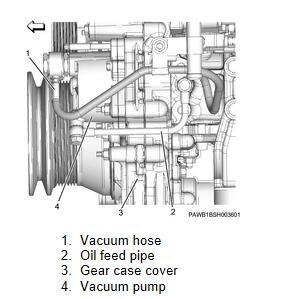
48 Vacuum Pump Assembly Removal
Remove the brackets from the gear case and the vacuum pump.
Note: Remove the fan shroud bracket left and fan shroud stay.
Disconnect the vacuum hose from the vacuum pump.
Remove the oil feed pipe from the vacuum pump and cylinder block.
Remove the vacuum pump from the gear case cover.
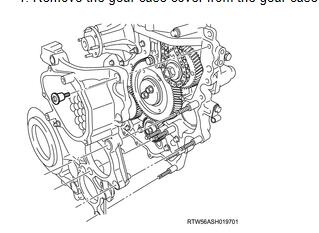
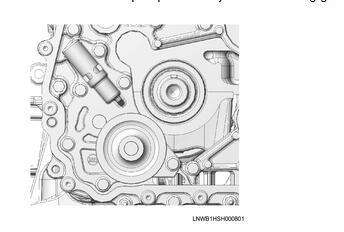
49 Gear Case Cover Removal
Remove the gear case cover from the gear case.
50 Crank Gear Removal
Remove the crank gear from the crankshaft.
51 Idle Gear A Removal
Remove the idle gear A from the idle gear A shaft.
Note: Remove idle gear A, idle gear A flange, and idle gear A shaft.
52 Oil Pump Assembly Removal
Remove the oil pump assembly from the timing gear case.
53 Timing Gear Case Removal
Remove the timing gear case from the cylinder block.
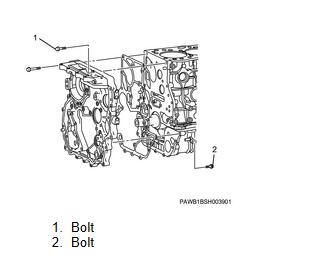
Note: Install bolt 1 in the diagram to the inside of timing gear case and bolt 2 from the crankcase side.
Caution: Do not forget to remove the bolt.
Remove the gasket from the cylinder block.
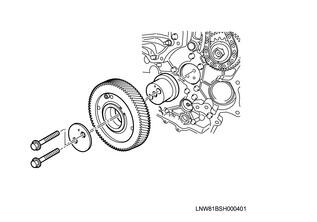
54 Flywheel Removal
Fasten special tool to flywheel housing.
Note: Install the crankshaft stopper to the flywheel housing starter installation section and ensure the crankshaft does not rotate.
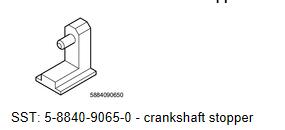
Caution: Verify that the stopper is installed and securely bites into the ring gear.
Remove the flywheel from the crankshaft.
Note: Gradually loosen the flywheel mounting bolts in the order shown in the diagram while making sure that the flywheel does not rotate.
Note: Loosen all bolts, then remove the stopper and the flywheel.
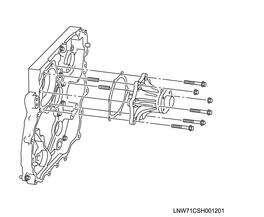
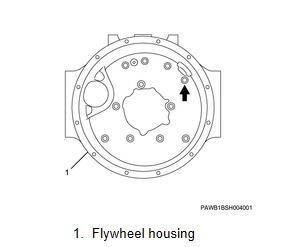
55 Flywheel Housing Removal
Remove the flywheel housing from the crankcase.
Note: Loosen the bolt indicated with arrows using a tool while holding down the nut on the opposite side.
56 Oil Seal Retainer Removal
Remove the oil seal retainer from the cylinder block and crankcase.
Note: Remove the retainer with the oil seal on.
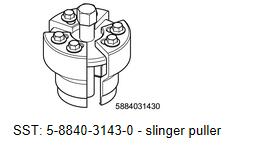
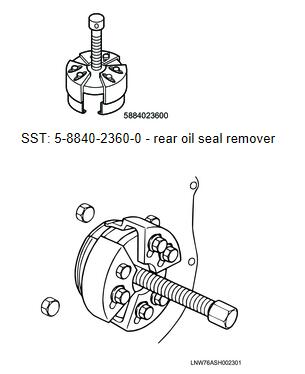
57Crankshaft Rear Oil Seal Removal
Remove the crankshaft rear oil seal from the oil seal retainer.
Remove the slinger from the crankshaft using special tool.
Note: Use a slinger puller to remove.
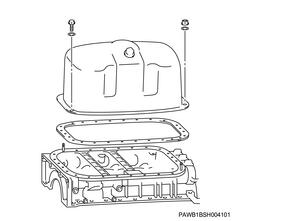
58 Oil Pan Removal
Remove the oil pan from the crankcase
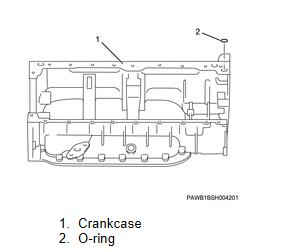
59 Crankcase Removal
Remove the crankcase from the cylinder block.
60 Piston Removal
Remove the connecting rod bearing cap from the connecting rod.
Remove the connecting rod bearing from the connecting rod bearing cap.
Note: Organize the removed bearings by the cylinders using tags, etc.

Clean the cylinder liner using a scraper.
Note: Remove any carbon from the top of the cylinder bore using a scraper.
Remove the piston from the cylinder block.
Note: Pull out the piston and connecting rod from the cylinder head side.
Caution: When pushing out the connecting rod, be careful not to damage the oil jet or cylinder block.
61 CKP Sensor Removal
Disconnect the harness connector from the CKP sensor.
Remove the CKP sensor from the cylinder block.
Caution: The CKP sensor is sensitive to shock, so do not throw or drop it.

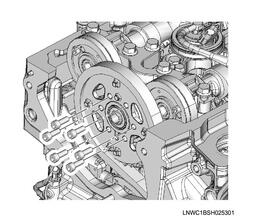
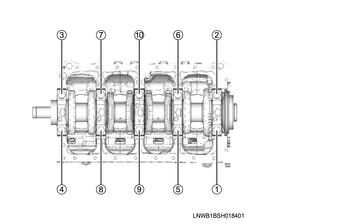
62 Crankshaft Removal
Remove the bearing cap bolt from the cylinder block.
Note: Gradually loosen the bolts in the order of the numbers indicated in the diagram.
Remove the crankshaft bearing from the bearing cap.
Note: Remove the crankshaft lower bearing.
Note: The removed crankshaft lower bearing should be lined in the order of the number.
Remove the crankshaft from the cylinder block.
Caution: Make sure to slightly lift the crank angle sensor rotor when laying the crankshaft.
Caution: Do not hit nor drop crank angle sensor rotors.
Caution: Do not reuse crank angle sensor rotors that have been hit or dropped.
Remove the thrust bearing from the cylinder block.
Remove the crankshaft bearing from the cylinder block.
Note: Remove the crankshaft upper bearing.
Note: The removed crankshaft upper bearing should be lined in the order of the number.
More repair cases for ISUZU engine,please refer to:ISUZU Engine Trouble Repair