The following brake bleeding methods explain how to bleed the hydraulic ABS modulator assembly during installation, or in the event of air in the brake system. There are instructions for both pressure and manual bleeding procedures.
These instructions include the procedure for bleeding both the master cylinder and the brake system. In some cases, for example, if you are replacing only the modulator assembly, it may not
be necessary to bleed the master cylinder. If you have any questions, please contact WABCO
NOTE: The modulator assembly must be handled with appropriate care and should not be exposed to excessive impact or compressed air at the hydraulic ports prior to assembly.
Related Contents:
Meritor Wabco Toolbox v13.6 v12 Diagnostic Software Download
WARNING
Failure to bleed the system whenever any hydraulic system fitting is loosened or disconnected will allow air to remain in the system. This will prevent the hydraulic pressure in the brake system from rising enough to apply the brakes properly. This will cause the stopping distance to increase and can result in serious personal injury.
Properly discard hydraulic brake fluid that is removed from the brake system. Hydraulic brake fluid that is removed can be contaminated and can cause damage, loss of braking and serious
personal injury.
Use only the type of hydraulic brake fluid specified by the equipment manufacturer. Do not use or mix different types of hydraulic brake fluid. The wrong hydraulic brake fluid will damage the rubber parts of the brake caliper and can cause damage, loss of braking and serious personal injury.
NOTE: Use DOT 3 or DOT 4 hydraulic brake fluid.
CAUTION
Hydraulic brake fluid is a caustic substance.
Contact with hydraulic brake fluid can cause skin irritation. Do not let hydraulic brake fluid touch any painted surfaces, as it will remove the paint.
Hydraulic brake fluid may also damage certain non-metal surfaces. Do not let fluid get on brake pads, shoes, rotors or disks.
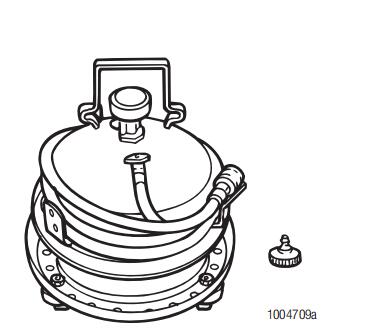
Pressure Fill and Bleed
Pressure fill and bleed is the preferred method for bleeding the service brake system. It requires the use of a special pressure bleeder kit, consisting of a tank, pressure pump and valve, gauge, tubing and adapter. These kits are available from a number of manufacturers and include instructions for use.
Pressure Fill and Bleed Procedure:
1.Apply the parking brake and chock the tires.
Turn the ignition OFF and disconnect the battery terminals.
NOTE: The ignition must remain off for the entire bleed procedure; energizing the unit during bleeding must be impossible.
2.Fill the pressure bleeder with new DOT 3 or DOT 4 hydraulic brake fluid. Refer to the vehicle specifications to determine which fluid to use.
3.Follow the manufacturer’s instructions to connect the pressure bleeder to the brake master cylinder reservoir.
4.Set filling pressure to 20 to 30 psi (1.5 to 2.0 bar).
5Turn on bleed equipment until fluid level in reservoir reaches approximately 0.875-inches (20 mm).
6.Release pressure for 3 to 5 seconds. Apply pressure for 5 to 10 seconds.
7.Repeat Steps 5 and 6 approximately 10 times.
After releasing the pressure, air bubbles should rise up into the reservoir.
WARNING
Do not let the brake master cylinder fluid get below the minimum level during the bleeding operation. Keep the master cylinder reservoir filled with new DOT-approved brake fluid, asspecified by the original equipment manufacturer.
Failure to keep the brake reservoir level above minimum could result in more air entering system, making it impossible to effectively bleed the system.
8.Bleed the brake system:
Set filling pressure to 20 to 30 psi (1.5 to 2.0 bar).
Put a wrench on the brake actuator bleeder fitting. Start with the farthest from the modulator, (typically the right rear), then attach a length of clear plastic tubing to the bleeder fitting. Make sure the tube fits snugly.
9.Submerge the tubing in a container of clean hydraulic brake fluid.
NOTE: Both the tubing and container must be able to withstand the effects of hydraulic brake fluid.
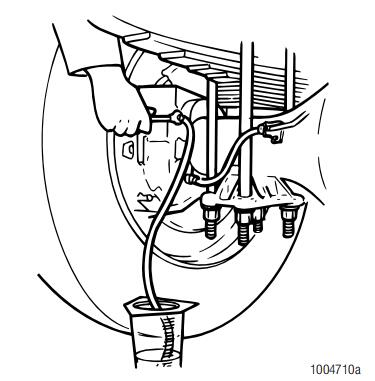
Loosen the bleeder fitting until the fluid begins to flow (about 3/4 turn). Let the hydraulic fluid flow out of the fitting until it is free of air bubbles.
10.Tighten firmly to secure the fitting.
11.Repeat Steps 5 through 8 to bleed the remaining three brake actuators. Bleed in sequence of the longest to shortest circuit from the modulator assembly.
12.Turn off bleed equipment and remove pressure.
Remove bleed device and check fluid level in reservoir. Fill if required. Replace reservoir cap and dispose of used brake fluid.
13.Remove wheel chocks.
Manual Bleed Procedure:
1.Apply the parking brake and chock the tires.
Turn the ignition OFF and disconnect the battery terminals.
NOTE: The ignition must remain off for the entire bleed procedure; energizing the unit during bleeding must be impossible.
2.Fill the reservoir with DOT 3 or DOT 4 hydraulic brake fluid.
3.Depress the brake pedal five times using the stroke between 1/3 travel and maximum travel in 5 seconds.
4.Release the pedal for 5 to 10 seconds. Air bubbles will rise into the reservoir while depressing and releasing pedal.
5.Repeat Steps 3 and 4 another three times, or until sufficient pedal resistance is felt.
WARNING
Do not let the brake master cylinder fluid get below the minimum level during the bleeding operation. Keep the master cylinder reservoir filled with new DOT-approved brake fluid as
specified by the original equipment manufacturer.
Failure to keep the brake reservoir level above minimum could result in more air entering system, making it impossible to effectively bleed the system.
6.Bleed the brake system. Put a wrench on the brake actuator bleeder fitting. Start with the farthest from the modulator, (typically the right rear), then attach a length of clear plastic tubing to the bleeder fitting. Make sure the tube fits snugly.
7.Submerge the tubing in a container of clean brake fluid.
NOTE: Both the tubing and container must be able to withstand the effects of brake fluid.
8.Depress the brake pedal 10 to 15 times, using the maximum available stroke.
9.Loosen the bleeder fitting until the fluid begins to flow, (about 3/4 turn), while depressing the brake pedal through its maximum available stroke.
10.Tighten the fitting firmly prior to releasing the brake pedal.
11.Repeat Steps 6 through 8 several times until the discharged fluid is free of air bubbles.
12.Repeat Steps 3 through 9 to bleed the remaining three brake actuators. Bleed in sequence of the longest to the shortest circuit from the modulator.
13.Check the travel of the brake pedal. If a firm resistance is felt the manual bleeding procedure is complete.
14.Check the fluid level in reservoir and fill if required. Replace reservoir cap and dispose of used brake fluid.
15.Remove wheel chocks.