This instruction show you guide on how to fit and remove Speedi-Sleeve for Perkins 1000 series engine.
Related Contents:
Perkins EST 2024A & 2023A & 2019A Software Free Download
Perkins SPI2 2018A EPC+Service Manual Free Download
Procedures:
1 Clean the crankshaft palm and remove burrs or rough areas from the palm.
2 Ensure that the sleeve (B1) is clean. Apply a narrow bead of Loctite 518 around the bore of the sleeve 5 mm (0.2 in) from the front face of the flange.
Note: The sleeve must be fitted not more than five minutes after the Loctite has been applied.
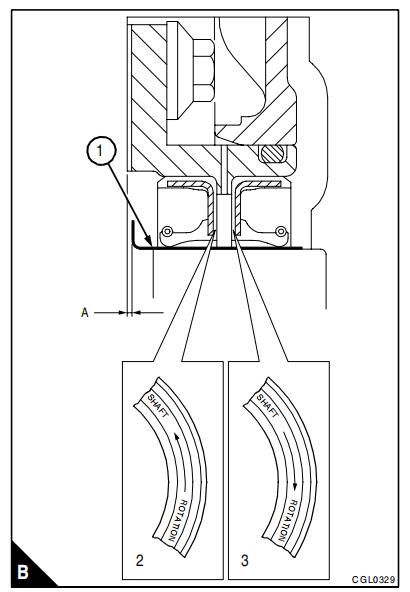
3 Ensure that the crankshaft is fully forward. Use a suitable adaptor and a hammer to drive carefully the sleeve onto the crankshaft palm. The sleeve must be fitted with a clearance of 0,4/0,6 mm (0.016/0.024 in) between the rear face of the cylinder block and the front face of the sleeve flange, dimension ‘A’ (B).
4 Ensure that this clearance is equal all around the flange of the sleeve. Do not try to pull the sleeve backwards as damage could occur to the sleeve. A special tool may be available later for sleeve location.
5 Fit a new joint for the oil seal assembly. Lubricate lightly the sleeve and the lip of the oil seals with clean engine oil and fit the assembly.
6 Fit a new joint to the flywheel housing and fit the cover. Fit the flywheel.
7 To remove a sleeve, cut the flange and pull the sleeve apart.
Note: If only the flange is removed, a recommendation of the sleeve manufacturer is to spread the sleeve. To do this use a small hammer and a suitable punch with a round end.
8 Make one or more lines of small distortions across the full width of the sleeve. This should increase the diameter of the sleeve enough to enable its removal.
More Perkins case,please refer to:Perkins Engine Trouble Repair