There follows a description of the operations for removing and refitting the rear axle with disc brakes that, by analogy,can be considered good for the rear axle with drum brakes too.
Iveco EASY 13.1+KeyGen Software Free Download
2021 2019 IVECO Power EPC Spare Parts Catalogue Free Download
Removal Guide:
– Set the vehicle on level ground and lock the front wheels.
– Loosen the nuts fixing the wheels.
– Lift the vehicle at the rear and put the chassis frame on two stands.
– Put the hydraulic trolley 99321024 under the wheels,take out the nuts fixing the wheels and remove them.
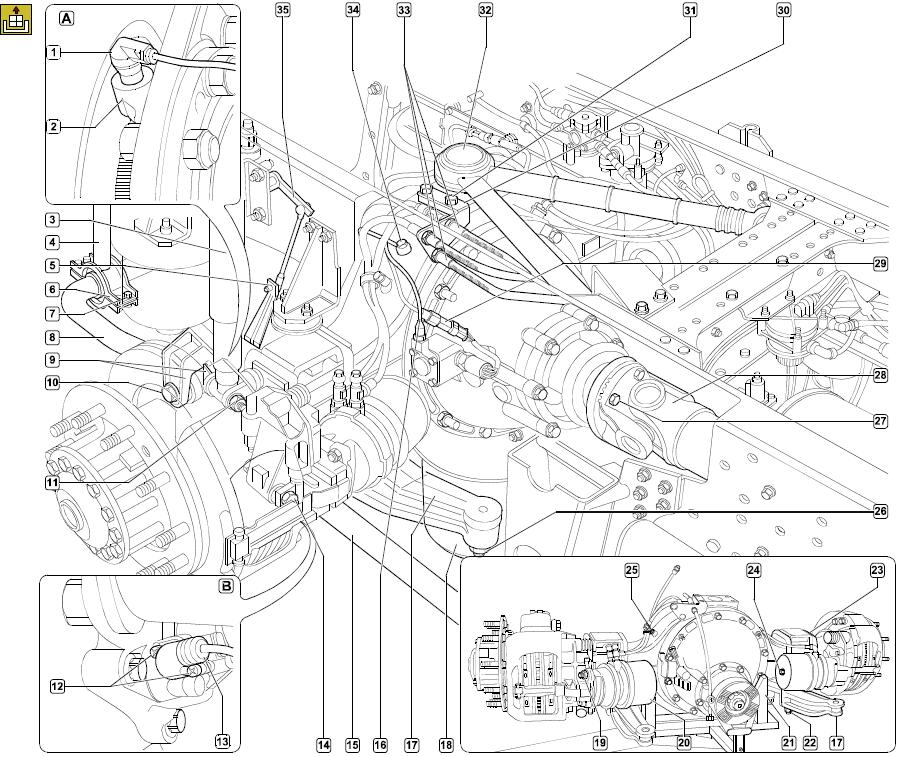
– Cut the clamps holding the wiring and air piping to the reaction triangle.
– Disconnect the three brake air pipes (33) from the bracket (30).
– Take out the screws (31) and disconnect the reaction triangle (32) from the axle housing.
– Extract the speed sensors (1) from the brake calliper supporting flange (2) (det. A).
– Take out the screws (12) and extract the brake lining wear sensor (13) (det. B).
– Disconnect the air pipe (16) and the electrical connection (29) from the differential locking control device.
– Take out the screws (27) fixing the propeller shaft flange (28).
– With an appropriate rope, secure the propeller shaft to the vehicle’s chassis frame.
– Disconnect the brackets (5) for the levelling valve tie rods (35) from the mounts (17).
– Using a hydraulic lift, apply the mount 99370617 (21) to the axle housing.
– Take out the fixing screws (10) and disconnect the stabilizer bar (8) from the mounts (9).
– Loosen the screws (7) fixing the cap (6) retaining the stabilizer bar (8) to the anchor bar (4).
– Turn the stabilizer bar and secure it with a suitable rope to the chassis frame so as not to obstruct removing the rear axle.
– Take out the nuts (14) and disconnect the longitudinal tie rods (15).
– Take out the nuts (11) and disconnect the shock absorbers (3) from the axle mount (17).
– Disconnect the air vent pipe (34) from the axle.
– Take out the nuts (26) and disconnect the air springs (18) from the mounts (17).
– Lower the hydraulic lift and extract the rear axle from the vehicle.
– Disconnect the mounts (17) from the axle housing, removing the nuts (22) for the fixing brackets (23).
– Take out the screws (25) and disconnect the wiring and air pipes of the differential case.
– Fully unscrew the screws (24) to release the brake cylinder (20).
– Remove the nuts (19) and disconnect the brake cylinder (20) from the axle housing.
Refitting Guide:
For refitting, carry out the operations described for removal in reverse order, keeping to the required tightening torques for the screws and/or nuts.
Afterwards, check that:
There is no air leakage from the air pipes.
– The lubricating oil of the axle housing is at the right level.
– The differential locking indicator lamp works properly; if it does not, proceed as described under the relevant heading.