This post show a step-by-step guide on how to reflash carprog MCU AT91SAM7S256. I bought my Carprog clone 4.01 from digi_obd but after about 50 uses starts a counter: “260 uses left – update hardware to synchronize” and was decreasing, anyway 260 uses is big number to recover the investment (us $209 dlls), the programmer was paid before the counter starts.
Need these stuff:
1.- AT91SAM7S256 bin:Contact car-auto-repair.com webmaster for this bin file
2.- Jtag programmer
3.- Jtag software:
Quartus II integrated development environment.
NIOS II IDE integrated development environment.
NIOS II EDS integrated development environment.
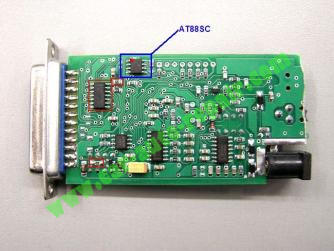
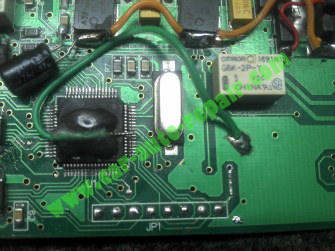
We need to prepare the Carprog to connect to Jtag programmer but first the flash need to be erased, the Jtag function in mcu is dissabled, you can’t connect to the mcu before erase the flash. Remove the AT88SC eeprom from the board, please note where is the pin 1 in eeprom before remove:
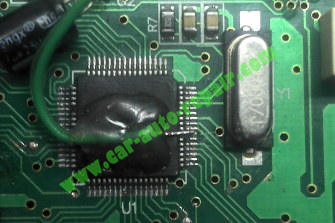
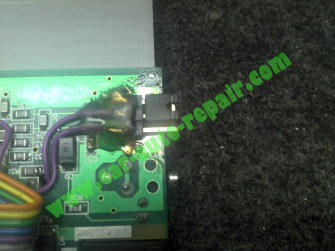
Carefully lift the pin 55 (reset) of the mcu and solder a wire and secure it with a small ammount of silicone (you don’t want to broke the pin in the process).
Connect the Carprog (with the pin 55 dissconected) to the 12v supply, wait about 10 seconds and connect the wire from pin 55 to Vcc (3.3V) in Carprog:
Wait from 5 to 10 seconds after connect the 12v supply, the flash content will be erased and the Jtag option of the Mcu will be enabled now. If not work leave connected for about 3 to 5 minutes. Disconnect the 12v supply from carprog and remove the pin 55 wire from vcc. The pin 55 must remain disconnected until the programming process is done.
Install the H-JTAG software in your pc.
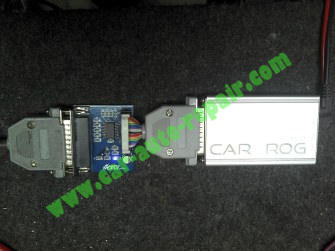
Now we can make the connections from Carprog to Jtag programmer:
Carprog Pinout:
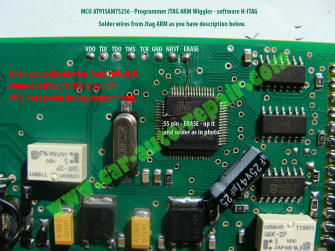
Jtag Pinout:

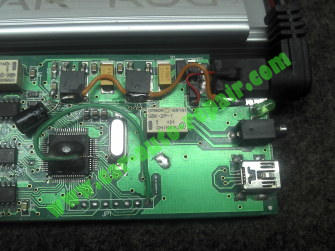
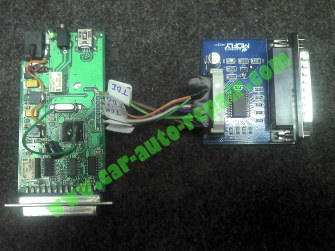
And here is the Carprog connected to the JTAG programmer (note that the pin 55 wire is disconnected):
After the H-Jtag sotware is installed we can procced to configure:
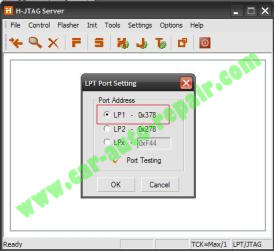
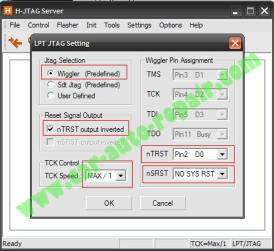
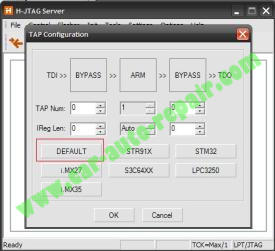
Open the H-Jtag server and make the adjustments:
Select the port:
LPT Jtag setting:
TAP configuration:
Target manager:

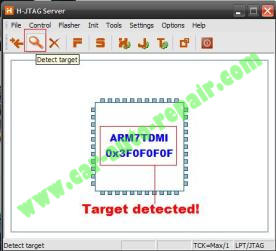
Now connect the carprog to JTag programmer and 12v supply and press “Detect Target” in H-TAG server, now the Carprog Mcu is detected!!!:
Now we procced to program the AT91 mcu:
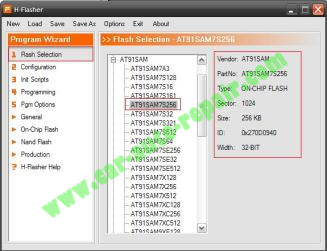
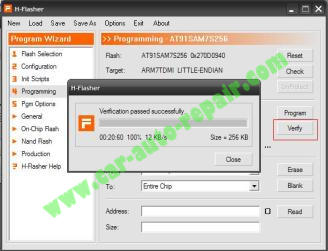
Start the H-FLASHER and select the AT91SAM7S256 from the list:
Go to “4 Programming” in the programming wizzard and press “Check” to verify the communication with the target mcu, if all is ok the values must be:
Flash: AT91SAM7S256 0x270D0940
Target: ARM7TDMI LITTLE-ENDIAN
-In “Type” select: “Plain Binary Format”
-In “Dst Addr” select: “Flash Base Address”
-In “Src File” select the location of the AT91SAM7S256 bin in your hard drive.:
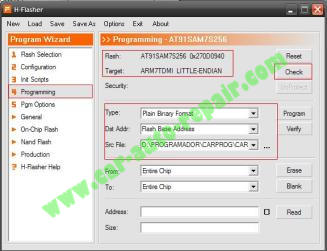
Now press the “Program” button and wait to finish:

If the progrmming was succefull you will receive the next message:
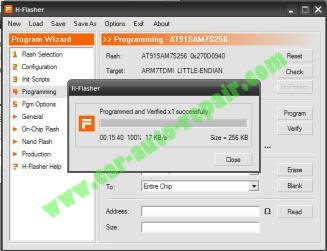
You can verify again if everything is ok by pressing the button “Verify”:
The programming process is finished!!, disconnect the 12v supply, then disconnect the programmer from carprog, solder the pin 55 wire to Ground (check the picture) and put back the AT88SC eeprom, reassemble the carprog and test it.
I already made some further tests and the Carprog works well with any version of the software and the COUNTER IS GONE!!!
Tested with versions: 3.75, 4.0, 4.1, 4.5, 4.85 and 4.86, the counter never start again.
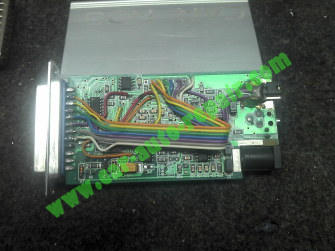
I made a modification to my Carprog clone for fast reprogramming, if I need to do it again will not be necessary to open it again and redo all connection every time I want or need to reprogram:
I used the Carprog pins from 15 to 21, those pins are useless for the programmer or any adapter, they are disconnected:
I used a “selector” like the desktop’s pc for bios, to select the programming mode, in picture from left to right: 1, 2 3, if the jumper is placed at pins 1 and 2, the pin 55 (reset) from the AT91 is shorted to ground, preventing deprogramming or programming the MCU, if the jumper is placed at pins 2 and 3 the pin 55 is shorted to vcc 3.3v and the Mcu is placed in ERASE MODE. Without jumper the mcu is placed in programming mode:
Now is probably a waste of time, in the near future will save me some time but from now I can reflash the AT91 in less than 5 minutes.
Update: I forgot to mention that I doesn’t need to remove the AT88SC eeprom to ERASE/REFLASH the AT91 mcu. After that the Carprog works well. This is MY OWN experience, so, If you want to do the same, do it at YOUR OWN risk.