This post show you guide on how to remove and install truck control unit MCU3 for Still RX20 forklift truck.More topics about Still trucks,please refer to:Still Forklift Repair
Related Contents:(all workshop manual included in below software)
STILL STEDS Forklift 8.19 8.18 2019 EPC & Diagnostics Free Download
What is Truck Control Unit MCU3?
The MCU 3 is located in the counterweight and can be accessed by removing the cover sheet.
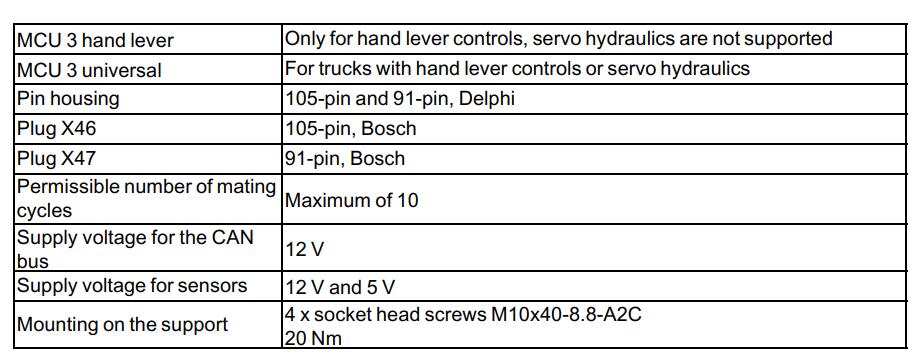
There are two variants of the MCU 3. The software versions are the same in both versions, the configuration of the printed circuit boards is different. The “MCU 3 hand lever” is intended for use solely on trucks that feature hand lever actuation.
The “MCU 3 universal” can be installed on any truck and is therefore intended as a spare part.

Caution:
If the plugs X46 and X47 are connected and disconnected too often, this can damage the connection assembly beyond repair.
– Do not exceed the permissible number of mating cycles.
– Do not measure directly at the plugs X46 and X47.
Tasks of the MCU 3:
• Error management
Error number management A (MCU)
• Main fuse circuit
Parent contact controller
Enabling and blocking of the drive unit and hydraulic drive
• Drive unit
Controller, control system, monitoring
• Hydraulic drive
Controller, control system, monitoring
• Servo hydraulics (option)
• Processing input signals from:
Accelerator, brake sensor, hydraulic transmitter
Drive direction switch
All switches in the front area of the truck
• Battery discharge indicator
Evaluating the values delivered by the MiniSU.
Calculating and displaying the battery residual capacity
• Concept for monitoring and safety
• Evaluating additional electrical installations
• Processing FleetManager data (BDE)
• Diagnostics, software download
• Saving the truck parameters, see the chapter entitled “Parameter management”
• Capacitor, no buffer battery
The capacitor stores the time for approx. 3 months.
All other relevant data is automatically written to an nv SRAM and is not lost even if the capacitor is discharged.
Removing/installing the MCU 3
Spare part
If the MCU needs to be replaced, before removing it, some information must be noted:
• As a rule, the spare part MCU does not contain any data or parameters.
The data and parameters are saved in other control units through constant automatic backups. Refer to chapter “Parameter management”.
Before servicing work is started, a copy of the truck parameters should be saved to the notebook.
• Only the universal MCU 3 is available as a spare part
Removing
– Park the truck securely.
– Disconnect the battery male connector.
– Remove the cover sheet on the counterweight.
– Disconnect the plugs X46 and X47.
– Unscrew the MCU from the counterweight.
Installing
– Screw the MCU onto the counterweight.
– Connect the plugs X46 and X47.
– Fit the cover sheet on the counterweight.
– Connect the battery male connector.
– Set key switch S1 to the ON position.
– Load the truck parameters; see the chapter entitled “Parameter management”.
– Load the current software package; see the chapter entitled “Software compatibility”.
– Start calibration; see the chapter entitled “Calibration”.
– Clear error lists; see the chapter entitled “Clearing error lists”.
– Function checking