Here’s how to reprogram your car’s engine immobilizer to program new keys in the invent of lost keys or a swapped ECU.
Disclaimer:
The engine immobilizer is a security device. Use the information provided here in a legal and appropriate manner.
Modern Toyota’s use a key with an embedded RFID chip as an added means of theft prevention. The key is read by the computer and if it matches, it will enable all systems to start the car. If the key does not match, the car will only crank but not start.
This engine immobilizer system presents a barrier to many owners when it comes time to swap out a bad ECU, or if you’ve lost all the master keys and can’t program new keys.
While taking the car to a dealership or locksmith is an option, it could get expensive because you are at their mercy. What follows is a cheaper method you can do yourself to “virginize” your ECU to accept new keys.
Here’s an overview on how the immobilizer system works on older Toyota and Lexus vehicles.
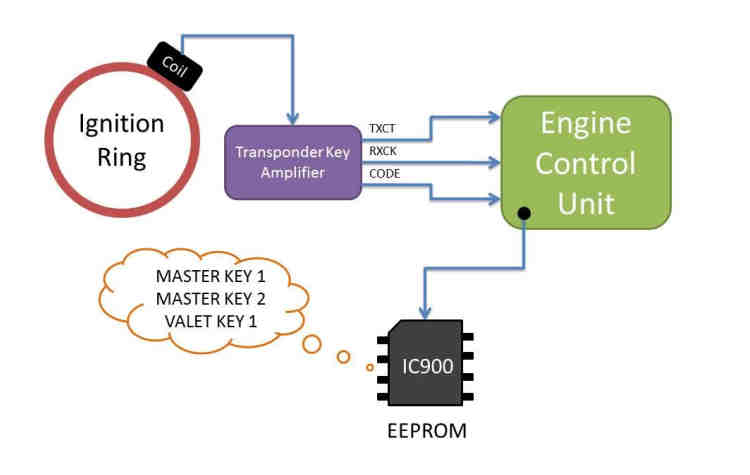
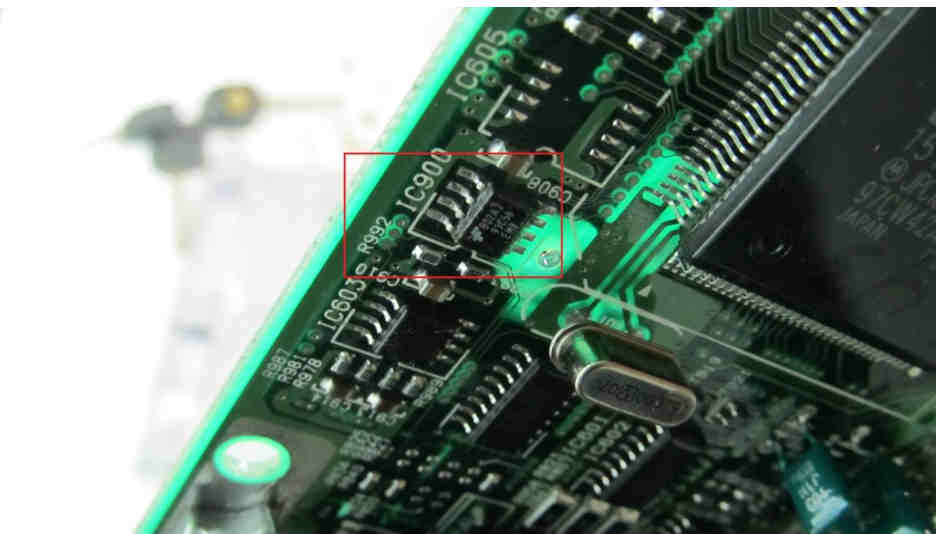
When you insert the key, a coil near the ignition ring picks up the RFID signal from your key and sends it to an amplifier. The amplifier then decrypts it and sends it to the ECU. Inside the ECU is a 93C56 EEPROM chip (IC900) that stores the key values. If the key code matches the stored values, the engine will start.
On newer Toyota and Lexus vehicles, the transponder ECU is a separate unit and it’s housed under the dashboard.
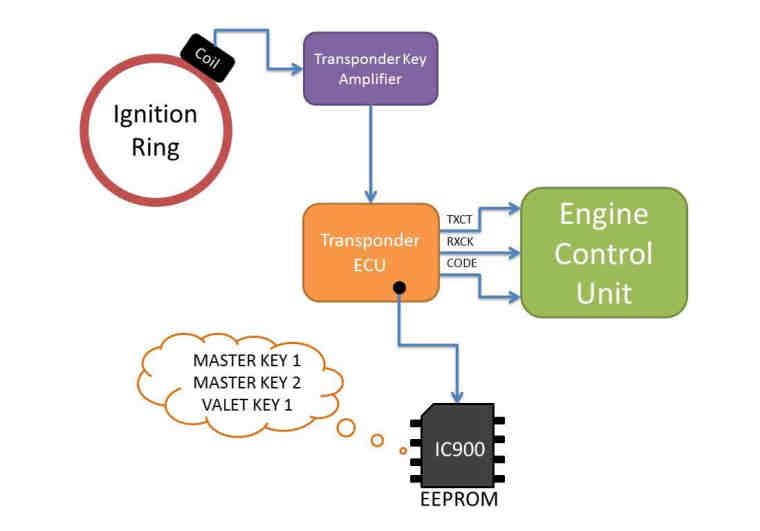
The reason for separating the Transponder ECU with the EEPROM storing the keys is that in the invent of lost keys, it would be cheaper for a dealership to replace the Transponder ECU than the Engine Control Unit. However its location under the dash means you will have to remove the entire dash pad. The procedure for reprogramming is similar, however you will have to short two wires on the OBDII port to perform a hand-shaking procedure between the ECUs to program new keys.
Here’s what the immobilizer system components look like:
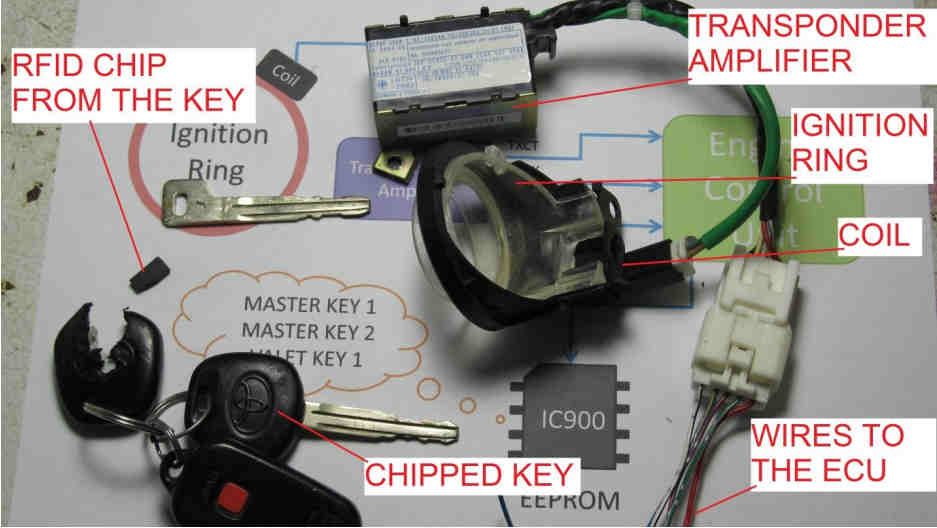
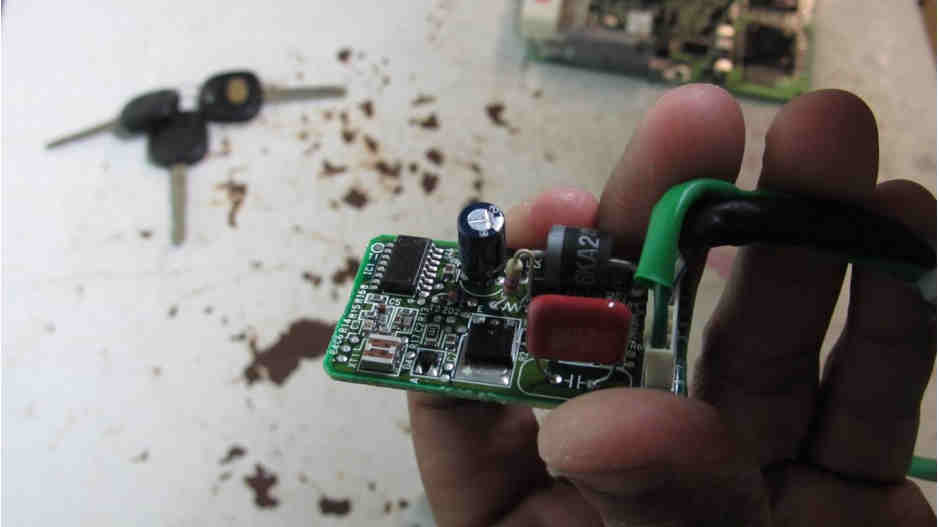
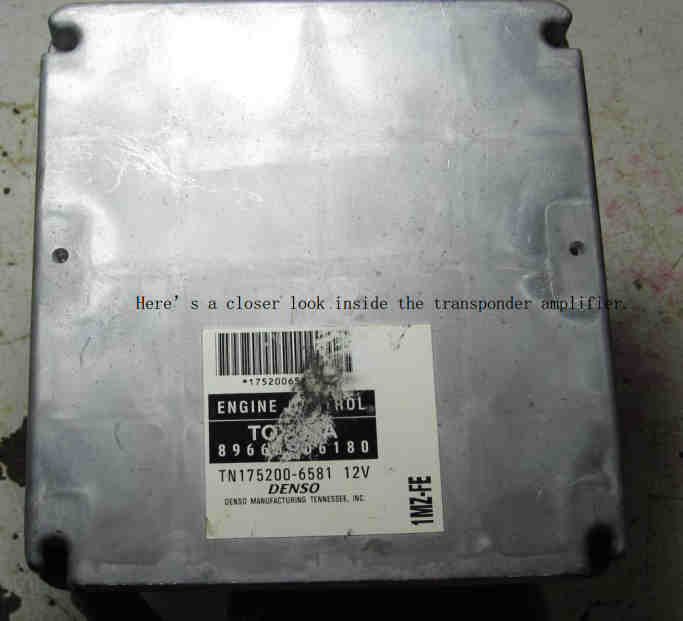
Here’s a closer look inside the transponder amplifier.
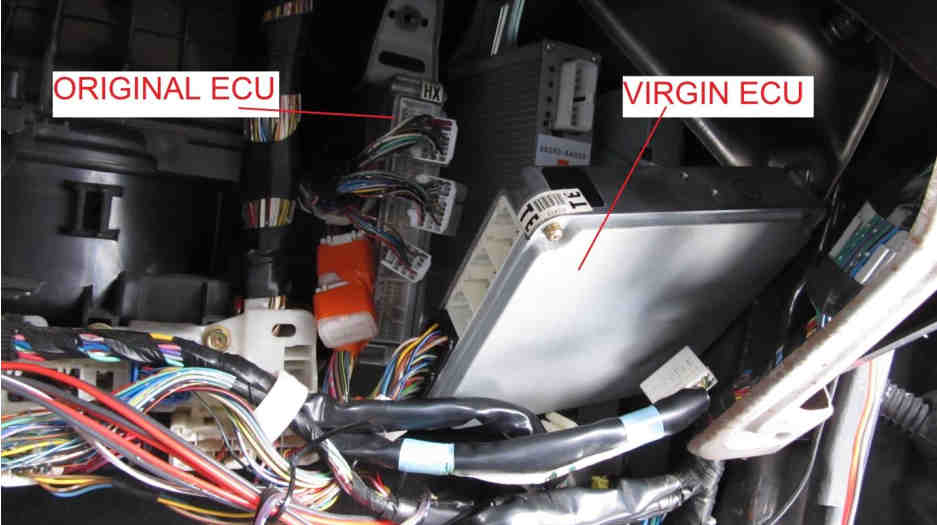
To demonstrate the immobilizer reprogram, I’ll be swapping ECU’s on my 1999 Toyota Solara with one from a 2001. Therefore my current keys won’t match what is in the new ECU.
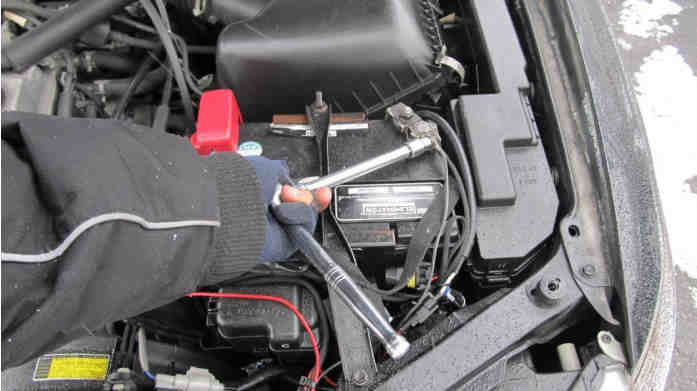
To be safe, pull the battery so you don’t cause any harm when unplugging the ECU.
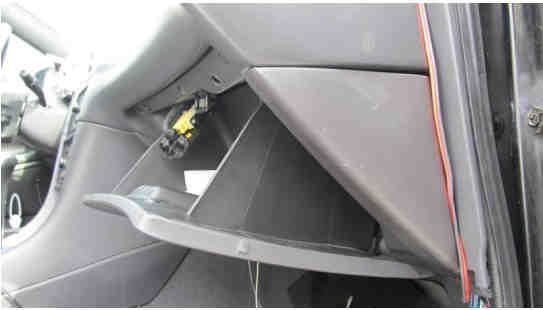
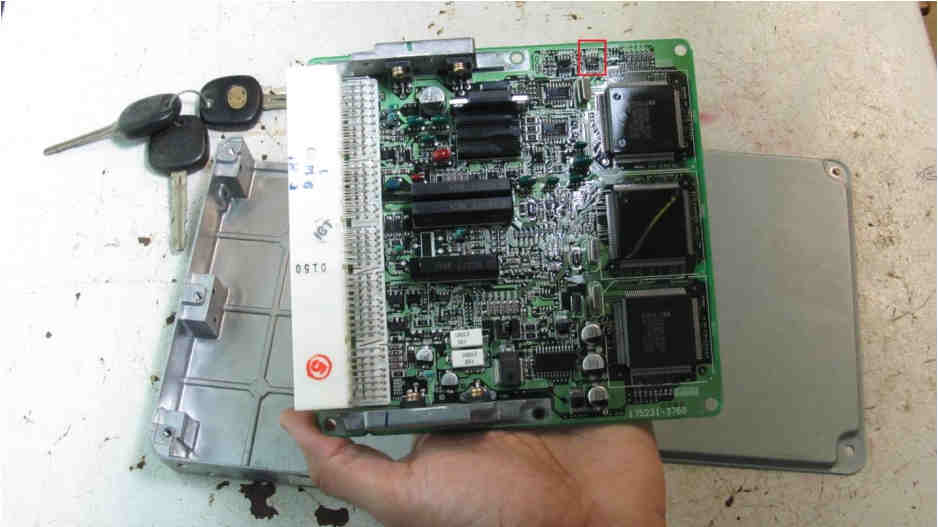
In most cars the ECU is located behind the glove box.
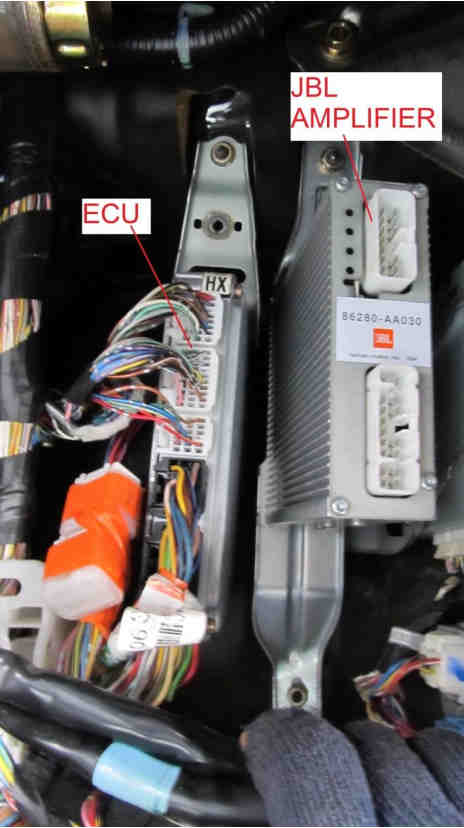
Here’s the ECU behind the glove box. It’s got 5 electrical connectors on it and is held in by two 10 mm nuts on the brackets.
When you open up the ECU, we’re going to be looking for IC900.
It’s a 93C56 EEPROM chip, surface mounted with 8 pins.
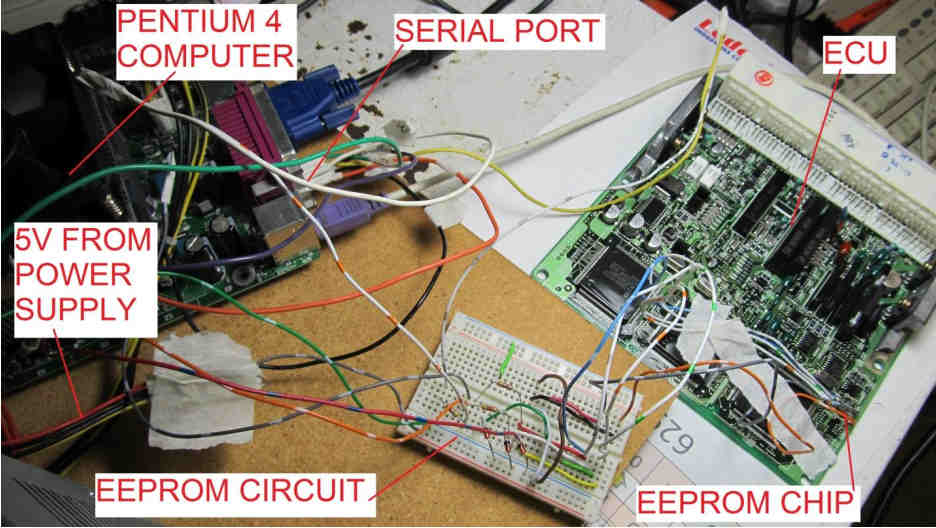
This is where you need to get a programmer to connect the chip to your PC. You can either buy a USB programmer from eBay or make your own to communicate to the serial port. In my case, I made my own, using the circuit below.
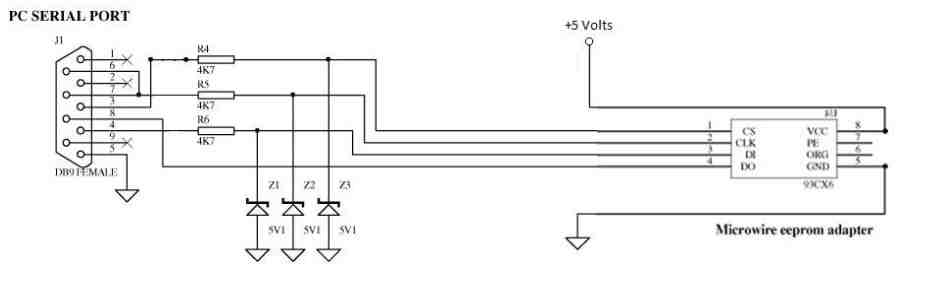
The components required are fairly basic, three 4.7K ohm resistors, three 5V zener diodes, and a computer with a serial port. To connect the 8-pin EEPROM chip to the computer you’ll either have to solder hook-up wires to the pins or get a Test Clip for onboard programming.
Note: This is the same circuit for programming the odometer’s EEPROM.
http://www.toyotanation.com/forum/103-3rd-4th-generation-1992-1996-1997-2001/782562-diyodometer-reprogramming.html
Using a test clip helped a lot during prototyping.
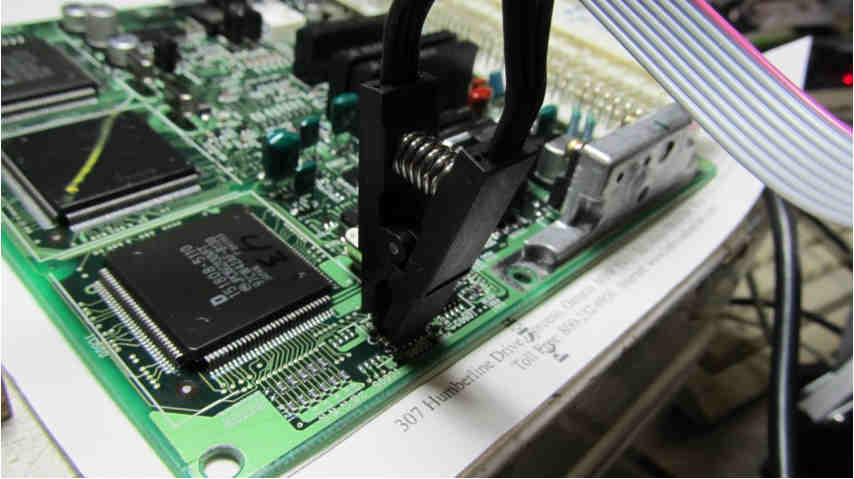
However the clip doesn’t have a good grip on the SMD chip so I chose to solder wires directly to the leads of the chip.
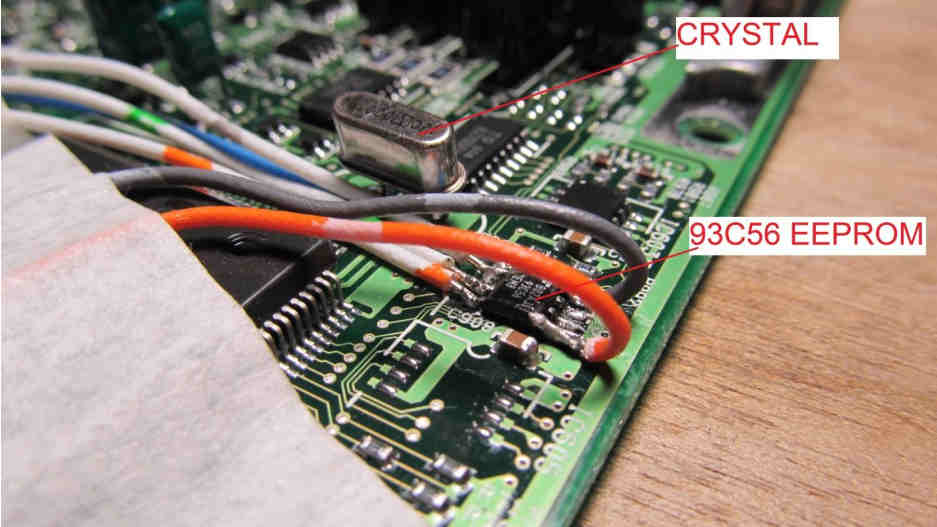
If you do have problems reading and writing from the chip, you have to short the crystal on the board.
Here’s the setup, with the computer connected to the ECU via the EEPROM circuit on a prototype breadboard.
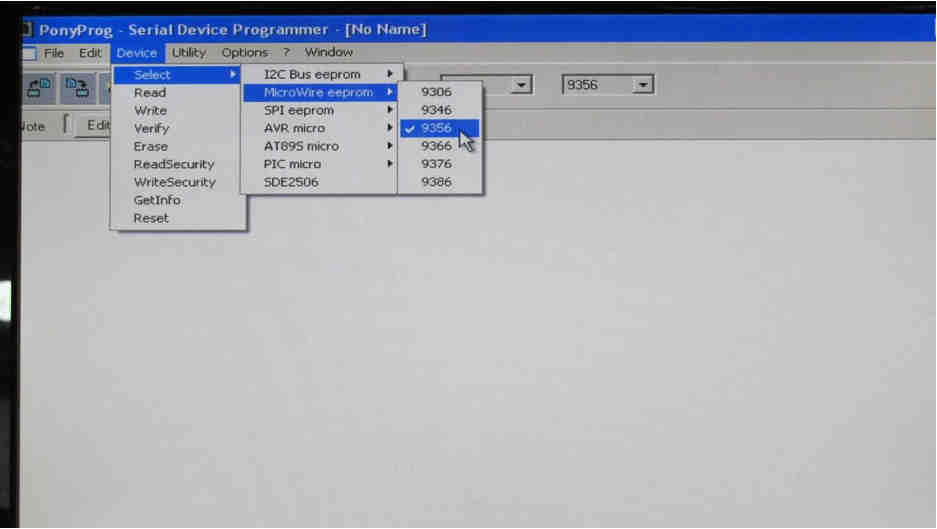
PonyProg, a free serial device programmer was the software used to read information from the serial port and “dump” the EEPROM’s contents. First go to setup under options.
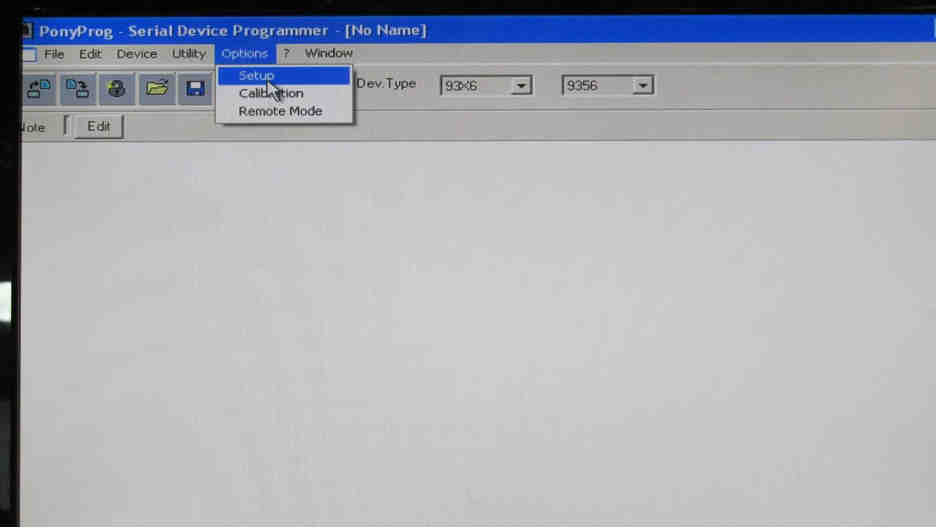
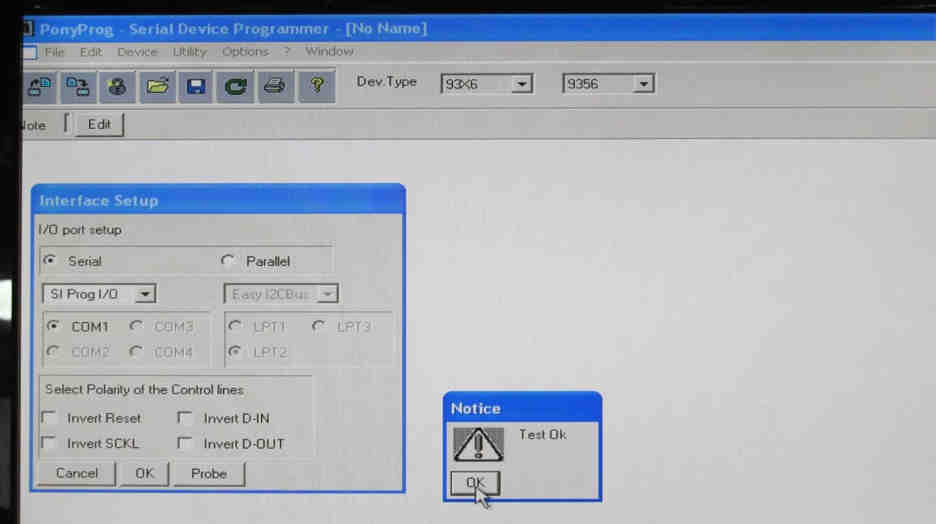
Select SI Prog I/O, COM 1 and then press Probe to check that the reader is communicating to the software.
Then select the device as 93C56 MicroWire EEPROM.
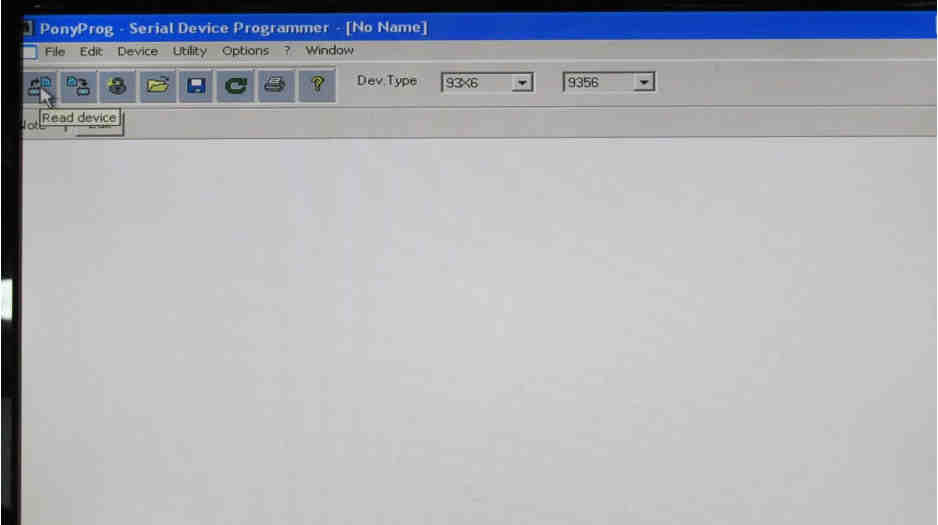
Click Read Device to dump the EEPROM’s contents.
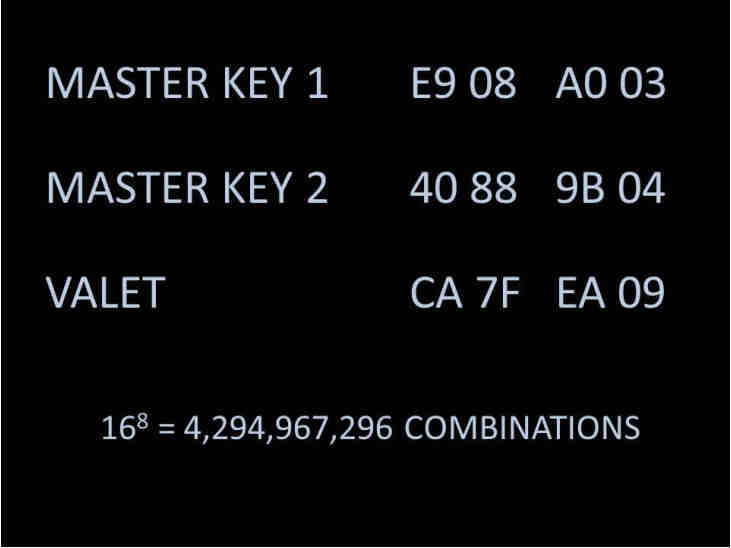
The content should appear as an array of HEX characters. Each key has a unique 8 digit HEX code. There are also bits to indicate key count, enable programming mode and valet lockout.
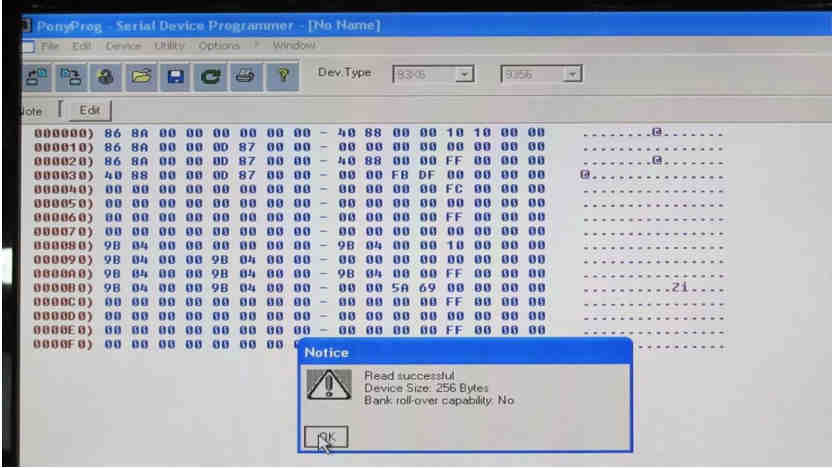
Here’s a breakdown of an EEPROM dump. After a lot of experimentation, it was observed that there are three distinct keys. Each key is an 8 digit HEX value, repeated three times. It is split across two groups of four, but there is symmetry in their positioning within the dump.
With 8 digits and 16 HEX characters, there are 4.2 billion different key combinations. For the example above, here is the breakdown of key codes:
Looking on the right side of the EEPROM dump, there are three noteworthy HEX clusters.
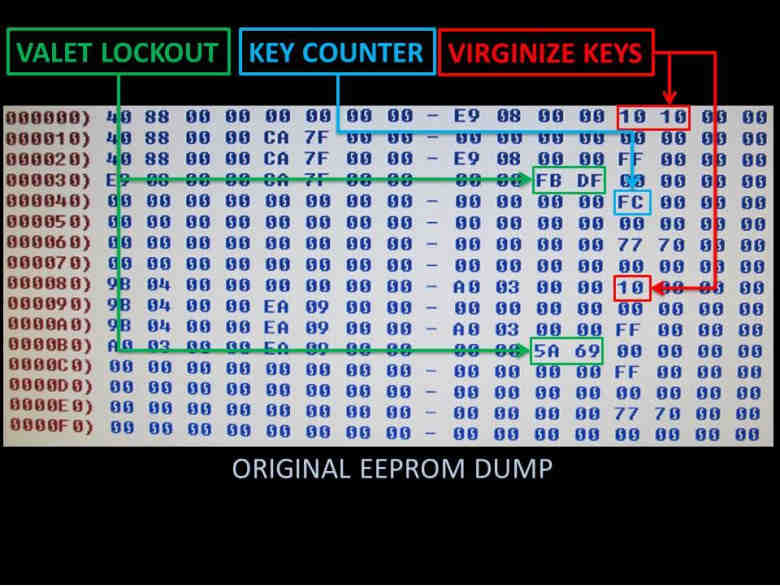
The Valet Lockout should be kept as is, FB DF 5A 69. Erasing this will only allow you to program one Valet key, and then you’re stuck.
The virginize keys are values that are “10” in the original dump but must be changed to “00” to tell the computer to go into auto-programming mode.
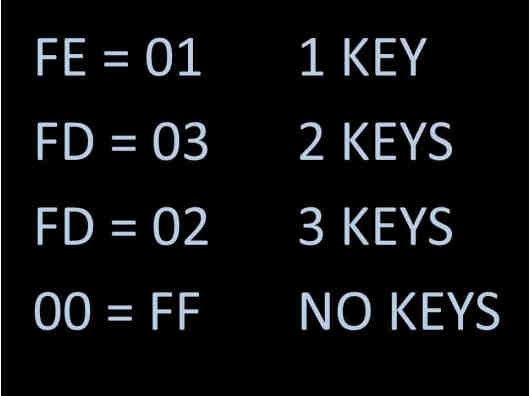
The Key counter is a number count, in inverse HEX, of how many keys are currently stored in the ECU.
This must be zeroed as well.
Here’s a look-up table to invert HEX. It’s pretty much 0 to F and F to 0 backward.

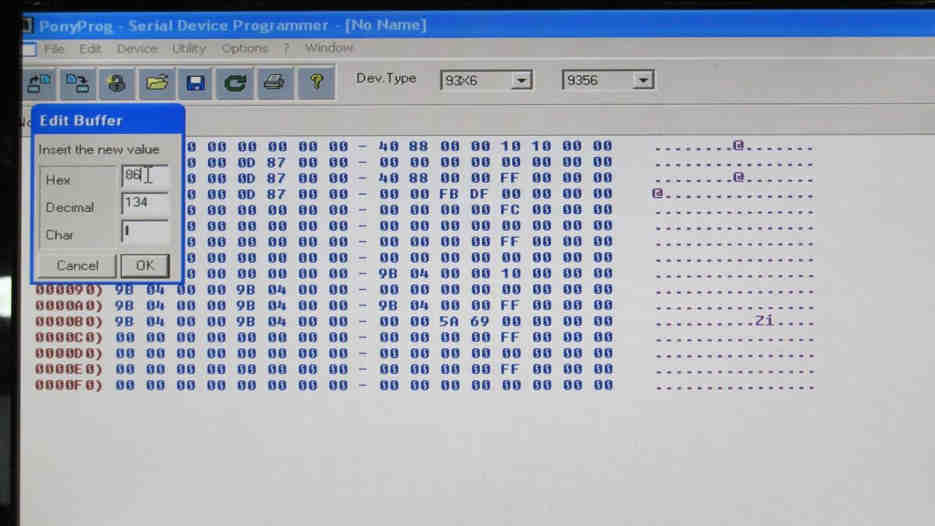
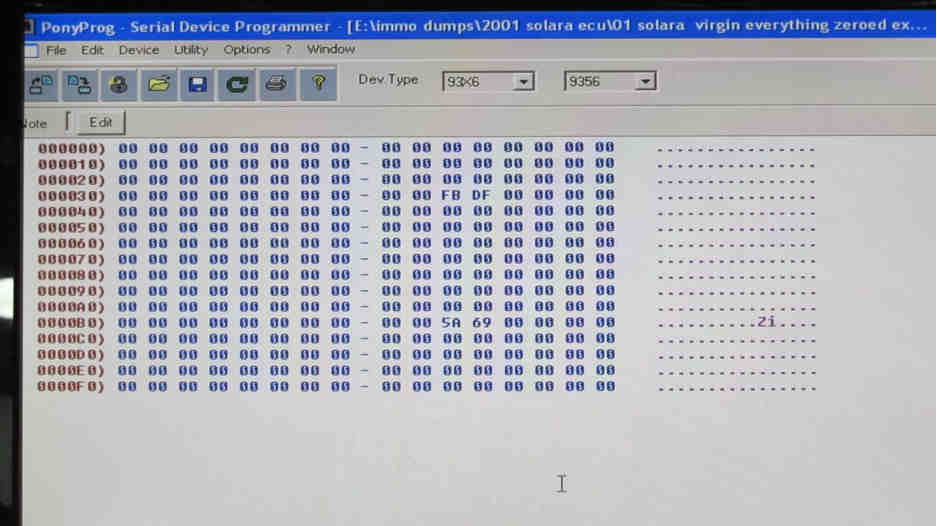
All other characters in the EEPROM dump must be changed to 00 to “virginize” the chip. In PonyProg, to do this, click Edit Buffer Enabled.
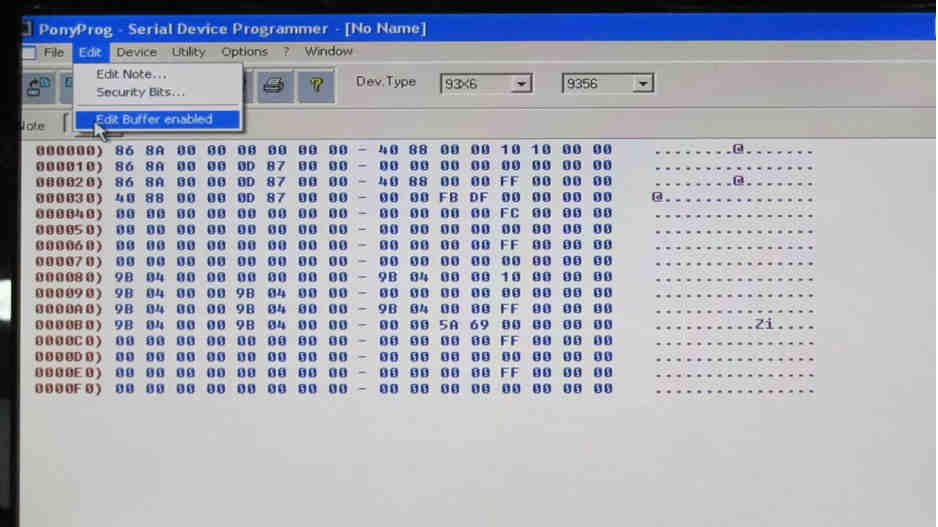
Then click on any HEX character to edit that bit.
Everything is zeroed (except for FB DF 5A 69), and you have your virgin dump:
You can then write to the chip:
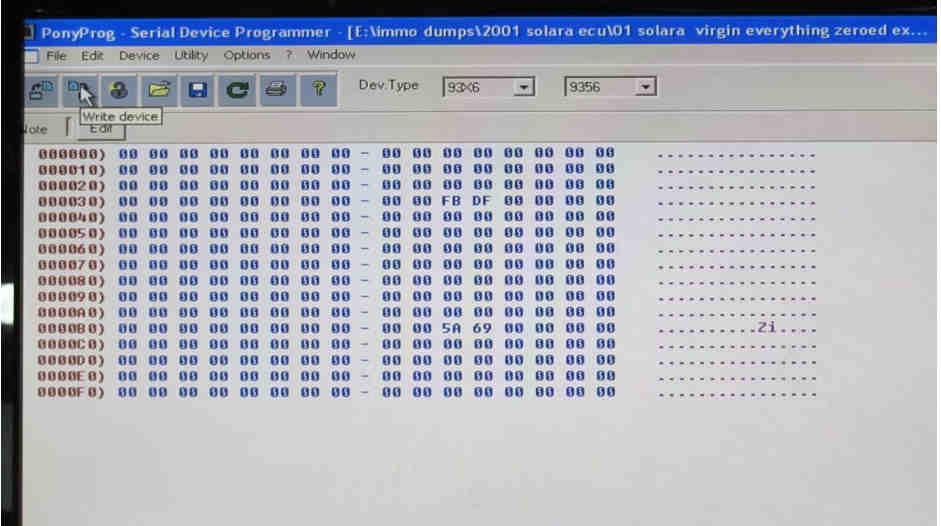
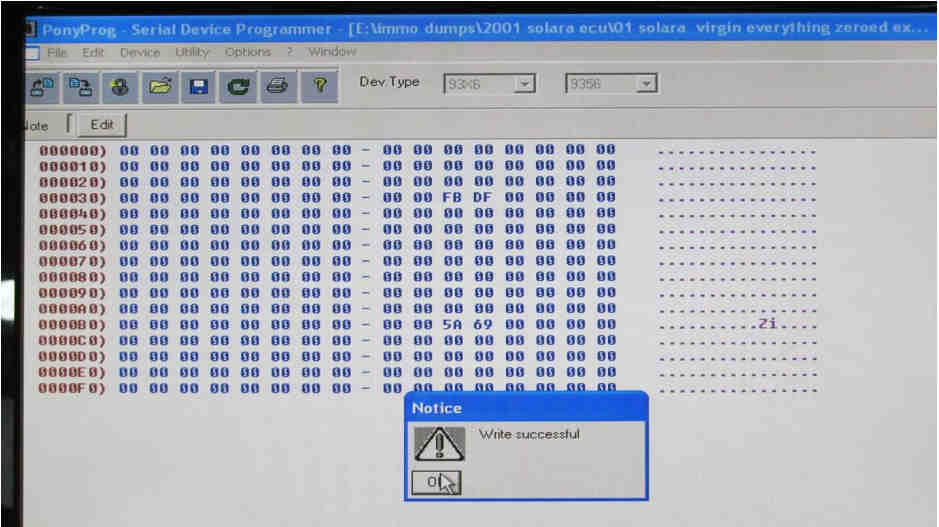
And then proceed to replace the ECU back in the car.
Key Programming:
When reconnected to the car, the ECU will be in auto-programming mode and will accept new keys as per the procedure below:
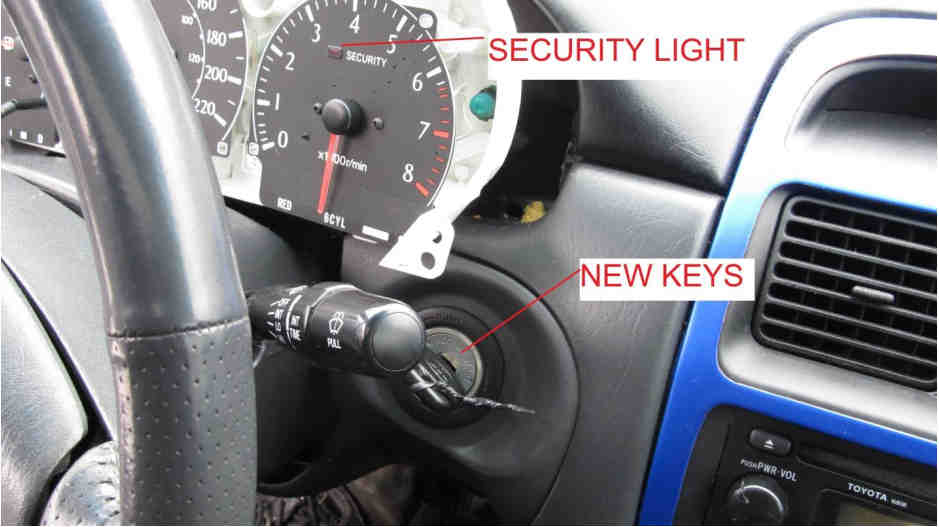
1. Briefly insert any key into ignition lock cylinder and remove immediately. The security light should illuminate and remain on.
2. Insert the first transponder key into ignition lock cylinder for registration DO NOT TURN ON. The Security light may blink indicating it has accepted the key. After 3-5 seconds remove the first key from the ignition. Security light should remain on indicating you’re still in programming mode.
3. Insert the second transponder key into ignition lock cylinder for registration DO NOT TURN ON. The Security light may blink indicating it has accepted the key. After 3-5 seconds remove the second key from ignition. Security light should remain on indicating you’re still in programming mode.
4. Insert third transponder key into ignition lock cylinder for registration DO NOT TURN ON. After security light goes off remove third key from ignition. The security light should extinguish and then commence to blink regularly.
5. Wait 30 seconds for the programming cycle and programming mode to close.
The first two keys are internally (inside the ECU) designated as MASTER keys and the 3rd key inserted will be internally designated as the VALET key.
As a test, when you insert a MASTER key, the security light should stop blinking right away. If you insert a VALET key, the security light will remain solid for 2 seconds and then go out. If the security light does not stop blinking, that key is not programmed to the car.
This procedure should work on many Toyota and Lexus vehicles from the 1990’s to early 2000’s. Newer Toyota/Lexus/Scion cars have a separate transponder ECU under the dashboard instead of having the EEPROM store key info in the ECU. The procedure is similar, though a hand-shaking procedure must be performed between the Transponder ECU and Engine Control Unit before key programming by shorting two wires on the OBDII port for 30 minutes.
Reference material:
http://qcwo.com/technicaldomain/working-with-immobilizer-software-for-virginizing-files
http://www.spyderchat.com/forums/showthread.php?44760-Lost-Keys-amp-Immobilizer-Fix
http://www.car-auto-repair.com/how-to-programming-keys-after-ecm-re-flashed-for-toyota-lexus/